
Petrol models
Removing
1. Apply the parking brake, jack up the front of the vehicle and place it on jack stands. If equipped, unscrew the fixing screws and remove the engine crankcase protection. Disconnect the negative cable from the battery.
Engines 1.6 l SOHC
1. Remove air cleaner housing and intake duct assembly with MAF sensor (see chapter Power and exhaust systems).
2. Loosen the alternator drive belt (see chapter Current service) and remove it from the alternator pulley.
3. Turn out fixing bolts and remove an arm of fastening of the generator to an inlet collector.
4. Turn out fixing bolts and remove a basic arm of fastening of the generator on a head of cylinders. Tilt the generator back.
5. Release from clamps an electroconducting and remove an arm.
6. At the appropriate complete set remove rubber protective caps from conclusions of the generator, give fixing nuts and disconnect electroconducting from a back part of the generator.
7. Turn out the bottom fixing bolt, lift the generator upwards and take it from an impellent compartment.
Engines 1.4, 1.6 and 1.8 l DOHC
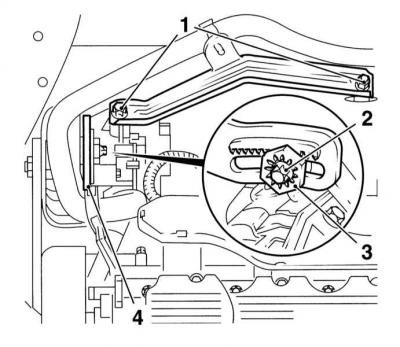
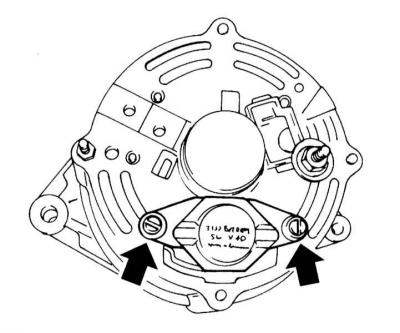
Disconnecting the electrical wiring
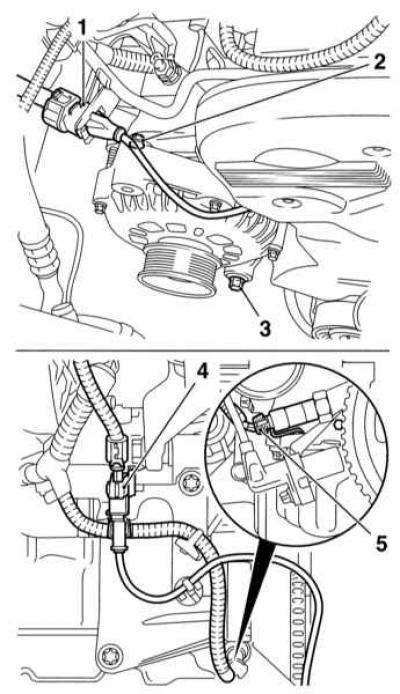
1 - electrical wiring
2 — the top bolt of fastening of the generator
3 — the bottom bolt of fastening of the generator
4 - TFR sensors
5 - oil pressure sensors
1. While holding the tensioner spring in the cocked position, remove the accessory drive belt from the pulleys (see chapter Current service).
2. Remove the air cleaner (see chapter Power and exhaust systems).
3. On models 1.8 l disconnect the wiring harness from the camshaft position sensor (CMP) and remove the connector from the support bracket.
4. Turn out the top bolt of fastening of the generator (see illustration Disconnecting the electrical wiring).
5. Loosen the bottom mounting bolt and tilt the generator back.
6. Turn out a fixing bolt (s) and remove the alternator drive belt tensioner (see Removing and installing alternator drive belt tensioner).
7. On models 1.8 l disconnect the wiring from the crankshaft position sensors (CKP) and emergency oil pressure. Take the harness aside.
8. At the appropriate complete set remove rubber protective caps, give fixing nuts and disconnect electroconducting from a back part of the generator.
9. Turn out bandages of fastening of an arm of the generator to the block of cylinders and remove the generator. On models equipped with A/C, the generator is pulled down.
10. Turn out bolts of fastening of the generator to an arm and remove an arm.
Engines 2.0 l
1. Remove the air cleaner housing and intake ducts (see chapter Power and exhaust systems).
2. While holding the tensioner spring in the cocked position, remove the belt from the pulleys (see chapter Current service).
3. On models without air conditioning, remove the alternator drive belt tensioner (see Removing and installing alternator drive belt tensioner).
4. Turn out fixing bolts and remove arms of fastening of the generator from the inlet pipeline and a head of cylinders.
5. At the appropriate complete set remove rubber protective caps from generator conclusions, give fixing nuts and disconnect from the generator electroconducting.
6. Turn out three bolts of fastening of an arm of the generator to the block of cylinders, remove the generator with an arm, lowering assembly down.
7. Turn out fixing bolts and separate an arm from the generator.
Installation
Installation is in the reverse order.
1. Make sure all fasteners are tightened to the correct torque. Adjust drive belt tension (see chapter Current service).
Diesel models
Removing
1. Apply the parking brake, jack up the front of the vehicle and place it on jack stands. If equipped, unscrew the fixing screws and remove the engine crankcase protection. Disconnect the negative cable from the battery.
Engines 1.7 l SOHC
1. Remove air cleaner housing and intake duct assembly with MAF sensor (see chapter Power and exhaust systems).
2. Loosen the alternator drive belt (see chapter Current service) and remove it from the alternator pulley. Turn out fixing bolts and remove a basic arm of fastening of the generator to the inlet pipeline.
3. On models without A/C unscrew the tensioner guide plate fixing bolt and remove it together with the adjusting nut. Turn out a fixing bolt and remove a directing level from a head of cylinders.

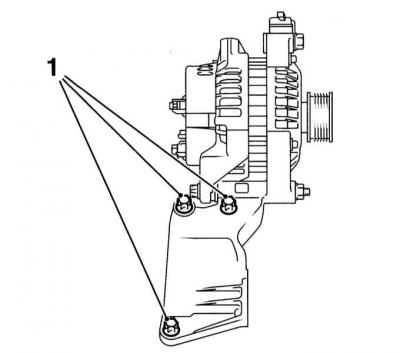
1 — Bolts of fastening of the top bracket
2 - Adjusting bolt
3 — Nut of an adjusting bolt
4 - Adjusting bar
4. On models with A/C Turn out fixing bolts and remove the top basic arm of the generator.
5. At the appropriate complete set remove rubber protective caps from generator conclusions, give fixing nuts and disconnect electroconducting from a back part of the generator.
6. Turn out bolts of fastening of a basic arm of the generator to the block of cylinders, lift the generator up and take it from an impellent compartment. If necessary, the generator can be separated from the bracket by loosening the nut and removing the fixing bolt.
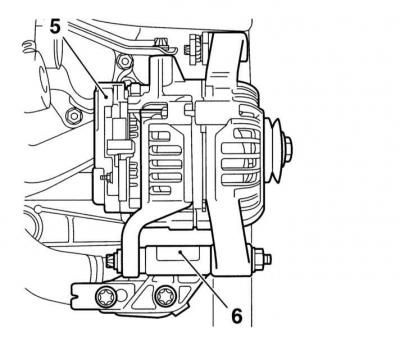
5 - Generator
6 - Support bracket
Engine 1.7L DOHC
1. While holding the tensioner spring in the cocked position, remove the accessory drive belt from the pulleys (see chapter Current service).
2. If equipped, release the fasteners and remove the crankcase protection.
3. Turn out fixing bolts, disconnect electroconducting and remove klaxon horns (see chapter Onboard electrical equipment).
4. Disconnect the electrical wiring from the generator.
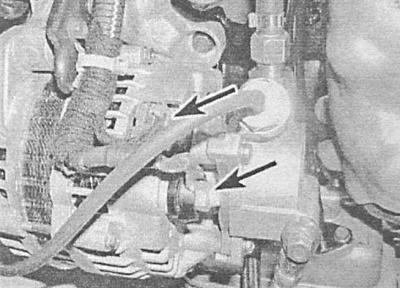
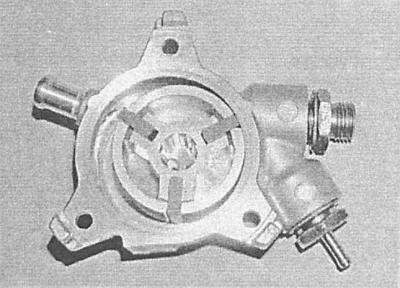
5. Disconnect the feed tube from the vacuum pump located behind the generator, disconnect the oil return tube - prepare to collect spilled oil.
6. Disconnect the EGR solenoid valve and vacuum tubes from the vacuum pump.
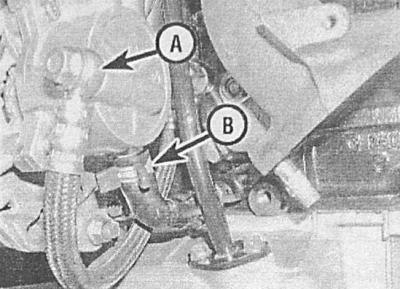
7. Turn out the top and bottom fixing bolts and take assembly of the generator with the vacuum pump through an aperture formed after removal of klaxon horns.
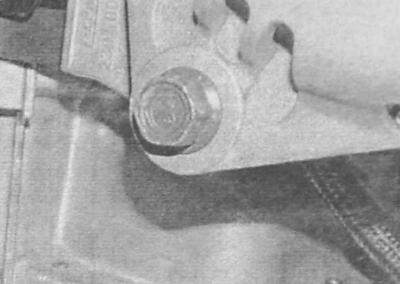
A - Upper alternator mounting bolt
B - Lower alternator mounting bolt
A.
B.
8. Despite the fact that the vacuum pump can, in principle, be separated from the generator, at the time of writing this manual, none of the units were individually supplied to the spare parts market - if necessary, seek advice from the specialists of the Opel branded service station.
2.0 liter engines
1. Remove the air cleaner housing and intake ducts (see chapter Power and exhaust systems).
2. While holding the tensioner spring in the cocked position, remove the belt from the pulleys (see chapter Current service).
3. Give two fixing screws and one nut and disconnect electroconducting from a back part of the generator.
4. Remove the starter and turbocharger heat shields and loosen the lower alternator mounting bolt.
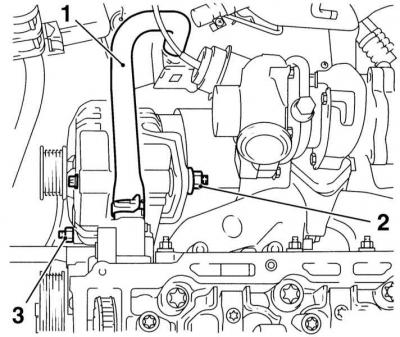
1 - Bottom bolt
2 - Top bolt
3 — Hose of a cooling path
5. Disconnect the vacuum tube and electrical wiring and remove the solenoid relief valve (see chapter Power and exhaust systems).
6. Give a nut and remove the top bolt of fastening of the generator.
7. Empty the cooling system (see chapter Current service), or prepare to collect spilled coolant. Separate the flange of the cooling path from the right wall of the cylinder head.
8. Remove the bottom fixing bolt, lift the generator up and remove it from the car.
Installation
Installation is in the reverse order.
1. Make sure all fasteners are tightened to the correct torque. Adjust drive belt tension (see chapter Current service).
Visitor comments