
OpelBook.ru
Cars AvtoVAZ Cars Mitsubishi Cars BMW Cars Mercedes Cars Nissan Cars Toyota Cars Chevrolet
English Русский
Български
Беларускі
Український
Српски
Hrvatski
Română
Polski
Slovenský
Magyar
 |  Sitemap  |  Contacts  |    


Main Astra Corsa Insignia Kadett Omega Vectra Zafira Others Articles
Vectra A (1988-1995, petrol) Vectra A (1988-1995) Vectra B (1995-2002, petrol) Vectra B (1995-2002) Vectra C (2002-2008)
  • Main
  • Vectra
  • Vectra B
  • Electrical equipment
  • Lighting and signaling
  • Other lights

Other lights (Opel Vectra B)

            0

Contents: Interior light ⬇ Door contact switch for interior…⬇ Rear reading lights ⬇ Trunk light ⬇ Ashtray and cigarette lighter…⬇ Lantern in the door ⬇

Interior light


Spotlight lamp (10 W, length 41 mm, DIN K form) should be lit when the doors are open and the switch is in the appropriate position. Current is supplied to it constantly.

Disconnect the battery ground cable or remove the interior light fuse, otherwise there is a risk of short circuit.

Press the lamp housing out of the cutout in the ceiling. To do this, you will need strong fingernails, a wide screwdriver, or a flat spoon handle.

Vehicles without reading lights: Remove the reading light from the mounting tabs.

Before installing the new lamp, press the fastening tabs slightly together.

For vehicles with reading lights: Disconnect the wire connector.

When installing an incandescent lamp, remove the lampshade from the clips.

For a reading lamp you need a 5W glass base bulb.

Door contact switch for interior lighting


The interior light in the Vectra should be on when the door is open. When the door is closed, it lights up if the switch is turned. If the interior light does not light up, the door contact switch may be faulty. It creates contact with the interior light ground, which is constantly energized, and thus closes the electrical circuit - the lamp may light up. Malfunctions of the door contact switch may occur if:
  • the switch push pin is jammed in the guide or bent. Replace the switch;
  • the wire connector has come loose from the switch. To make the connector hold better, bend it a little and reinsert it.

The door contact switch itself is screwed to the door post with only one screw. When dismantling, unscrew the screw and take out the switch.
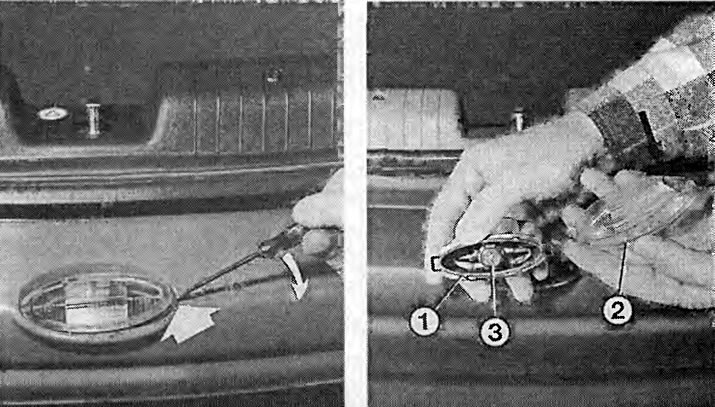


Removal the license plate light and replacing the bulb.

Removal the license plate light and replacing the bulb.

Left:
use a slotted screwdriver to remove the mounting tab (arrow) from the groove and remove the license plate light from the cutout.

Right: the lampshade (2) of the license plate light (3) is disconnected after pressing the fastening protrusion (arrow) from the socket (1).
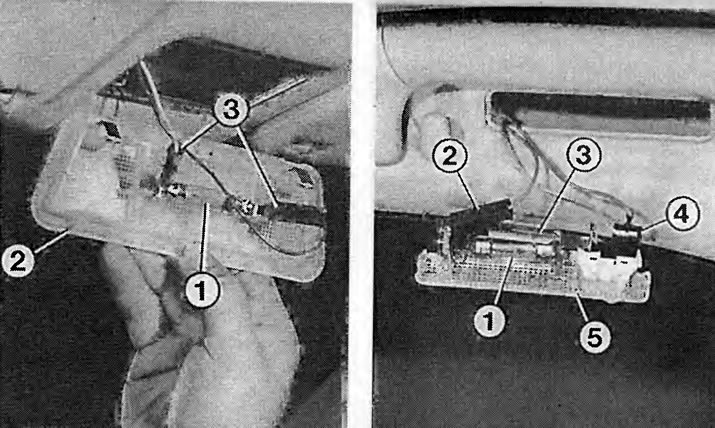

Left: with the interior light (2) removed, the following is visible:

Left: with the interior light (2) removed, the following is visible:
1 - spotlight;
3 - connecting connector.

Right: the photo shows the removed rear reading light. The numbers indicate:
1 - spotlight;
2 - ground wire;
3 - lid;
4 - connecting connector;
5 - flashlight body.


Rear reading lights


Before removing the rear reading light, close the door to ensure that the light is not under voltage.


Unscrew the handrail together with the reading light.

Disconnect the wire connector.

Remove the heat shield from the clamps above the incandescent lamp.

Remove the spotlight from the socket and insert a new spotlight (10 W, length 41 mm, DIN K form).

Reinstall the heat shield and connecting wire.

Screw the handrail.

Trunk light


The boot lighting consists of one 10-watt spotlight, 41 mm long, DIN K shape. It is located in the left boot trim. The connection of the lamp to ground is provided via a contact switch in the rear lid.

Unscrew the contact switch so that the trunk light is not under voltage.

Place your hand through the hole under the interior light and pry the light out of the trim.

Or insert a screwdriver into the side of the recess on the lamp housing and carefully pry the lamp out of the recess.

After replacing the bulb, insert the bulb housing back into place, wire side first.

Screw the contact switch back on.
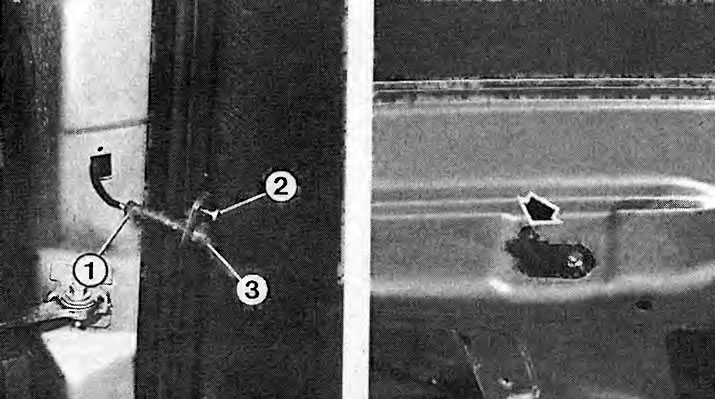
Left: here the door contact switch has been dismantled. The numbers indicate:

Left: here the door contact switch has been dismantled. The numbers indicate:
1 - connecting connector;
2 - mounting screw;
3 - contact pin.

Right: when the rear lid is opened, the contact switch (arrow) closes the connection to ground. The lamp in the trunk lights up.
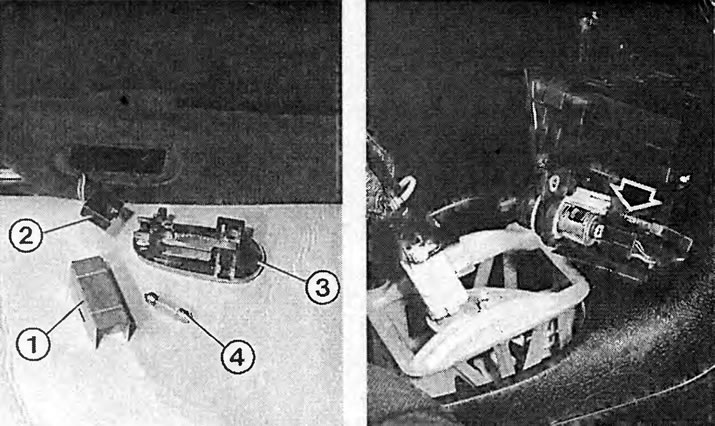

Left: dismantled door light. The numbers indicate:

Left: dismantled door light. The numbers indicate:
1 - lid;
2 - connecting connector;
3 - lampshade;
4 - spotlight.

Right: lighting of the cigarette lighter in front with the ashtray removed. The arrow shows the bulb with a glass base. Remove the bulb from the base and insert a new bulb.


Ashtray and cigarette lighter lighting


Material copied from this website OpelBook.ru

A glass-base bulb in the light ring of the cigarette lighter simultaneously illuminates the ashtray through a plastic window.

Remove the ashtray with bottle holder, see the chapter on the interior.

Disconnect the wire connector.

Unlock the cartridge and remove it from the hole.

Remove the glass base bulb from the socket.

Insert a new light bulb.

Lantern in the door


Use a small screwdriver to pry the bulb housing out of the door trim.

Disconnect the wire connector.

Remove the heat shield from the lamp housing.

Remove the spotlight bulb from its holders and insert a new bulb.


This article is available at russian, bulgarian, belarusian, ukrainian, serbian, croatian, romanian, polish, slovak, hungarian
Checking the article: Shapovalov Yaroslav

Share information:

Previous articles
Opel Vectra B: Lighting and signaling
Next articles

License plate light
Rear lights
Side direction indicators
Front direction indicators
Adjusting the light range
Checking headlight adjustment
Dashboard lights
Checking direction indicators and hazard warning lights
Help with signaling equipment malfunctions
Checking the brake lights
Brake light switch
Help with brake light malfunctions


See similar ones from other Opel car manuals:
▶ Brake System Warning Lights — General Information Opel Astra F (1991-1998, petrol)
▶ Replacing bulbs in headlights, parking lights and front… Opel Corsa B (1993-2000)
▶ Low beam/daytime running lights Opel Insignia A (2008-2017)
▶ Removal and installation rear lights Opel Kadett D (1979-1984)
▶ Signal lights and button designations Opel Omega B2 (1999-2003)
Link to this page in different formats

Visitor comments


No comments yet


How much will 21 + 47 =


Vectra C (2002-2008) 
  • General information
  • User manual
  • Vehicle device
  • Maintenance
  • Troubleshooting
  • Power unit
  • Engine repair
  • Cooling system
  • Power and control system
  • Engine electrics
  • Transmission
  • Clutch
  • Car gearbox
  • Drive shafts
  • Chassis
  • Car suspension
  • Steering
  • Brake system
  • Body
  • Exterior
  • Interior
  • Doors, locks and windows
  • Heating and ventilation
  • Electrical equipment
  • Equipment and devices
  • Headlights and lighting
  • Electrical circuits
Vectra B (1995-2002) 
  • General information
  • User manual
  • Weekly checks
  • Maintenance (gasoline)
  • Maintenance (diesel)
  • Troubleshooting
  • Power unit
  • SOHC gasoline engine
  • DOHC petrol engine
  • Diesel engine 1.7 liter
  • Diesel engine 2.0 liters
  • Engine repair
  • Cooling system
  • Fuel system (gasoline)
  • Fuel system (diesel)
  • Charging system
  • Launch system
  • Ignition and preheat
  • Transmission
  • Clutch
  • Mechanical gearbox
  • Automatic gearbox
  • Drive shafts
  • Chassis
  • Brake system
  • Wheel suspension
  • Steering
  • Body
  • Exterior
  • Interior
  • Doors and windows
  • Heating and ventilation
  • Electrical equipment
  • Equipment and devices
  • Electrical circuits
Vectra B (1995-2002, petrol) 
  • General information
  • Maintenance
  • Help with malfunctions
  • Power unit
  • Engine repair
  • Exhaust system
  • Cooling system
  • Fuel system
  • Multec injection system
  • Four point injection
  • Transmission
  • Clutch
  • Gearbox and drive
  • Chassis
  • Wheel suspension
  • Steering
  • Brake system
  • Wheels and tires
  • Body
  • Exterior
  • Interior
  • Electrical equipment
  • Fuses and electronics
  • Power devices
  • Ignition system
  • Lighting and signaling
  • Equipment and devices
  • Heating and ventilation
  • Electrical circuits
Vectra A (1988-1995) 
  • Power unit
  • Engine repair
  • Ignition system
  • Lubrication system
  • Cooling system
  • Injection system
  • Fuel system (carburetor)
  • Fuel system (diesel)
  • Exhaust system
  • Transmission
  • Clutch
  • Car gearbox
  • Chassis
  • Front suspension
  • Rear suspension
  • Steering
  • Brake system
  • Wheels and tires
  • Body
  • Exterior
  • Interior
  • Electrical equipment
  • Electrical circuits
Vectra A (1988-1995, petrol) 
  • General information
  • User manual
  • Maintenance
  • Power unit
  • SOHC engine
  • DOHC engine
  • Cooling and ventilation
  • Fuel system (carburetor)
  • Fuel system (injector)
  • Exhaust converter
  • Transmission
  • Clutch
  • Mechanical gearbox
  • Automatic gearbox
  • Drive shafts
  • Chassis
  • Brake system
  • Car suspension
  • Steering
  • Body
  • Body elements
  • Electrical equipment
  • Power devices
  • Equipment and devices
  • Electrical circuits
OpelBook.ru © 2017–2026 · Mobile version · · Sitemap: EN BG BY UA RS HR RO PL SK HU · Feedback · Site search
Astra F, petrol · Astra G, petrol · Astra G · Astra H · Astra J, petrol · Corsa B · Corsa C, petrol · Corsa C · Insignia A · Kadett D · Kadett E · Omega A · Omega B · Omega B2 · Vectra A, petrol · Vectra A · Vectra B, petrol · Vectra B · Vectra C · Zafira A, petrol · Frontera A, petrol · Frontera B · Ascona C · Vivaro A ·
We want your visit to be comfortable 🤝! We use cookies 🍪 to make that happen.