


Contents: 8.1. Decorative trim of the front…⬇ 8.2. Decorative trim for the middle…⬇ 8.3. Front sill decorative trim ⬇ 8.4. Decorative trims for the rear…⬇ 8.5. Decorative trims for the rear…⬇ 8.6. Front floor mat ⬇ 8.7. Front door decorative panel ⬇ 8.8. Hood trim ⬇
8.1. Decorative trim of the front pillar
Partially remove the front door seal. Disconnect the decorative panel of the front pillar from the clips (figure 10.8).
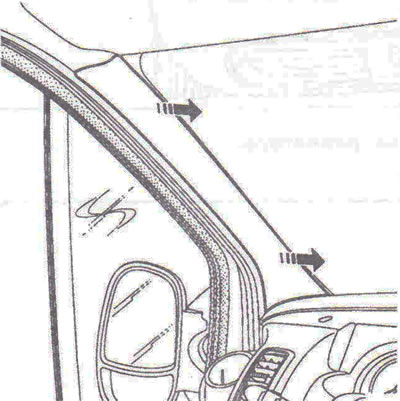
Figure 10.8. Decorative trim of the front pillar.
8.2. Decorative trim for the middle pillar
Remove the front seat belt anchorage, the side sliding door upper rail trim, the front door opening seals and the side sliding door (partially).
Disconnect the two covers A from the clamps to be able to remove the two handrail fasteners (figure 10.9). Disconnect the cover 1, then 2 from the clips.
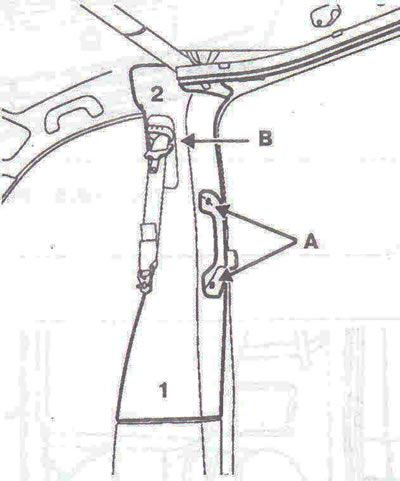
Figure 10.9. Disconnect the two covers A from the fasteners to be able to remove the two handrail fasteners. Disconnect the cover 1, then 2 from the clips.
Disconnect the trim from the clips at the top 3, then at the bottom 4 (figure 10.10).
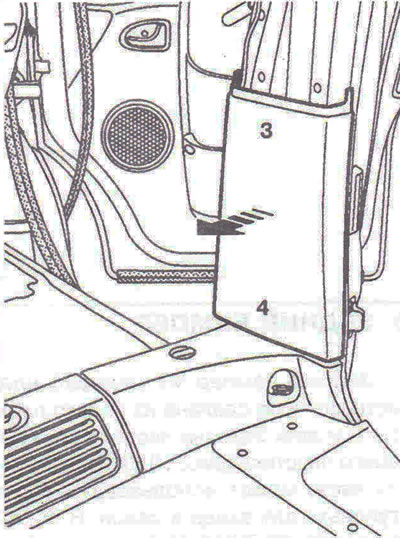
Figure 10.10. Disconnect the cover from the clips in the upper part 3, then in the lower part 4.
8.3. Front sill decorative trim
Remove the front seats and seat mounting spacers. Unscrew the four mounting bolts A, then release the footrest (figure 10.11)
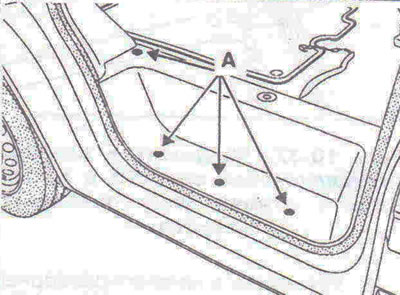
Figure 10.11. Unscrew the four mounting bolts A, then release the footrest.
8.4. Decorative trims for the rear wing
1. Remove the 12V socket, then disconnect the wiring connector. Using pliers for removing trim and panel holders, remove the retainers B, trim panel (figure 10.12).
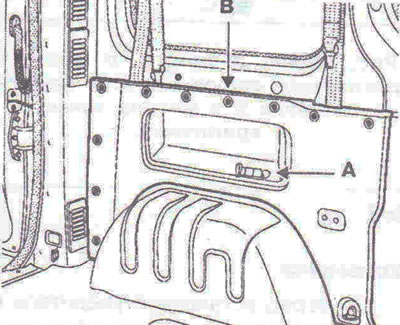
Figure 10.12 Remove the 12V receptacle, then disconnect the wiring connector. Using pliers for removing trim and panel holders, remove fasteners B, trim panel.
2. Remove the cabin pillar trim and the center lower trim, remove the C fasteners, then the trim panel (figure 10.13).
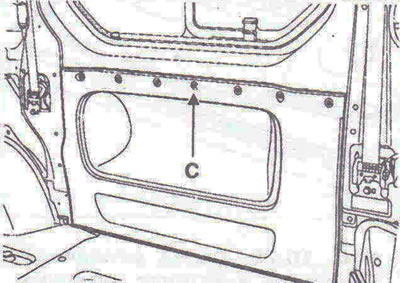
Figure 10.13. Remove the fasteners C, then the trim panel.
8.5. Decorative trims for the rear sill
Remove the bolts securing the threshold trim A, then remove the trim (figure 10.14).
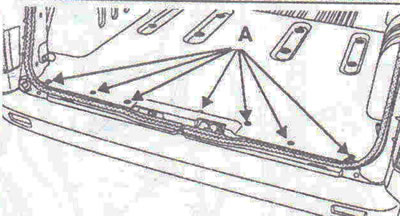
Figure 10.14. Remove the bolts securing the threshold trim A, then remove the trim.
8.6. Front floor mat
1. Partially remove the door seal.
2. Remove the three fasteners D, unscrew the two bolts E securing the steering column, then remove the column, the sealing boot F, the cabin carpet, trying to free the cutout for the steering column (figure 10.15).
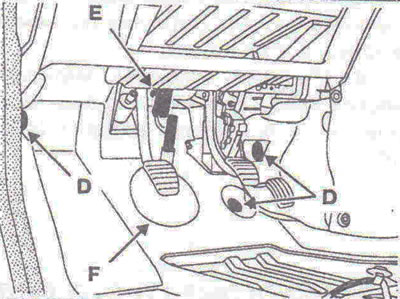
Figure 10.15. Remove the three fasteners D, unscrew the two bolts E securing the steering column, then remove the column, the sealing boot F, the cabin carpet, trying to free the cutout for the steering column.
8.7. Front door decorative panel
1. Loosen the mounting bolt A, then remove the inner door lock actuator handle, loosen the mounting bolt B, mounting bolts C, remove the window lifter handle (figure 10.16). Detach the panel.
For modifications equipped with electric windows
2. Remove the window switch D (figure 10.17). Disconnect the wiring connectors. Detach the panel.
8.8. Hood trim
1. Unscrew the four mounting bolts A and five mounting bolts B of the trim (figure 10.18). Using trim and panel retainer pliers, remove retainer C.
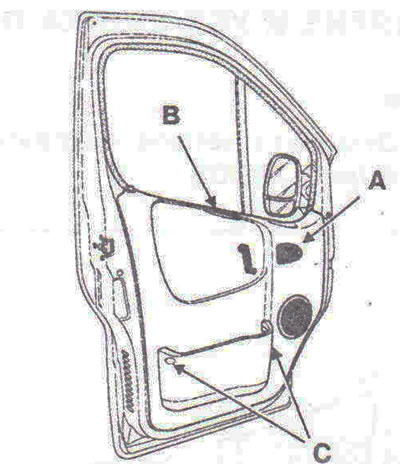
Figure 10.16. Unscrew the mounting bolt A, then remove the inner door lock drive handle, unscrew the mounting bolt B, mounting bolts C, remove the window lift handle.
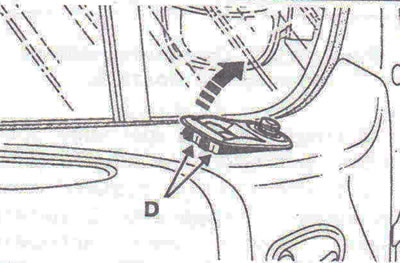
Figure 10.17. Remove window switch D.
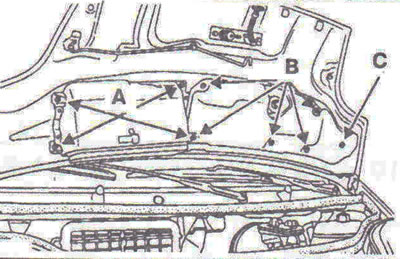
Figure 10.18. Remove the four trim mounting bolts A and five trim mounting bolts B. Using trim and panel retainer pliers, remove retainer C.
2. Disconnect the retaining pins D, then remove the ventilation grille (figure 10.19). When replacing the hood, replace the E holders.
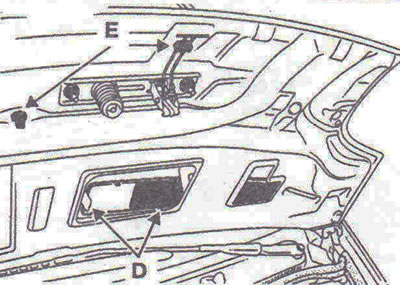
Figure 10.19. Disconnect the retaining pins D, then remove the ventilation grille.
Visitor comments