


Cars with 2.5L diesel engine
To check, you need a measuring device with an arrow indicator, as well as a corresponding adapter for screwing onto the pump. When checking, the engine must be cold, but not below +20°C.
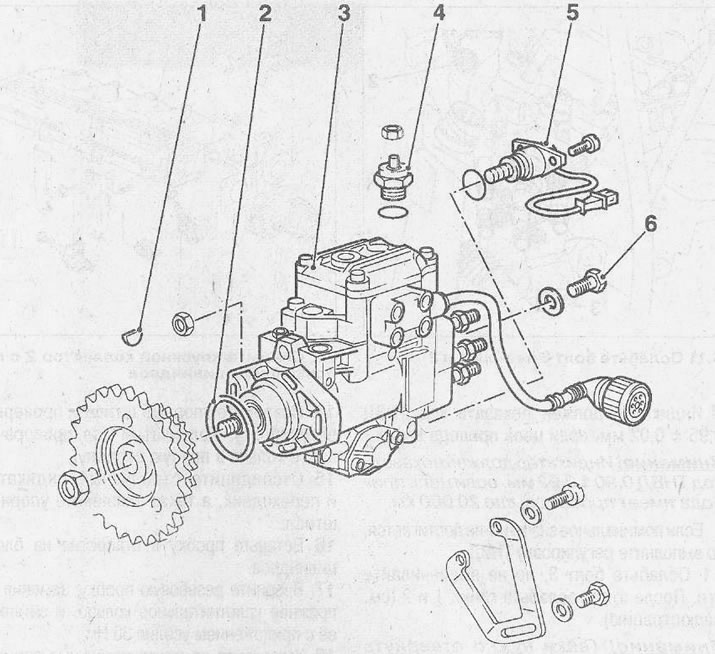
6.0 Fuel injection pump for a car with a 2.5 liter diesel engine
1 - key for fastening the gear on the shaft
2 - oil seal
3 - Fuel injection pump
4 - fuel cut-off electromagnetic valve
5 - fuel injection advance electromagnetic valve
6 - screw plug
1. Disconnect the negative (-) battery terminal ground cable.
2. Remove the engine compartment protection
3. Remove the intake manifold.
4. Cars with air conditioning.
Remove the radiator fan viscous coupling.
[Material provided by this website OpelBook]
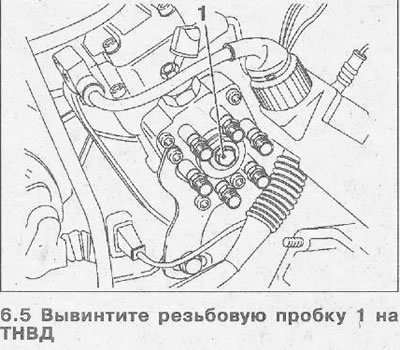
5. Unscrew the threaded plug 1 on the high-pressure fuel pump (see illustration).
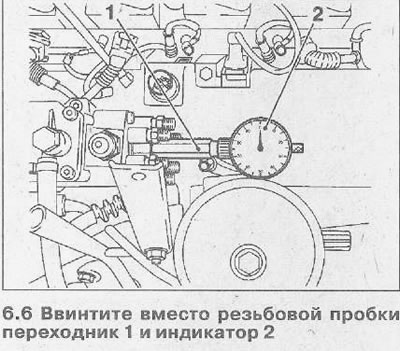
6. Screw in adapter 1 OPEL KM-226-A and indicator 2 KM-571-B instead of the threaded plug (see illustration).
7. Rotate the engine crankshaft clockwise towards TDC of the piston of cylinder No.1 until the indicator arrow stops for a while. The beginning of the rotation should be 60-90° before TDC.
The piston of cylinder #1 is at TDC when both cams of the valve drive of cylinder #1, located near the timing chain, are facing upwards. To check, remove the oil filler cap and watch the position of the cams.
To turn the crankshaft, engage 5th gear, release the parking brake and push the car. You can also apply the parking brake, engage neutral gear and turn the crankshaft by the central bolt of the V-belt pulley of the auxiliary drive units.
8. Reset the indicator reading to "0".
9. Remove plug 1 from the cylinder block (see illustration).
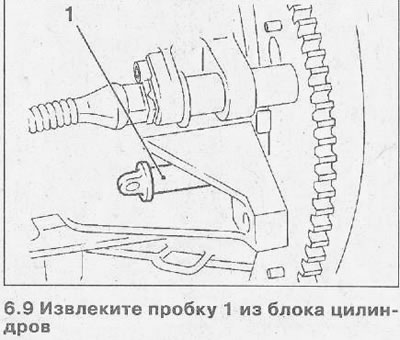
10. Turn the crankshaft clockwise two turns so that you can insert the OPEL-813 thrust pin or a roller of the appropriate diameter into the hole in the cylinder block and into the flywheel to fix the engine at TDC.
Caution! Do not turn the crankshaft against the direction of the engine. This will result in incorrect values when checking the start of the injection pump supply.
Attention! The indicator should show a fuel injection pump stroke of 0.90±0.02 mm if the drive chain has a mileage of over 20,000 km.
If the nominal value is not achieved, adjust the high-pressure fuel pump.
11. Loosen bolt 3, but do not unscrew it. Then loosen nuts 1 and 2 (see illustration).
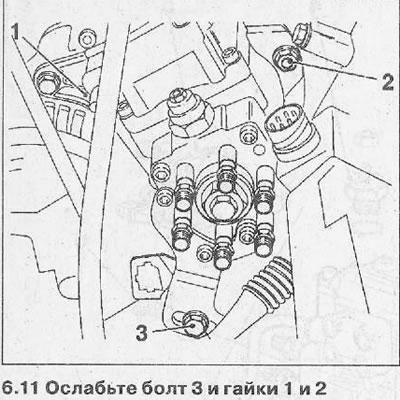
Caution! The nuts should only be loosened 2-3 turns. Loosening the nuts more than that may cause jamming due to tension in the drive chain.
12. Turn the fuel injection pump and achieve the required fuel injection pump stroke value, which the indicator should show.
13. Tighten the nuts and bolt in sequence from 1 to 3 with a torque of 25 Nm (see illustration 6.11).
14. Remove the stop pin and check the adjustment. Turn the crankshaft only to the right.
15. Disconnect the dial indicator and adapter, and remove the stop pin.
16. Insert the plug into the hole on the cylinder block.
17. Screw in the threaded plug, replacing its old sealing ring, and tighten it to 30 Nm.
18. Reinstall the remaining components that were removed.
19. Start the engine. If necessary, bleed air from the engine fuel system.
20. Perform a test drive and check the tightness of the threaded plug. Tighten the plug if necessary.
Visitor comments