
OpelBook.ru
Cars AvtoVAZ Cars Mitsubishi Cars BMW Cars Mercedes Cars Nissan Cars Toyota Cars Chevrolet
English Русский
Български
Беларускі
Український
Српски
Hrvatski
Română
Polski
Slovenský
Magyar
 |  Sitemap  |  Contacts  |    


Main Astra Corsa Insignia Kadett Omega Vectra Zafira Others Articles
Omega A (1986-1993) Omega B (1993-1999) Omega B2 (1999-2003)
  • Main
  • Omega
  • Omega B2
  • Power unit
  • Diesel engines 2.5 l
  • Oil pan — removal and installation

Oil pan — removal and installation (Opel Omega B2)

            0

Contents: Removal ⬇ Installation ⬇

Removal


1. Disconnect the negative (-) battery terminal from the battery.

2. Remove the engine splash guard, the engine oil dipstick guide tube and drain the oil by unscrewing the drain plug. After draining the oil, screw the plug back in.

3. Remove the radiator support 4, which consists of three parts (see illustration).
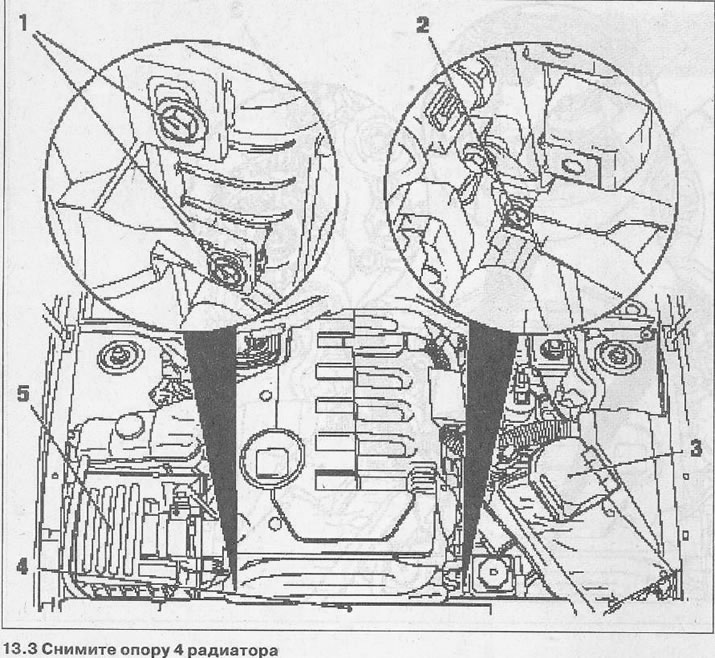
3. Remove the radiator support 4, which consists of three parts (see illustration).


4. Remove the 3 fuse box and battery (see illustration 13.3).

5. Remove the air filter 5 (see illustration 13.3).

6. Vehicles with automatic transmission: Remove the oil cooler line.

7. Unscrew bolts 1 and 2 and remove the radiator fan together with the diffuser (see illustration 13.3).

8. Attach the 2 MKM-883-1 crossbar to the engine to lift the engine and relieve its supports (see illustration).
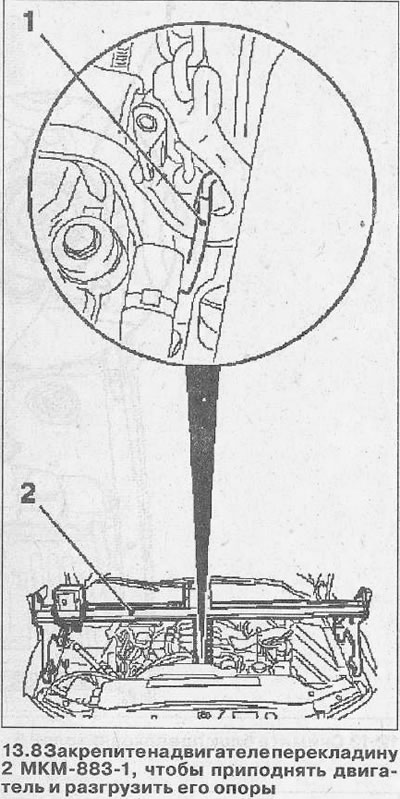
8. Attach the 2 MKM-883-1 crossbar to the engine to lift the engine and relieve its supports (see…


9. Unscrew nut 2 securing left support 3 of the engine (see illustration).
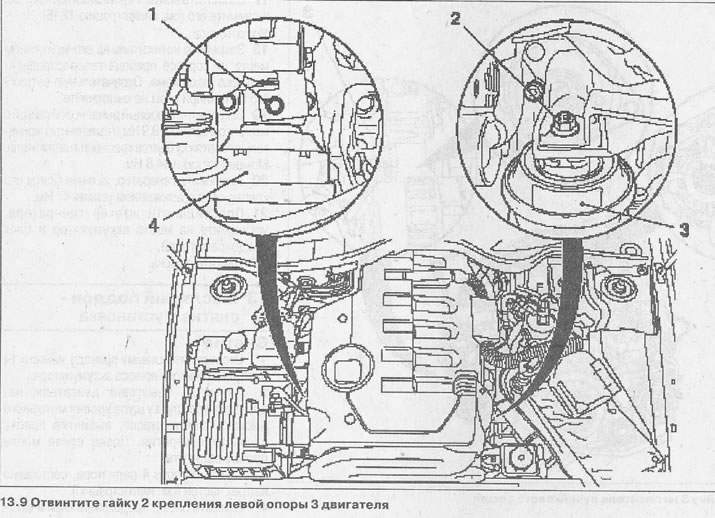


9. Unscrew nut 2 securing left support 3 of the engine (see illustration).


10. Unscrew the bolt securing the right support 4 of the engine (see illustration 13.9).

11. Disconnect plug 2 of the dynamic engine oil level control sensor (see illustration).
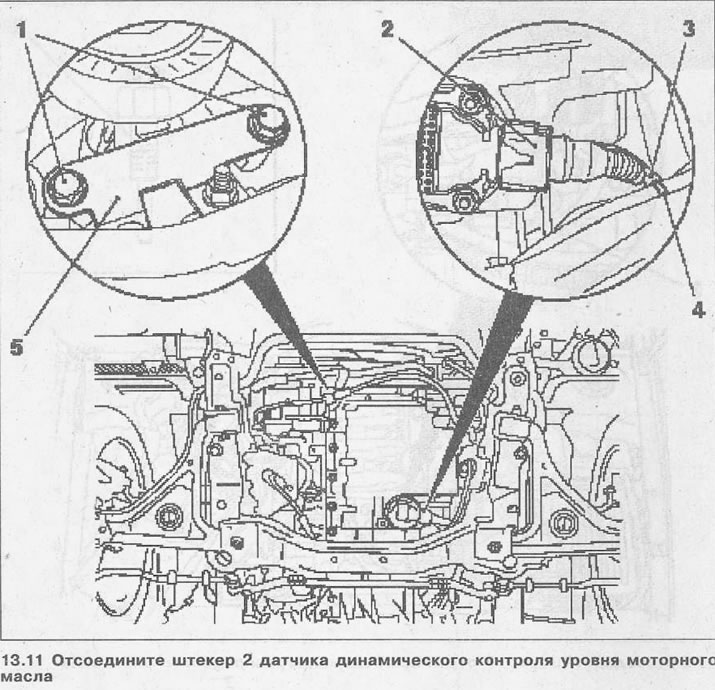
11. Disconnect plug 2 of the dynamic engine oil level control sensor (see illustration).


12. Unscrew the bolts 1 securing the bracket 3 of the cooling system pipe and disconnect the low-pressure hose 3 from the T-shaped branch pipe 4 (see illustration 13.11).

13. Unscrew the bolts securing the oil pan to the cylinder block, timing case and transmission. Mark the mounting position of the bolts due to their different lengths.

14. Raise the engine slightly, secured to the MKM-883-1 support crossbar. Attention! This operation should be performed with extreme caution so as not to damage the parts or compromise the tightness of the connections.


15. Remove the oil pan by moving it, as shown by the arrow, between the front axle cross member and the cylinder block (see illustration).
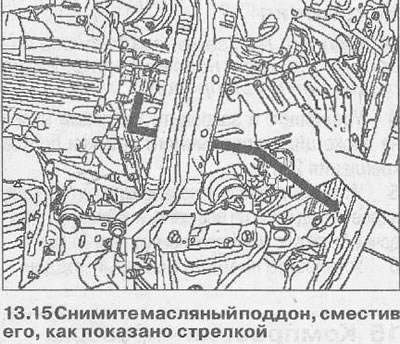
15. Remove the oil pan by moving it, as shown by the arrow, between the front axle cross member and…


(Article published on the website: OPELBOOK)

Caution! Do not damage the sealing surfaces of the engine and sump.


Installation


16. Clean the sealing surfaces and remove any remaining old sealant.

17. Apply a drop of black sealant to the ends at points 1 and place a new sealing gasket on the cylinder block housing (see illustration).
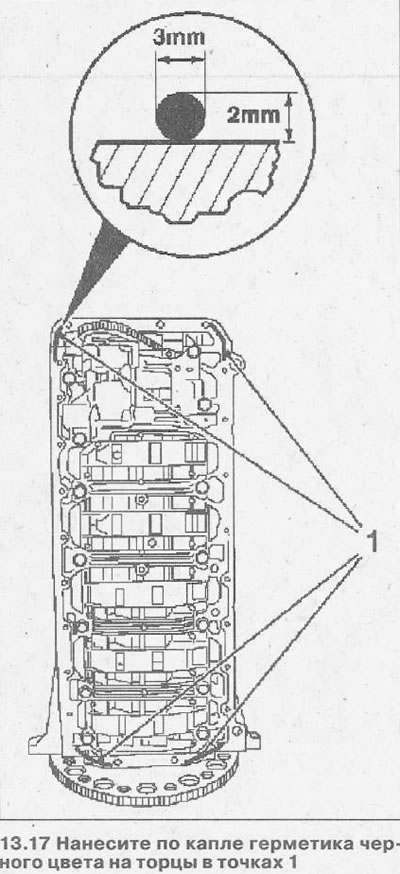
17. Apply a drop of black sealant to the ends at points 1 and place a new sealing gasket on the…


18. Install the oil pan and secure it to the crankcase.

19. Lower the raised engine and fully tighten the oil pan mounting bolts.

20. Tighten the oil pan bolts. Bolt tightening torque:
  • M6 - 10 Nm,
  • M8 - 22 Nm.

21. Install or connect the removed parts in the reverse order of removal, and also remove the support crossbar from the engine.


22. Fill the engine with oil, test drive and check the oil pan for leaks.

Caution! Replace the left engine mount mounting bolt with a new one.


This article is available at russian, bulgarian, belarusian, ukrainian, serbian, croatian, romanian, polish, slovak, hungarian
Checking the article: Shapovalov Yaroslav

Share information:

Previous articles
Opel Omega B2: Diesel engines 2.5 l
Next articles

V-ribbed auxiliary drive belt — removal and installation
Rear Crankshaft Oil Seal — Replacement
Front Crankshaft Oil Seal — Replacement
Flywheel — removal and installation
Connecting rod and piston group — removal and installation
Crankshaft — removal and installation
Oil pump — removal and installation
Compression — check


Link to this page in different formats

Visitor comments


No comments yet


How much will 38 + 49 =


Omega B2 (1999-2003) 
  • General information
  • User manual
  • Maintenance
  • Troubleshooting
  • Power unit
  • Petrol 4-cylinder
  • Petrol 6-cylinder
  • Engine overhaul
  • Diesel engines 2.0 l
  • Diesel engines 2.5 l
  • Cooling and heating
  • Injection system (gasoline)
  • Fuel system (diesel)
  • Fuel system
  • Exhaust system
  • Ignition system
  • Transmission
  • Clutch
  • Mechanical gearbox
  • Automatic gearbox
  • Main gear and shafts
  • Chassis
  • Brake system
  • Car suspension
  • Steering
  • Body
  • Body elements
  • Electrical equipment
  • Equipment and devices
  • Electrical circuits
Omega B (1993-1999) 
  • General information
  • User manual
  • Tips for the car owner
  • Maintenance (gasoline)
  • Maintenance (diesel)
  • Power unit
  • Petrol engine SOHC 2.0 l
  • Petrol engine DOHC 2.0 l
  • Petrol engines 2.5 and 3.0 l
  • Repair of gasoline engines
  • Diesel engine 2.0 l
  • Diesel engine repair 2.0 l
  • Diesel engine 2.5 l
  • Cooling and heating
  • Power system (petrol)
  • Emission reduction
  • Fuel system (diesel 2.0 l)
  • Fuel system (diesel 2.5 l)
  • Launch system
  • Ignition system
  • Transmission
  • Clutch
  • Mechanical gearbox
  • Automatic gearbox
  • Drive shafts
  • Chassis
  • Brake system
  • Wheel suspension
  • Steering
  • Body
  • Exterior
  • Interior
  • Doors and windows
  • Electrical equipment
  • Equipment and devices
  • Wiring diagrams (early)
  • Wiring diagrams (late)
Omega A (1986-1993) 
  • General information
  • User manual
  • Maintenance
  • Changes and additions
  • Troubleshooting
  • Power unit
  • Gasoline engines
  • Diesel engines
  • Cooling system
  • Fuel system (gasoline)
  • Fuel system (diesel)
  • Ignition system
  • Transmission
  • Clutch
  • Mechanical gearbox
  • Automatic gearbox
  • Cardan shaft
  • Drive shafts
  • Chassis
  • Brake system
  • Car suspension
  • Steering
  • Body
  • Exterior
  • Interior
  • Electrical equipment
  • Power devices
  • Lighting and appliances
  • Electrical circuits
OpelBook.ru © 2017–2026 · Mobile version · · Sitemap: EN BG BY UA RS HR RO PL SK HU · Feedback · Site search
Astra F, petrol · Astra G, petrol · Astra G · Astra H · Astra J, petrol · Corsa B · Corsa C, petrol · Corsa C · Insignia A · Kadett D · Kadett E · Omega A · Omega B · Omega B2 · Vectra A, petrol · Vectra A · Vectra B, petrol · Vectra B · Vectra C · Zafira A, petrol · Frontera A, petrol · Frontera B · Ascona C · Vivaro A ·
We want your visit to be comfortable 🤝! We use cookies 🍪 to make that happen.