
OpelBook.ru
Cars AvtoVAZ Cars Mitsubishi Cars BMW Cars Mercedes Cars Nissan Cars Toyota Cars Chevrolet
English Русский
Български
Беларускі
Український
Српски
Hrvatski
Română
Polski
Slovenský
Magyar
 |  Sitemap  |  Contacts  |    


Main Astra Corsa Insignia Kadett Omega Vectra Zafira Others Articles
Omega A (1986-1993) Omega B (1993-1999) Omega B2 (1999-2003)
  • Main
  • Omega
  • Omega B2
  • Chassis
  • Car suspension
  • Rear shock absorber — removal and installation

Rear shock absorber — removal and installation (Opel Omega B2)

            0

Contents: Removal ⬇ Installation ⬇
Attention! If one of the shock absorbers is subject to replacement, the other shock absorber should also be replaced in order not to disturb the suspension geometry.


Removal


1. Block the front wheels, then jack up the rear of the vehicle and support it securely on axle stands.

2. Raise the diagonal arm on the jack to remove the load from the shock absorber.

3. On Sedan models, remove the trunk wall trim panel, then use a screwdriver to pry off the rubber cover of the upper shock absorber mount.

4. On Estate models, fold back the cargo area carpet, then remove the screws and remove the cover to access the upper shock absorber mount.

5. Unscrew the upper mounting nuts and remove the washer and rubber cushions (see illustration).
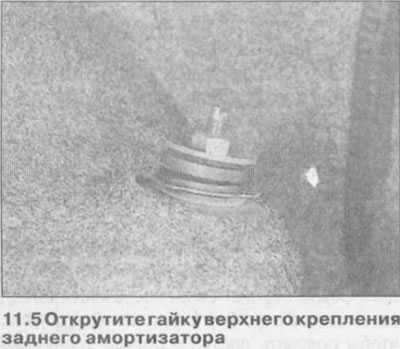
5. Unscrew the upper mounting nuts and remove the washer and rubber cushions (see illustration).


6. On models equipped with a rear damper adjuster, reach under the rear wheel arch and release the air pressure through the valve in the shock absorber body. Release the clamp and disconnect the pressure tube from the shock absorber.

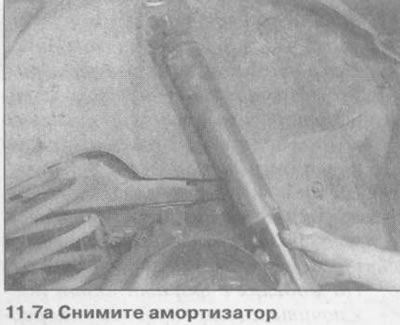
7. Lower the diagonal arm on the jack, then unscrew the lower mounting bolt with washer and remove the shock absorber (see illustrations).
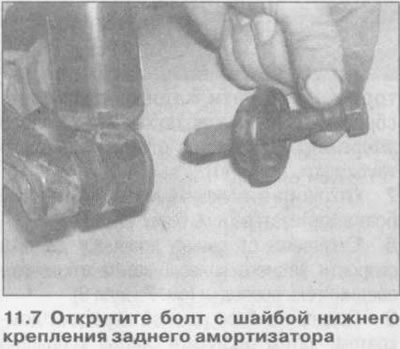

7. Lower the diagonal arm on the jack, then unscrew the lower mounting bolt with washer and remove…


7. Lower the diagonal arm on the jack, then unscrew the lower mounting bolt with washer and remove…


8. Inspect the shock absorber for signs of wear, damage and deformation. Check the condition of the rubber components. Replace components as necessary.

9. Inspect the shock absorber for leaks. Check the condition of the shock absorber rod and its housing. Set the unit in a vertical position and check its operation by moving the rod to its full stroke, and then several times to a short stroke (50-100 mm). In both cases, the resistance should be smooth and the same. If the piston moves jerkily or the elasticity of the shock absorber changed during the test, and if there is any visible sign of wear, replace the shock absorber.

10. If you are installing a new shock absorber, push the shock absorber rod all the way into the housing before assembly, then move it through its full stroke three to four times.


Installation


11. Place the shock absorber on the trailing arm and insert the lower mount bolt. Make sure the bushing is aligned with the recess in the lower mount.

12. Raise the diagonal arm on the jack and position the top end of the shock absorber against the mount.

13. On models with a rear damper adjuster, apply some compressed air to the shock absorber. The exact pressure is not specified by the manufacturer, but it is recommended to fill the unit until it comes out of the upper mount. Install the pressure tube onto the shock absorber valve and secure it with a clamp. Make sure that the pressure tube does not become entangled with adjacent suspension components.

14. Install the upper mount rubber pads and washer. Install the new mounting nut and tighten it to the torque specified in the Specifications.

15. Tighten the lower shock absorber mounting bolt to the specified tightening torque Specifications.

16. On Station Wagon models, install the cover panel and secure it with screws.

17. On Sedan models, install the rubber cover onto the top end of the shock absorber.

Information taken from the website opelbook.ru

18. Install the wheels and lower the car to the ground.

19. Check the rear suspension stiffness adjuster.


This article is available at russian, bulgarian, belarusian, ukrainian, serbian, croatian, romanian, polish, slovak, hungarian
Checking the article: Shapovalov Yaroslav

Share information:

Previous articles
Opel Omega B2: Car suspension
Next articles

Engine subframe — removal and installation
Front Wheel Hub and Bearings — Removal and Installation
Steering knuckle — removal and installation
Front anti-roll bar vertical link — removal and installation
Front Anti-Roll Bar — Removal and Installation
Front lower ball joint — replacement
Rear Trailing Arm — Removal and Installation
Rear leaf spring — removal and installation
Rear Anti-Roll Bar — Removal and Installation
Rear Suspension Reactive Rod — Removal and Installation
Rear Ride Control System — Component Removal and Installation
Rear suspension assembly — removal and installation


See similar ones from other Opel car manuals:
▶ Rear shock absorber — removal, inspection and installation Opel Astra F (1991-1998, petrol)
▶ Removal and installation the rear shock absorber Opel Corsa B (1993-2000)
▶ GNE Rear Suspension Shock Absorber Replacement Opel Insignia A (2008-2017)
▶ Rear shock absorber — removal and installation Opel Vectra A (1988-1995, petrol)
▶ Rear shock absorber — removal, inspection and installation Opel Ascona C (1981-1988)
Link to this page in different formats

Visitor comments


No comments yet


How much will 48 + 46 =


Omega B2 (1999-2003) 
  • General information
  • User manual
  • Maintenance
  • Troubleshooting
  • Power unit
  • Petrol 4-cylinder
  • Petrol 6-cylinder
  • Engine overhaul
  • Diesel engines 2.0 l
  • Diesel engines 2.5 l
  • Cooling and heating
  • Injection system (gasoline)
  • Fuel system (diesel)
  • Fuel system
  • Exhaust system
  • Ignition system
  • Transmission
  • Clutch
  • Mechanical gearbox
  • Automatic gearbox
  • Main gear and shafts
  • Chassis
  • Brake system
  • Car suspension
  • Steering
  • Body
  • Body elements
  • Electrical equipment
  • Equipment and devices
  • Electrical circuits
Omega B (1993-1999) 
  • General information
  • User manual
  • Tips for the car owner
  • Maintenance (gasoline)
  • Maintenance (diesel)
  • Power unit
  • Petrol engine SOHC 2.0 l
  • Petrol engine DOHC 2.0 l
  • Petrol engines 2.5 and 3.0 l
  • Repair of gasoline engines
  • Diesel engine 2.0 l
  • Diesel engine repair 2.0 l
  • Diesel engine 2.5 l
  • Cooling and heating
  • Power system (petrol)
  • Emission reduction
  • Fuel system (diesel 2.0 l)
  • Fuel system (diesel 2.5 l)
  • Launch system
  • Ignition system
  • Transmission
  • Clutch
  • Mechanical gearbox
  • Automatic gearbox
  • Drive shafts
  • Chassis
  • Brake system
  • Wheel suspension
  • Steering
  • Body
  • Exterior
  • Interior
  • Doors and windows
  • Electrical equipment
  • Equipment and devices
  • Wiring diagrams (early)
  • Wiring diagrams (late)
Omega A (1986-1993) 
  • General information
  • User manual
  • Maintenance
  • Changes and additions
  • Troubleshooting
  • Power unit
  • Gasoline engines
  • Diesel engines
  • Cooling system
  • Fuel system (gasoline)
  • Fuel system (diesel)
  • Ignition system
  • Transmission
  • Clutch
  • Mechanical gearbox
  • Automatic gearbox
  • Cardan shaft
  • Drive shafts
  • Chassis
  • Brake system
  • Car suspension
  • Steering
  • Body
  • Exterior
  • Interior
  • Electrical equipment
  • Power devices
  • Lighting and appliances
  • Electrical circuits
OpelBook.ru © 2017–2026 · Mobile version · · Sitemap: EN BG BY UA RS HR RO PL SK HU · Feedback · Site search
Astra F, petrol · Astra G, petrol · Astra G · Astra H · Astra J, petrol · Corsa B · Corsa C, petrol · Corsa C · Insignia A · Kadett D · Kadett E · Omega A · Omega B · Omega B2 · Vectra A, petrol · Vectra A · Vectra B, petrol · Vectra B · Vectra C · Zafira A, petrol · Frontera A, petrol · Frontera B · Ascona C · Vivaro A ·
We want your visit to be comfortable 🤝! We use cookies 🍪 to make that happen.