


Removal
1. Disconnect the negative battery cable.
2. Drain the coolant, remove the spark plugs and remove the auxiliary drive belt.
3. Remove the intake and exhaust manifolds.
4. Remove the timing belt. Before removing the belt, turn the crankshaft approximately 60° back. This reduces the likelihood of the valves touching the pistons.
5. Remove the camshafts.
6. Remove the bolts securing the rear timing belt cover to the cylinder head.
7. Disconnect all hoses from the cylinder head.
8. Unscrew the ventilation pipe from the cylinder block.
9. Make sure all hoses and wires that interfere with the removal of the cylinder head are disconnected.
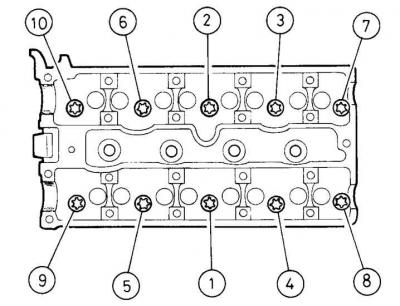
10. Unscrew the head bolts in the reverse tightening sequence (see figure Cylinder Head Bolt Tightening Sequence).
11. Remove the cylinder head.
12. Remove the head gasket.
Preparing for installation
1. Thoroughly clean the mating surfaces of the head and cylinder block. Clean the water and oil passages in the head. Clean the piston heads from carbon deposits.
2. Inspect the mating surfaces for deep scratches, dents, and other damage. Small scratches can be sanded down with sandpaper, but severe damage should be machined.
3. Check that the surface on which the gasket is installed is not deformed.
4. Clean the threads of the cylinder head bolts.
5. Prepare new bolts.
Installation
1. Check that the crankshaft is still turned approximately 60° rearward.
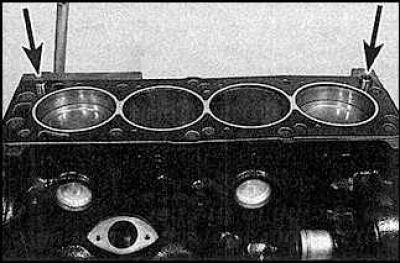
2. Install the head gasket onto the dowel pins (indicated by arrows).
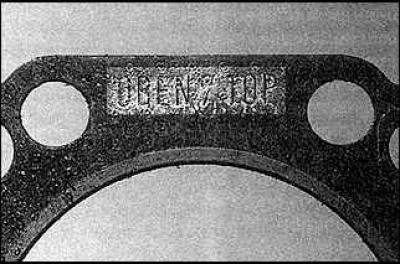
3. Make sure the mark on the gasket is facing up.
4. Install the head.
5. Install new cylinder head bolts.
6. Tighten the head bolts in the specified sequence (see figure Cylinder Head Bolt Tightening Sequence).
7. Install the remaining parts.
8. Connect the battery, start the car and check the engine operation.
Visitor comments