
OpelBook.ru
Cars AvtoVAZ Cars Mitsubishi Cars BMW Cars Mercedes Cars Nissan Cars Toyota Cars Chevrolet
English Русский
Български
Беларускі
Український
Српски
Hrvatski
Română
Polski
Slovenský
Magyar
 |  Sitemap  |  Contacts  |    


Main Astra Corsa Insignia Kadett Omega Vectra Zafira Others Articles
Omega A (1986-1993) Omega B (1993-1999) Omega B2 (1999-2003)
  • Main
  • Omega
  • Omega A
  • Chassis
  • Brake system
  • ABS hydraulic modulator — removal and installation

ABS hydraulic modulator — removal and installation (Opel Omega A)

            0

1. Disconnect the negative battery cable.

2. Remove the brake fluid reservoir cap and place a piece of polyethylene in the opening to prevent further loss of brake fluid.

3. Remove the bolt from the power steering reservoir, clamp and tie the reservoir to one side.

4. Remove the screw and take the trim out of the hydraulic modulator.

5. Remove the screws and remove the wiring harness retaining clip.

6. Remove the multi-pin plug, using a screwdriver if necessary to release it from the clamps.

7. Mark the position of all brake pipes on the modulator, then unscrew the union nuts and separate the brake pipes from the modulator. Plug the ends of the brake pipes to prevent dust and dirt from entering. Also plug the ports of the modulator.
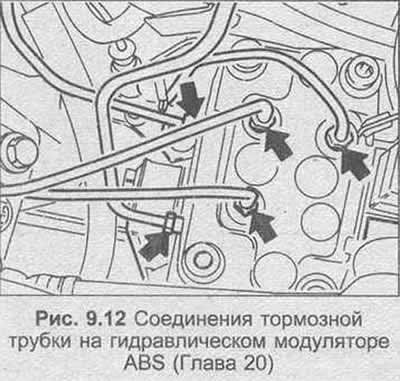
7. Mark the position of all brake pipes on the modulator, then unscrew the union nuts and separate…


8. Unscrew the modulator mounting nuts and remove the trim.

9. Tilt the modulator slightly and pull it forward from the suspension, then loosen the nut and disconnect the ground cable.

10. Remove the modulator from the engine compartment, being careful not to spill brake fluid on the vehicle body.

11. If a new modulator is being installed, unscrew the two relays and install them on the new unit. Do not attempt to disassemble the modulator.


12. Check that the modulator mounting bracket bolts are tight and that the rubber pads on the modulator are in good condition.

13. Installation is carried out in the reverse order, while tightening all nuts and bolts with the tightening force specified Specification and finally bleed the hydraulic system as described in Chapter 13. Check that the ABS warning light goes out after the engine starts.


This article is available at russian, bulgarian, belarusian, ukrainian, serbian, croatian, romanian, polish, slovak, hungarian
Checking the article: Zinoviev Kirill

Share information:

Previous articles
Opel Omega A: Brake system
Next articles

Anti-lock Braking System (ABS) — Precautions
Brake pedal — removal and installation
Vacuum booster — removal and installation
Booster Vacuum Hose and One-Way Valve — Replacement
Vacuum booster — testing
Brake pipes and hoses — removal and installation
Electronic ABS control unit — removal and installation
ABS Wheel Speed Sensor — Removal and Installation
ABS Relay — Replacement


See similar ones from other Opel car manuals:
▶ ABS hydraulic modulator — removal and installation Opel Vectra A (1988-1995, petrol)
▶ Hydraulic system — air release (bleeding) Opel Astra F (1991-1998, petrol)
▶ Pressure regulator valve in the hydraulic circuits of the… Opel Corsa B (1993-2000)
▶ Bleeding the clutch hydraulic drive Opel Insignia A (2008-2017)
▶ Construction of hydraulic tappets Opel Kadett E (1984-1995)
Link to this page in different formats

Visitor comments


No comments yet


How much will 21 + 41 =


Omega B2 (1999-2003) 
  • General information
  • User manual
  • Maintenance
  • Troubleshooting
  • Power unit
  • Petrol 4-cylinder
  • Petrol 6-cylinder
  • Engine overhaul
  • Diesel engines 2.0 l
  • Diesel engines 2.5 l
  • Cooling and heating
  • Injection system (gasoline)
  • Fuel system (diesel)
  • Fuel system
  • Exhaust system
  • Ignition system
  • Transmission
  • Clutch
  • Mechanical gearbox
  • Automatic gearbox
  • Main gear and shafts
  • Chassis
  • Brake system
  • Car suspension
  • Steering
  • Body
  • Body elements
  • Electrical equipment
  • Equipment and devices
  • Electrical circuits
Omega B (1993-1999) 
  • General information
  • User manual
  • Tips for the car owner
  • Maintenance (gasoline)
  • Maintenance (diesel)
  • Power unit
  • Petrol engine SOHC 2.0 l
  • Petrol engine DOHC 2.0 l
  • Petrol engines 2.5 and 3.0 l
  • Repair of gasoline engines
  • Diesel engine 2.0 l
  • Diesel engine repair 2.0 l
  • Diesel engine 2.5 l
  • Cooling and heating
  • Power system (petrol)
  • Emission reduction
  • Fuel system (diesel 2.0 l)
  • Fuel system (diesel 2.5 l)
  • Launch system
  • Ignition system
  • Transmission
  • Clutch
  • Mechanical gearbox
  • Automatic gearbox
  • Drive shafts
  • Chassis
  • Brake system
  • Wheel suspension
  • Steering
  • Body
  • Exterior
  • Interior
  • Doors and windows
  • Electrical equipment
  • Equipment and devices
  • Wiring diagrams (early)
  • Wiring diagrams (late)
Omega A (1986-1993) 
  • General information
  • User manual
  • Maintenance
  • Changes and additions
  • Troubleshooting
  • Power unit
  • Gasoline engines
  • Diesel engines
  • Cooling system
  • Fuel system (gasoline)
  • Fuel system (diesel)
  • Ignition system
  • Transmission
  • Clutch
  • Mechanical gearbox
  • Automatic gearbox
  • Cardan shaft
  • Drive shafts
  • Chassis
  • Brake system
  • Car suspension
  • Steering
  • Body
  • Exterior
  • Interior
  • Electrical equipment
  • Power devices
  • Lighting and appliances
  • Electrical circuits
OpelBook.ru © 2017–2026 · Mobile version · · Sitemap: EN BG BY UA RS HR RO PL SK HU · Feedback · Site search
Astra F, petrol · Astra G, petrol · Astra G · Astra H · Astra J, petrol · Corsa B · Corsa C, petrol · Corsa C · Insignia A · Kadett D · Kadett E · Omega A · Omega B · Omega B2 · Vectra A, petrol · Vectra A · Vectra B, petrol · Vectra B · Vectra C · Zafira A, petrol · Frontera A, petrol · Frontera B · Ascona C · Vivaro A ·
We want your visit to be comfortable 🤝! We use cookies 🍪 to make that happen.