


Contents: Checking the throttle opening ⬇ Checking the air flow meter ⬇ Checking the fuel supply pressure ⬇ Checking the performance of the fuel…⬇ Checking the coolant temperature…⬇ Checking the intake air temperature…⬇ Checking the idle speed control knob ⬇ Checking the oxygen concentration…⬇ Checking the tightness and fuel…⬇
Checking and adjusting the idle speed is performed on an engine warmed up to normal operating temperature, with the gaps between the spark plug electrodes and the ignition timing correctly set, with a clean air filter element and disconnected current consumers.
The idle speed of the crankshaft is determined by the idle speed control, which maintains it within 720-780 rpm according to the controller commands and is not subject to adjustment.
To check the carbon monoxide (CO) content in the exhaust gases, connect the gas analyzer according to the instructions, start the engine at idle speed and check the CO content, which should be no more than 1%.
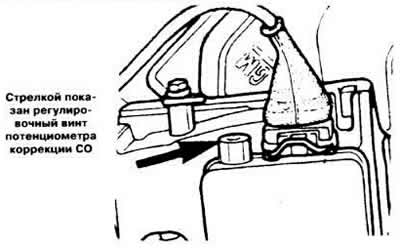
If there is a deviation from the norm, use a small screwdriver to remove the plug of the adjusting screw of the CO correction potentiometer located on the side of the air flow meter (see picture) and, by turning the screw, achieve the required CO content.
Original source on the website: www.OpelBook.ru
After adjustment, install a new plug for the CO correction potentiometer adjustment screw.
Checking the throttle opening
The throttle opening is set at the factory and is not subject to adjustment. Checking and adjusting the throttle position sensor.
Disconnect the connector from the throttle position sensor.
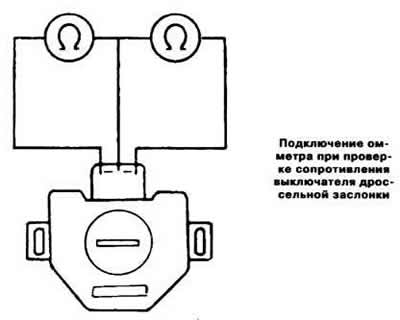
Connect an ohmmeter to terminals "2" and "18" of the sensor block and measure the resistance with an ohmmeter, which should be 0 Ohm.
Connect an ohmmeter to terminals "3" and "18" of the sensor block and measure the resistance, which should be equal to infinity.
If the ohmmeter readings do not match the data, loosen both screws securing the sensor housing and turn it counterclockwise until resistance is felt. In this position, tighten the screws securing the sensor housing, then check its operation by slowly opening the throttle valve. In this case, when the throttle valve begins to open, a click from the switch operation should be heard.
Checking the air flow meter
Disconnect the wire from the negative terminal of the battery.
Disconnect the air flow meter connector.
By deflecting the air flow meter pressure flap, check the smoothness of its movement along its entire stroke. If necessary, thoroughly clean the internal surfaces from resinous deposits using a suitable solvent.
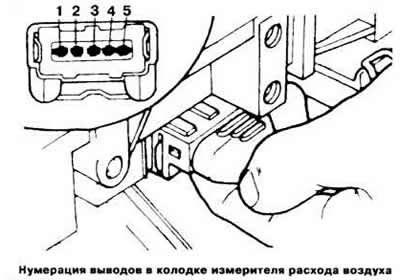
By successively connecting the ohmmeter to the pairs of terminals "2" and "4", "4" and "3", "4" and "1" of the measuring block (see picture), check that its readings correspond to the required resistance values (see subsection "Design and technical characteristics").
Checking the fuel supply pressure
Disconnect the fuel supply hose from the fuel line and connect the pressure gauge hoses to the hose opening and the line branch.
Start the engine at idle speed.
Disconnect the vacuum hose from the fuel pressure regulator and check the fuel supply pressure on the pressure gauge, which should be within 2.3-2.7 kg/cm². Connect the vacuum hose to the fuel pressure regulator and make sure that the pressure on the pressure gauge has decreased by 0.3-0.5 kg/cm².
Stop the engine and monitor the pressure on the pressure gauge. If the pressure drops, check the operation of the fuel pump check valve by pinching the fuel supply hose between the fuel pump and the fuel line. Check the tightness of the pressure regulator check valve by pinching the fuel drain hose below the regulator. If the check valves are in good condition, check the tightness of the injection nozzles as described below.
Checking the performance of the fuel pump
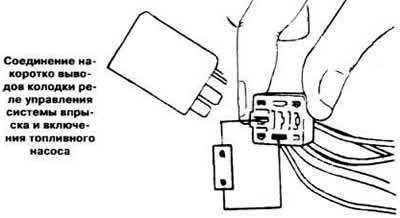
Disconnect the connector of the dual relay for controlling the injection system and turning on the fuel pump and short-circuit the terminals "30" and "87V" of the block through a fuse (see picture).
Disconnect the fuel supply hose from the fuel distribution line and lower the end of the hose into a graduated container.
After turning on the ignition, operate the fuel pump for 60 seconds and measure the amount of fuel flowing out of the hose, which should be equal to 1 l.
Checking the coolant temperature sensor
Disconnect the connector from the sensor, release residual pressure from the cooling system and unscrew the sensor.
Place the sensor in a tank with water or coolant that can be heated. Connect an ohmmeter to the sensor terminals (see picture). Turn on the water heating and measure the resistance of the sensor, which should correspond to the values specified in the subsection "Design and technical characteristics".
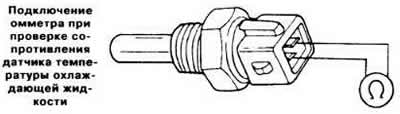
Note: The sensor can be tested on the vehicle provided that the specified test conditions are met.
Checking the intake air temperature sensor
The air temperature sensor is built into the air flow meter and cannot be replaced separately from it.
To check the electrical resistance of the sensor, connect an ohmmeter to terminals "4" and "5" of the air flow meter connector and check the resistance of the sensor, which should correspond to the values given in the subsection "Design and technical characteristics".
Checking the idle speed control knob
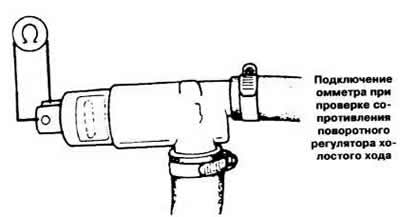
Disconnect the connector from the idle speed control, connect an ohmmeter to the terminals of the control and check the resistance, which at a temperature of 20°C should be approximately 8 ohms.
Checking the oxygen concentration sensor in the exhaust gases
If the oxygen concentration sensor installed on vehicles with an exhaust gas neutralizer malfunctions, the digital engine management system malfunction indicator lamp lights up on the instrument panel.
Note: When removing the oxygen sensor, it should be removed from the exhaust manifold only after the engine has warmed up to normal operating temperature.
Checking the tightness and fuel spray cone of the injection nozzles
Remove the fuel line assembly with injectors and fuel pressure regulator from the engine.
Disconnect the pads from the injectors without disconnecting the fuel lines from them.
The fuel line with injection nozzles and pressure regulator and with the fuel supply and drain hoses connected to it should be secured over a suitable container.
Disconnect the connector of the injection system control relay and fuel pump activation, activate the fuel pump by short-circuiting terminals "30" (red wire) and "87B" (red-black wire) pads through a 10 A fuse, and check the fuel leak through the injectors, which should not be more than 1 drop per minute. Replace leaky injectors.
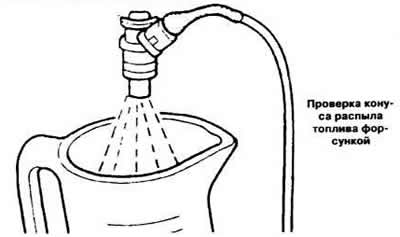
Check the correctness of the fuel spray cone of the injector, which should correspond to that shown in the figure, by connecting a 12 V DC source in series to each injector.
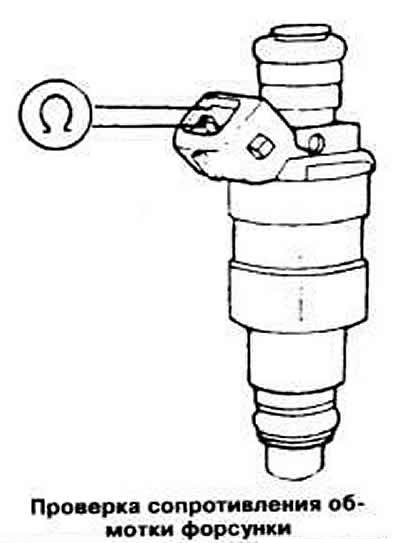
Check the resistance of the injector windings by sequentially connecting an ohmmeter to their terminals; the readings should be within 15-17 Ohms.
Visitor comments