
OpelBook.ru
Cars AvtoVAZ Cars Mitsubishi Cars BMW Cars Mercedes Cars Nissan Cars Toyota Cars Chevrolet
English Русский
Български
Беларускі
Український
Српски
Hrvatski
Română
Polski
Slovenský
Magyar
 |  Sitemap  |  Contacts  |    


Main Astra Corsa Insignia Kadett Omega Vectra Zafira Others Articles
Corsa B (1993-2000) Corsa C (2000-2006, petrol) Corsa C (2000-2006)
  • Main
  • Corsa
  • Corsa C
  • Transmission
  • Drive shafts
  • Removal and installation the hub nut

Removal and installation the hub nut (Opel Corsa C)

            0

1. Shift the manual transmission into neutral/move the AT selector lever to the "N" position. Apply the parking brake lever.

2. Remove the appropriate wheel.

3. On Corsa C models, use a screwdriver to remove the protective cap from the wheel hub - it will be damaged during removal and must be replaced without fail. Remove the locking pin from the hub nut.

4. The hub nut is tightened with very great force. It is recommended to install the wheels and lower the car to the ground before loosening/tightening the nut - ask an assistant to press the foot brake pedal. If this operation is carried out on a raised car, a special lever must be attached to the hub using the wheel bolts to prevent it from turning (see accompanying illustration).
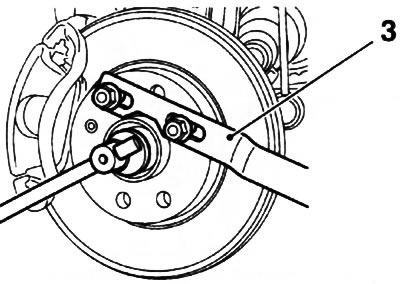
2.4. Loosing the hub nut: 3. Special lever

2.4. Loosing the hub nut: 3. Special lever


Note: If necessary, the lever can be made independently.


5. Loosen the hub nut and remove it from the drive shaft journal (on the front wheels), if necessary, separate the auxiliary lever from the hub.

Note: On the rear wheels, the hub nut is installed on the axle of the hub assembly.


6. Installation is carried out in the reverse order of removal. When installing, use only new hub nuts and washers. Initially, tighten the nuts with a torque of 60 Nm, install the wheels and lower the car. Further tightening of the nut is carried out in 4 stages. In the first approach, tighten the nut with a force of 120 Nm, then loosen the nut so that its further unscrewing can be continued manually. In the third approach, tighten the nut with a force of 20 Nm, and then another 90°.

7. Secure the hub nut with a new cotter pin. If the cotter pin does not fit, back off the nut slightly until the hole for the cotter pin aligns with the nearest groove on the hub nut crown. Insert the cotter pin and spread its ends apart with pliers. On Corsa C models, do not forget to install a new protective cap.


This article is available at russian, bulgarian, belarusian, ukrainian, serbian, croatian, romanian, polish, slovak, hungarian
Checking the article: Kornev Georgy

Share information:

Previous articles
Opel Corsa C: Drive shafts
Next articles

General information about drive shafts
Drive shaft specifications
Removal and installation drive shafts
Right drive shaft with intermediate shaft (diesel)
Checking the condition of constant velocity joints (CV joints)
Replacement of double compensation CV joint
Features of replacing a tripod type CV joint (Z10XE engines)
Replacing CV joint boots


Link to this page in different formats

Visitor comments


No comments yet


How much will 41 + 15 =


Corsa C (2000-2006) 
  • General information
  • Introduction to guide
  • Troubleshooting
  • Vehicle device
  • User manual
  • Maintenance
  • Power unit
  • Engine repair
  • Cooling system
  • Power and exhaust system
  • Control system
  • Engine electrical equipment
  • Transmission
  • Clutch
  • Mechanical gearbox
  • Automatic gearbox
  • Drive shafts
  • Chassis
  • Brake system
  • Wheel suspension
  • Steering
  • Body
  • Exterior
  • Interior
  • Doors and windows
  • Heating and air conditioning
  • Electrical equipment
  • Equipment and devices
  • Lamps and lighting
  • Electrical circuits
Corsa C (2000-2006, petrol) 
  • User manual
  • Car access
  • Governing bodies
  • Seat control
  • Heating and air conditioning
  • Driving and maintenance
  • Engines 1.0 and 1.2 l
  • Engine repair
  • Cooling and lubrication system
  • Injection system
  • Engines 1.4, 1.6 and 1.8 l
  • Engine repair
  • Cooling and lubrication system
  • Injection system
  • Transmission
  • Clutch
  • Mechanical gearbox
  • Automatic gearbox
  • Drive shafts
  • Chassis
  • Wheels and tires
  • Wheel suspension
  • Steering
  • Brake system
  • Body
  • Exterior
  • Doors and windows
  • Electrical equipment
  • Equipment and devices
  • Lighting system
  • Electrical circuits
Corsa B (1993-2000) 
  • General information
  • Introduction to guide
  • User manual
  • Maintenance
  • Power unit
  • SOHC gasoline engines
  • DOHC gasoline engines
  • Diesel engines
  • Engine repair
  • Cooling system
  • Supply system
  • Injection system (gasoline)
  • Injection system (diesel)
  • Exhaust systems
  • Control system (gasoline)
  • Preheat system (diesel)
  • Charge and launch system
  • Transmission
  • Mechanical gearbox
  • Automatic gearbox
  • Clutch and drive shafts
  • Chassis
  • Brake system
  • Front suspension
  • Rear suspension
  • Steering
  • Body
  • Ventilation and heating
  • Exterior
  • Interior
  • Doors and windows
  • Electrical equipment
  • Equipment and devices
  • Lamps and lighting
  • Electrical circuits
OpelBook.ru © 2017–2026 · Mobile version · · Sitemap: EN BG BY UA RS HR RO PL SK HU · Feedback · Site search
Astra F, petrol · Astra G, petrol · Astra G · Astra H · Astra J, petrol · Corsa B · Corsa C, petrol · Corsa C · Insignia A · Kadett D · Kadett E · Omega A · Omega B · Omega B2 · Vectra A, petrol · Vectra A · Vectra B, petrol · Vectra B · Vectra C · Zafira A, petrol · Frontera A, petrol · Frontera B · Ascona C · Vivaro A ·
We want your visit to be comfortable 🤝! We use cookies 🍪 to make that happen.