
OpelBook.ru
Cars AvtoVAZ Cars Mitsubishi Cars BMW Cars Mercedes Cars Nissan Cars Toyota Cars Chevrolet
English Русский
Български
Беларускі
Український
Српски
Hrvatski
Română
Polski
Slovenský
Magyar
 |  Sitemap  |  Contacts  |    


Main Astra Corsa Insignia Kadett Omega Vectra Zafira Others Articles
Corsa B (1993-2000) Corsa C (2000-2006, petrol) Corsa C (2000-2006)
  • Main
  • Corsa
  • Corsa C
  • Body
  • Heating and air conditioning
  • Removal and installation the air distribution flap assembly (Corsa)

Removal and installation the air distribution flap assembly (Corsa) (Opel Corsa C)

            0

1. Remove the main storage compartment (see Chapter 11).

2. Remove the lower instrument panel trim from the front passenger footwell side (see Chapter 11).

3. Unlock and remove the air supply hose to the passenger footwell.

4. On models equipped with the A/C system, set the rotary switch handle for selecting the air flow direction to the position and activate the system in circulation mode.

5. Remove the HVAC control panel (see Section 11).

6. Separate the drive cable from the air distributor housing.

7. Disconnect the intermediate air damper drive levers (see accompanying illustration).
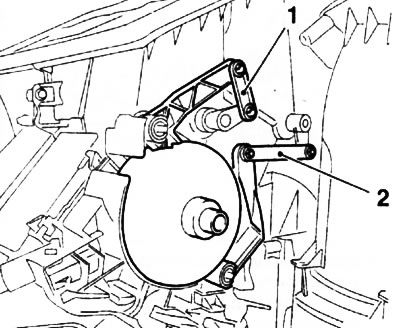
14.7. Intermediate (connecting) levers (1 and 2) of the air distribution flap (corsa C models)

14.7. Intermediate (connecting) levers (1 and 2) of the air distribution flap (corsa C models)


8. Remove the mounting bolt and remove the air distribution flap assembly from the guide on the air distribution housing (see accompanying illustration).
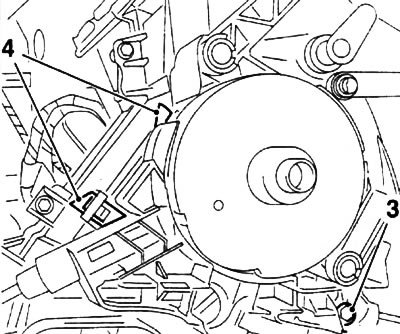


14.8. Bolt (3) for fastening and guide (4) for assembly of air distribution flap (corsa C models)

14.8. Bolt (3) for fastening and guide (4) for assembly of air distribution flap (corsa C models)


9. Installation is performed in the reverse order of removal. After installing the assembly into the air distributor housing, check the position of the damper (see accompanying illustration) and the functioning of the drive levers.
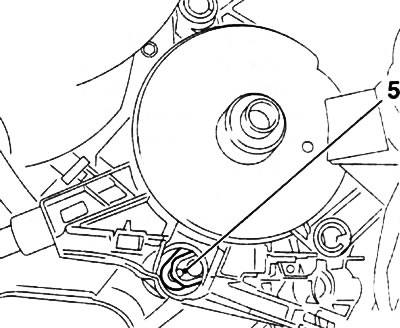
14.9. Correct position (5) of the air distribution flap during installation (corsa C models)

14.9. Correct position (5) of the air distribution flap during installation (corsa C models)


(Article posted on a web portal: opelbook)


This article is available at russian, bulgarian, belarusian, ukrainian, serbian, croatian, romanian, polish, slovak, hungarian
Checking the article: Kornev Georgy

Share information:

Previous articles
Opel Corsa C: Heating and air conditioning
Next articles

Removal and installation the heater fan drive motor
Removal and installation the HVAC fan drive motor
Removal and installation the HVAC control panel switch assembly
Complete removal and installation of HVAC control panel
Removal and installation air duct deflectors (Meriva)
Removal and installation air duct deflectors (Corsa C)
Removal and installation an additional heater (diesel models)
Removal and installation the heater heat exchanger


See similar ones from other Opel car manuals:
▶ Removal and installation the electric motor of the… Opel Astra H (2004-2009)
▶ Air distribution flap actuator diaphragm valve — removal… Opel Omega B2 (1999-2003)
▶ Gas distribution mechanism drive device Opel Insignia A (2008-2017)
▶ The device of the gas distribution mechanism of 8-valve… Opel Kadett E (1984-1995)
▶ Fuel filler flap engine Opel Vectra B (1995-2002)
Link to this page in different formats

Visitor comments


No comments yet


How much will 33 + 30 =


Corsa C (2000-2006) 
  • General information
  • Introduction to guide
  • Troubleshooting
  • Vehicle device
  • User manual
  • Maintenance
  • Power unit
  • Engine repair
  • Cooling system
  • Power and exhaust system
  • Control system
  • Engine electrical equipment
  • Transmission
  • Clutch
  • Mechanical gearbox
  • Automatic gearbox
  • Drive shafts
  • Chassis
  • Brake system
  • Wheel suspension
  • Steering
  • Body
  • Exterior
  • Interior
  • Doors and windows
  • Heating and air conditioning
  • Electrical equipment
  • Equipment and devices
  • Lamps and lighting
  • Electrical circuits
Corsa C (2000-2006, petrol) 
  • User manual
  • Car access
  • Governing bodies
  • Seat control
  • Heating and air conditioning
  • Driving and maintenance
  • Engines 1.0 and 1.2 l
  • Engine repair
  • Cooling and lubrication system
  • Injection system
  • Engines 1.4, 1.6 and 1.8 l
  • Engine repair
  • Cooling and lubrication system
  • Injection system
  • Transmission
  • Clutch
  • Mechanical gearbox
  • Automatic gearbox
  • Drive shafts
  • Chassis
  • Wheels and tires
  • Wheel suspension
  • Steering
  • Brake system
  • Body
  • Exterior
  • Doors and windows
  • Electrical equipment
  • Equipment and devices
  • Lighting system
  • Electrical circuits
Corsa B (1993-2000) 
  • General information
  • Introduction to guide
  • User manual
  • Maintenance
  • Power unit
  • SOHC gasoline engines
  • DOHC gasoline engines
  • Diesel engines
  • Engine repair
  • Cooling system
  • Supply system
  • Injection system (gasoline)
  • Injection system (diesel)
  • Exhaust systems
  • Control system (gasoline)
  • Preheat system (diesel)
  • Charge and launch system
  • Transmission
  • Mechanical gearbox
  • Automatic gearbox
  • Clutch and drive shafts
  • Chassis
  • Brake system
  • Front suspension
  • Rear suspension
  • Steering
  • Body
  • Ventilation and heating
  • Exterior
  • Interior
  • Doors and windows
  • Electrical equipment
  • Equipment and devices
  • Lamps and lighting
  • Electrical circuits
OpelBook.ru © 2017–2026 · Mobile version · · Sitemap: EN BG BY UA RS HR RO PL SK HU · Feedback · Site search
Astra F, petrol · Astra G, petrol · Astra G · Astra H · Astra J, petrol · Corsa B · Corsa C, petrol · Corsa C · Insignia A · Kadett D · Kadett E · Omega A · Omega B · Omega B2 · Vectra A, petrol · Vectra A · Vectra B, petrol · Vectra B · Vectra C · Zafira A, petrol · Frontera A, petrol · Frontera B · Ascona C · Vivaro A ·
We want your visit to be comfortable 🤝! We use cookies 🍪 to make that happen.