
OpelBook.ru
Cars AvtoVAZ Cars Mitsubishi Cars BMW Cars Mercedes Cars Nissan Cars Toyota Cars Chevrolet
English Русский
Български
Беларускі
Український
Српски
Hrvatski
Română
Polski
Slovenský
Magyar
 |  Sitemap  |  Contacts  |    


Main Astra Corsa Insignia Kadett Omega Vectra Zafira Others Articles
Astra F (1991-1998, petrol) Astra G (1998-2004, petrol) Astra G (1998-2004) Astra H (2004-2009) Astra J (2009-2015, petrol)
  • Main
  • Astra
  • Astra J
  • Electrical equipment
  • Equipment and devices
  • Electric heating of the rear window glass

Electric heating of the rear window glass (Opel Astra J)

            0

Electric heating of the rear window glass


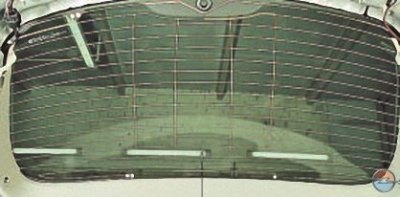
The rear window glass heating element consists of horizontal conductive strips connected on both sides by vertical buses. One bus is connected to the "+" of the vehicle electrical system, the other to the "ground" of the vehicle body. The supply voltage of the electric heater is 12 V. Power is supplied to the heating element via fuse No.18 in the mounting block located in the trunk of the vehicle.

If the glass surface remains uncleaned after switching on the electric heating, check fuse No.11. If the fuse is in good condition, check with a test lamp or voltmeter whether there is supply voltage at the terminals of the glass heating element. To do this, use a test lamp (or a voltmeter) connect to the "+" terminal of the electric heater and the "ground" of the body. If there is no supply voltage, check the wiring of the power supply circuit of the element and eliminate the malfunction.

If the fuse and the heating element power supply circuit are in good condition, check the condition of its conductive strips.

The test is carried out with the engine running and the rear window heating switched on. Using a voltmeter, measure the voltage on all strips one by one, connecting one terminal of the voltmeter to the body "ground" and the other one in series to the conductive strips. If the voltage measured by the voltmeter at the beginning and end of the strips is the same and approximately equal to the battery voltage, check the reliability of the contact of the "ground" wire of the heating element with the car body.


The voltage on the strip should decrease as the voltmeter connection point moves away from the positive polarity bus of the element. The voltage should be measured in at least two places at the same distance from the axis of symmetry to eliminate the possibility of missing a damaged section. If you find a discrepancy in the readings on one of the strips, move the contact of the voltmeter wire along this strip until the voltage becomes zero. A sharp decrease in voltage indicates a break in the strip at this point. Mark the break on the outer surface of the glass with chalk or a glass graphite pen for subsequent repair of the damaged section.

To repair the heating element, you can use one of the special kits available on the market that contain silver. Although the kits are made by different manufacturers, their composition is approximately the same, and they all come with instructions for use. Below is a typical procedure for working with these kits.

1. Remove a 6mm long section of the strip from each side of the damaged area.

2. Wipe the damaged area with a clean cloth soaked in alcohol.

3. Apply repair adhesive tape or two pieces of regular adhesive tape to the glass at the damaged strip location, above and below the area being repaired, with the distance between the pieces of adhesive tape corresponding to the width of the conductive strip on the glass.

4. Mix the hardener thoroughly with the silver base compound. If the hardener has thickened, place the package in hot water and wait until the hardener becomes liquid.


5. Apply the composition to the area to be repaired using a wooden spatula and remove the adhesive tape.

6. Place the heater at a distance of 25 mm from the damaged area and heat the composition for 1–2 minutes. The minimum heating temperature is 149°C.

Note: In some kits, the composition does not need to be heated: it polymerizes at room temperature.


7. If the strip has become discolored after drying, apply a tinting iodine composition to it with a brush – the color of the strip will be restored. After the iodine composition has dried for 30 seconds, wipe off its excess with a clean, lint-free cloth. During the polymerization of the repair composition, which lasts 24 hours, exclude any mechanical impact on the repaired section of the strip.

8. Turn on the rear window heating element and check its operation.

If the wire has come off the busbar, solder it with solder containing 3% silver and rosin paste as flux in the following order.

1. Clean the soldering area on the busbar and the wire core.

2. Using a brush, apply a little rosin paste to the areas of the wire and busbar to be connected.

3. Apply a thin layer of solder to the wire core.

4. Solder the wire to the busbar, avoiding overheating of the parts being connected.


This article is available at russian, bulgarian, belarusian, ukrainian, serbian, croatian, romanian, polish, slovak, hungarian
Checking the article: Trifonova Emilia

Share information:

Previous articles
Opel Astra J: Equipment and devices
Next articles

Removal and installation the electric motor of the radiator fan of the cooling system
Replacing the joystick for controlling the outside mirrors
Replacing the rear door window lift motor
Replacing the front door window lift motor
Replacement of the electric window control unit and switches
Removal and installation the windshield washer
Features of the instrument cluster design
Removal and installation the instrument cluster
Replacement of the control unit for external lighting and backlight brightness
Removal and installation the central display
Removal and installation a car radio
Removal and installation speakers


See similar ones from other Opel car manuals:
▶ Heating system, fuel pump, rear window heating Opel Corsa C (2000-2006)
▶ Rear window heating Opel Insignia A (2008-2017)
▶ Scheme 19. Electrical heating of the rear window Opel Zafira A (1999-2005, petrol)
▶ Rear window or rear door glass — removal and installation Opel Ascona C (1981-1988)
▶ Removal and installation glass in the rear doors Opel Kadett D (1979-1984)
Link to this page in different formats

Visitor comments


No comments yet


How much will 47 + 35 =


Astra J (2009-2015, petrol) 
  • General information
  • Vehicle device
  • User manual
  • Faults en route
  • Maintenance
  • Power unit
  • Engine repair
  • Cooling and lubrication system
  • Engine power system
  • Exhaust system
  • Transmission
  • Clutch
  • Car gearbox
  • Drive shafts
  • Chassis
  • Front suspension
  • Rear suspension
  • Steering
  • Brake system
  • Wheels and tires
  • Body
  • Exterior
  • Interior
  • Doors and windows
  • Body Care
  • Heating and air conditioning
  • Security systems
  • Electrical equipment
  • Equipment and devices
  • Lighting and signaling
  • Power devices
  • Electrical circuits
Astra H (2004-2009) 
  • General information
  • Introduction to the guide
  • Troubleshooting
  • User manual
  • Maintenance
  • Power unit
  • Engine repair
  • Cooling and heating
  • Power and exhaust system
  • Ignition system
  • Launch and charge system
  • Transmission
  • Mechanical gearbox
  • Automatic gearbox
  • Drive shafts
  • Chassis
  • Brake system
  • Car suspension
  • Steering
  • Body
  • Interior
  • Exterior
  • Electrical equipment
  • Equipment and devices
  • Electrical circuits
Astra G (1998-2004) 
  • General information
  • Introduction to manual
  • User manual
  • Maintenance
  • Power unit
  • SOHC gasoline engines
  • DOHC gasoline engines
  • Diesel engines 1.7 and 2.0
  • Engine repair
  • Cooling system
  • Supply system
  • Injection system (gasoline)
  • Injection system (diesel)
  • Exhaust system
  • Charge and launch system
  • Ignition system (gasoline)
  • Preheat system (diesel)
  • Transmission
  • Manual gearbox
  • Automatic gearbox
  • Clutch
  • Drive shafts
  • Chassis
  • Brake system
  • Wheel suspension
  • Steering
  • Body
  • Exterior
  • Interior
  • Doors and windows
  • Ventilation and heating
  • Electrical equipment
  • Equipment and devices
  • Electrical circuits
Astra G (1998-2004, petrol) 
  • General information
  • User manual
  • Car care
  • Maintenance
  • Power unit
  • Single shaft engines
  • Twin shaft engines
  • Engine repair
  • Cooling and heating
  • Fuel and exhaust systems
  • Starting and charging system
  • Ignition system
  • Transmission
  • Clutch
  • Mechanical gearbox
  • Automatic gearbox
  • Drive shafts
  • Chassis
  • Brake system
  • Car suspension
  • Steering
  • Body
  • Interior
  • Exterior
  • Electrical equipment
  • Equipment and devices
  • Wiring diagrams Opel Astra
  • Wiring diagrams Opel Zafira
Astra F (1991-1998, petrol) 
  • General information
  • Maintenance
  • Power unit
  • Engine in car
  • Engine removed
  • Cooling system
  • Heating and ventilation
  • Fuel supply (carburetor)
  • Fuel supply (injector)
  • Emission control
  • Ignition system
  • Transmission
  • Clutch
  • Mechanical gearbox
  • Automatic gearbox
  • Drive shafts
  • Chassis
  • Brake system
  • Car suspension
  • Steering
  • Body
  • Exterior
  • Interior
  • Electrical equipment
  • Equipment and devices
  • Electrical circuits
OpelBook.ru © 2017–2026 · Mobile version · · Sitemap: EN BG BY UA RS HR RO PL SK HU · Feedback · Site search
Astra F, petrol · Astra G, petrol · Astra G · Astra H · Astra J, petrol · Corsa B · Corsa C, petrol · Corsa C · Insignia A · Kadett D · Kadett E · Omega A · Omega B · Omega B2 · Vectra A, petrol · Vectra A · Vectra B, petrol · Vectra B · Vectra C · Zafira A, petrol · Frontera A, petrol · Frontera B · Ascona C · Vivaro A ·
We want your visit to be comfortable 🤝! We use cookies 🍪 to make that happen.