
Remember that the dust produced during the wear of the friction linings of the clutch disc may contain asbestos, which is harmful to health. Do not blow off dust with compressed air and try not to inhale it. Do not use petroleum-based solvents to clean clutch components, use only special brake cleaners or pure methanol. Store used rags in a sealed container.
Removing
1. To remove the assembly of the slave cylinder with the release bearing, it is necessary to dismantle the gearbox (see chapter Manual transmission), or remove the power unit.
2. Thoroughly wipe the outside of the cylinder, then loosen the union nut and disconnect the hydraulic line from the cylinder - immediately collect traces of spilled hydraulic fluid with a rag.
3. Turn out three fixing bolts and remove the cylinder from an input shaft. Remove the sealing ring installed between the cylinder and the manual transmission housing - the ring must be replaced without fail. Take precautions to prevent dirt from getting into the box.
Clutch Slave Cylinder Installation Diagram
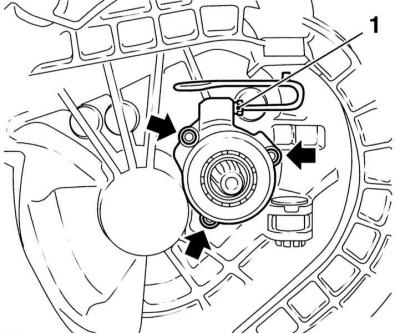
1 — Nut of union connection of a hydraulic line
Arrows - cylinder bolts
4. A failed executive repair is not subject to repair. If hydraulic fluid leaks develop, replace the cylinder assembly.
Installation
1. Make sure that the mating surfaces of the cylinder and the crankcase of the manual transmission are absolutely clean and dry. Fit a new O-ring into the receiving groove on the transmission case.
2. Lubricate the cylinder with clean transmission oil, place it on the shaft pin and press it against the manual transmission housing. Check the fit of the O-ring in the receiving groove, then screw in the mounting bolts and tighten them to the required torque.
3. Connect the hydraulic line to the cylinder and tighten the union nut to the required torque.
4. Install the gearbox on the engine (see chapter Manual transmission).
5. Bleed the hydraulic system (see Removal of air from the hydraulic path of the clutch release drive).
Visitor comments