
OpelBook.ru
Cars AvtoVAZ Cars Mitsubishi Cars BMW Cars Mercedes Cars Nissan Cars Toyota Cars Chevrolet
English Русский
Български
Беларускі
Український
Српски
Hrvatski
Română
Polski
Slovenský
Magyar
 |  Sitemap  |  Contacts  |    


Main Astra Corsa Insignia Kadett Omega Vectra Zafira Others Articles
Astra F (1991-1998, petrol) Astra G (1998-2004, petrol) Astra G (1998-2004) Astra H (2004-2009) Astra J (2009-2015, petrol)
  • Main
  • Astra
  • Astra G
  • Transmission
  • Clutch
  • Removal and installation the clutch pedal

Removal and installation the clutch pedal (Opel Astra G)

            0

Contents: Removal ⬇ Installation ⬇
Wiring diagram for connecting the master cylinder pushrod to the clutch pedal
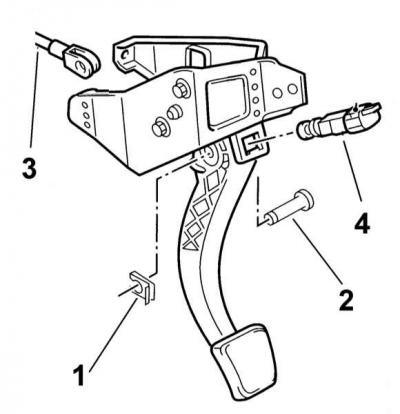
1 - Mounting pin retainer

1 - Mounting pin retainer

2 — Split pin mounting pin

3 - Split pusher pin

4 — Clutch pedal position sensor switch (models with tempostat)


Removal


1. In the vehicle interior, remove the lower trim section from the left side of the instrument panel (see Chapter Body).

2. Disconnect the return spring from the clutch pedal. Remove the retainer and remove the pin attached to the pedal of the split pin of the push rod of the clutch master cylinder (see illustration Wiring diagram for connecting the master cylinder pushrod to the clutch pedal).

3. Remove the two bolts securing the pedal support bracket to the steering crossmember.

4. On models equipped with a speed control system (tempostat), disconnect the electrical wiring and remove the pedal position sensor switch from the bracket (see illustration Wiring diagram for connecting the master cylinder pushrod to the clutch pedal).

5. Remove the two nuts securing the pedal bracket to the engine compartment bulkhead/clutch master cylinder.


6. Push the master cylinder studs back so they do not stick out of the bulkhead.

7. Carefully remove the pedal assembly and take it out of the passenger compartment.

8. Check the pedal bracket for deformation and damage (the unit is made easily deformable to improve safety in the event of a collision). Assess the degree of wear of the bushings. Replace the failed components. If necessary, the pedal can be removed from the bracket by unscrewing the mounting bolts.

Installation


1. If the pedal assembly has been disassembled, reinstall all removed components - the pedal axle and bushings should be lubricated with a multi-purpose grease before installation. Connect the return spring and tighten the fasteners securely. Before installing the assembly on the car, check the smoothness of the pedal movement.

2. Install the pedal assembly on the engine compartment bulkhead - make sure that the split pin of the master cylinder pusher is seated correctly. Tighten the bolts securing the assembly to the steering crossmember.

3. Using the push rod, push the master cylinder mounting studs through the bulkhead and into the holes in the pedal assembly bracket. Install new mounting nuts and tighten them to the specified torque.

4. Lubricate the axial pin of the split pusher pin with universal grease, place it on the clutch pedal and secure it with the mounting pin - make sure the retainer is securely seated.

5. Tighten the pedal-to-steering crossmember bolts to the required torque.

6. Connect the return spring.


7. On models equipped with a cruise control, install the clutch pedal position sensor switch, having first pressed its nipple in. Connect the electrical wiring to the sensor, then press the clutch pedal all the way down, pull out the sensor plunger and release the pedal again to allow the sensor to self-install.

8. Reinstall the lower instrument panel trim section. Before operating the vehicle, make sure the clutch is functioning properly.


This article is available at russian, bulgarian, belarusian, ukrainian, serbian, croatian, romanian, polish, slovak, hungarian
Checking the article: Pavlovsky Nikolay

Share information:

Previous articles
Opel Astra G: Clutch
Next articles

Bleeding air from the hydraulic circuit of the clutch release drive
Removal and installation the clutch slave cylinder assembly with release bearing
Removal and installation the clutch master cylinder
Clutch — General information and component condition check
Clutch and Drive Shaft Specifications
General information about clutches and drive shafts
Removal, inspection and installation of clutch components


See similar ones from other Opel car manuals:
▶ Checking the clutch pedal adjustment Opel Corsa B (1993-2000)
▶ Replacing the clutch pedal position sensor Opel Insignia A (2008-2017)
▶ Clutch pedal — removal and installation Opel Omega A (1986-1993)
▶ Clutch pedal — removal and installation Opel Vectra A (1988-1995, petrol)
▶ Clutch pedal — removal and installation Opel Ascona C (1981-1988)
Link to this page in different formats

Visitor comments


No comments yet


How much will 18 + 11 =


Astra J (2009-2015, petrol) 
  • General information
  • Vehicle device
  • User manual
  • Faults en route
  • Maintenance
  • Power unit
  • Engine repair
  • Cooling and lubrication system
  • Engine power system
  • Exhaust system
  • Transmission
  • Clutch
  • Car gearbox
  • Drive shafts
  • Chassis
  • Front suspension
  • Rear suspension
  • Steering
  • Brake system
  • Wheels and tires
  • Body
  • Exterior
  • Interior
  • Doors and windows
  • Body Care
  • Heating and air conditioning
  • Security systems
  • Electrical equipment
  • Equipment and devices
  • Lighting and signaling
  • Power devices
  • Electrical circuits
Astra H (2004-2009) 
  • General information
  • Introduction to the guide
  • Troubleshooting
  • User manual
  • Maintenance
  • Power unit
  • Engine repair
  • Cooling and heating
  • Power and exhaust system
  • Ignition system
  • Launch and charge system
  • Transmission
  • Mechanical gearbox
  • Automatic gearbox
  • Drive shafts
  • Chassis
  • Brake system
  • Car suspension
  • Steering
  • Body
  • Interior
  • Exterior
  • Electrical equipment
  • Equipment and devices
  • Electrical circuits
Astra G (1998-2004) 
  • General information
  • Introduction to manual
  • User manual
  • Maintenance
  • Power unit
  • SOHC gasoline engines
  • DOHC gasoline engines
  • Diesel engines 1.7 and 2.0
  • Engine repair
  • Cooling system
  • Supply system
  • Injection system (gasoline)
  • Injection system (diesel)
  • Exhaust system
  • Charge and launch system
  • Ignition system (gasoline)
  • Preheat system (diesel)
  • Transmission
  • Manual gearbox
  • Automatic gearbox
  • Clutch
  • Drive shafts
  • Chassis
  • Brake system
  • Wheel suspension
  • Steering
  • Body
  • Exterior
  • Interior
  • Doors and windows
  • Ventilation and heating
  • Electrical equipment
  • Equipment and devices
  • Electrical circuits
Astra G (1998-2004, petrol) 
  • General information
  • User manual
  • Car care
  • Maintenance
  • Power unit
  • Single shaft engines
  • Twin shaft engines
  • Engine repair
  • Cooling and heating
  • Fuel and exhaust systems
  • Starting and charging system
  • Ignition system
  • Transmission
  • Clutch
  • Mechanical gearbox
  • Automatic gearbox
  • Drive shafts
  • Chassis
  • Brake system
  • Car suspension
  • Steering
  • Body
  • Interior
  • Exterior
  • Electrical equipment
  • Equipment and devices
  • Wiring diagrams Opel Astra
  • Wiring diagrams Opel Zafira
Astra F (1991-1998, petrol) 
  • General information
  • Maintenance
  • Power unit
  • Engine in car
  • Engine removed
  • Cooling system
  • Heating and ventilation
  • Fuel supply (carburetor)
  • Fuel supply (injector)
  • Emission control
  • Ignition system
  • Transmission
  • Clutch
  • Mechanical gearbox
  • Automatic gearbox
  • Drive shafts
  • Chassis
  • Brake system
  • Car suspension
  • Steering
  • Body
  • Exterior
  • Interior
  • Electrical equipment
  • Equipment and devices
  • Electrical circuits
OpelBook.ru © 2017–2026 · Mobile version · · Sitemap: EN BG BY UA RS HR RO PL SK HU · Feedback · Site search
Astra F, petrol · Astra G, petrol · Astra G · Astra H · Astra J, petrol · Corsa B · Corsa C, petrol · Corsa C · Insignia A · Kadett D · Kadett E · Omega A · Omega B · Omega B2 · Vectra A, petrol · Vectra A · Vectra B, petrol · Vectra B · Vectra C · Zafira A, petrol · Frontera A, petrol · Frontera B · Ascona C · Vivaro A ·
We want your visit to be comfortable 🤝! We use cookies 🍪 to make that happen.