


Contents: Removal ⬇ Installation ⬇
ATF Cooling System Hose Fittings (aF13 transmissions)
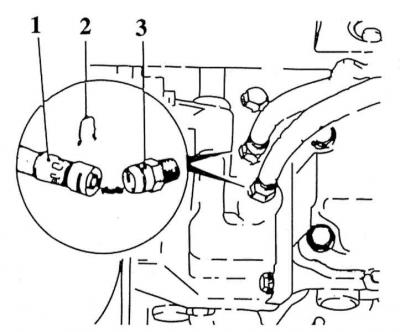
1 — Hose nipple connector
2 — Retainer
3 - Transmission connector nipple
ATF Cooling System Hose Fittings (aF17 and AF 20 transmissions)
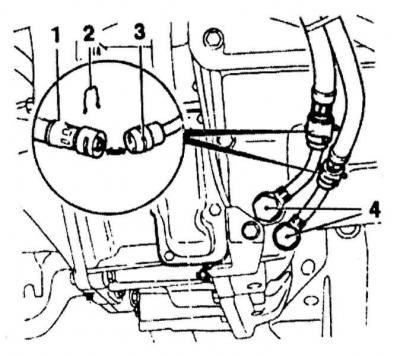
1 — Hose nipple connector
2 — Retainer
3 — The mating part of the nipple connector
4 — Transmission connector nipple
Removal
1. Support the rear wheels with wheel chocks, set the parking brake, move the selector lever to the "N" position, then jack up the front of the car and place it on supports. If equipped, remove the crankcase guard.
2. Drain the ATF (see Chapter Routine maintenance), then screw the drain plug back into its original place and tighten it to the required torque.
3. Remove the battery with the mounting tray (see Chapter Engine electrical equipment).
4. Remove the exhaust pipe, catalytic converter and the middle section of the exhaust system (see Chapter Power and exhaust systems).
5. Remove both drive shafts (see Chapter Clutch and drive shafts), - if you have not drained the ATF, get ready to collect it.
6. Having suspended the power unit from above on a crossbar laid across the engine compartment, remove the front subframe (see Chapter Suspension and steering).
7. Release the lock (if provided) and carefully disconnect the selector cable from the AT lever. Release the cable sheath from the support bracket and move the cable to the side.
8. Unscrew the fastening bolt and remove the measuring guide tube. Remove the sealing ring.
9. Follow the wiring harness from the transmission switches and sensors, release the clamps and disconnect the connectors. Release the wiring harnesses from all the provided intermediate clamps on the transmission case.
10. Loosen the mounting bolts and remove the electrical wiring support bracket.
11. If equipped, disconnect the breather hose from the top of the transmission case.
12. Remove the air cleaner with the air intake ducts (see Chapter Power and exhaust systems).
13. Support the transmission with a trolley jack (to distribute the load, place a wooden block between the jack head and the transmission housing).
Material taken from an internet portal: www.opelbook.ru
14. Remove the three bolts securing the right powertrain suspension support to the bracket at the end of the cylinder block.
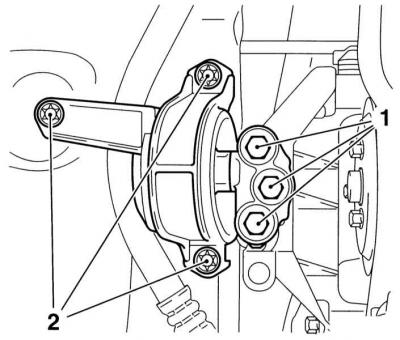
15. Unscrew five or six bolts securing the left suspension support to the AT housing.
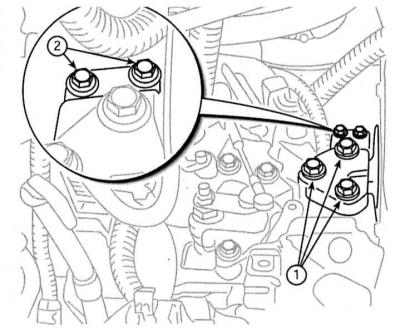
16. After marking, disconnect the ATF cooling hoses from the front of the transmission case (release the clips by prying them up with a screwdriver) (see illustration ATF Cooling System Hose Fittings (aF13 transmissions) or ATF Cooling System Hose Fittings (aF17 and AF 20 transmissions)). Put the clamps back in place and remove the sealing rings - the rings must be replaced without fail. Immediately plug the open ends of the hoses and fittings to prevent dirt from getting into the system.
17. Remove the two mounting bolts and remove the front powertrain suspension support assembly.
18. Using a hoist and jack, lower the power unit by approximately 50 mm, being careful not to allow the communication lines running under the transmission to be pinched.
19. In order to provide access to the torque converter mounting bolts, remove the rubber plugs from the pan flange. Turn the torque converter by the crankshaft pulley bolt and unscrew all the bolts that mount it to the drive disk one by one.
20. To prevent the torque converter from slipping off the shaft and falling during transmission removal, move it further into the assembly.
21. Support the entire weight of the transmission on the jack, then remove the upper and lower transmission-to-engine mounting bolts, making sure to note the location of the bolts and the mounting brackets they secure.
On models equipped with AF13 and AF17 transmissions, do not confuse the transmission mounting bolts with the two bolts that secure the engine oil pan to the transmission. Again, make sure all communication lines are disconnected and nothing interferes with transmission removal.
22. Once all the bolts are removed, move the jack and separate the transmission from the engine, completely removing it from the guide bushings. Lower the jack and remove the transmission from under the car, being careful not to drop the torque converter. If the bushings are loose in their sockets, remove them and put them in a safe place.
Installation
New torque converter to drive plate mounting bolts and new ATF cooler line fitting O-rings will be required.
Installation is performed in the reverse order of dismantling the components. Please note the following points.
1. Before installation, run a tap through the threaded holes of the torque converter, completely removing traces of corrosion and old sealant from their threads (instead of a tap, you can use an old bolt of the appropriate size, after making a longitudinal cut in it).
2. Make sure that the guide bushings are in place and lubricate the torque converter guide pin and the centering bushing on the crankshaft journal with molybdenum-containing grease.
3. Make sure the transmission is installed correctly on the engine, tighten all fasteners to the required force.
4. Do not forget to replace the bolts that secure the torque converter to the drive disk - at the first stage, the bolts are tightened by hand, then (in a diagonal order in several steps, evenly with the required force).
5. Do not forget to replace the drive shaft seals (see Chapter Clutch and drive shafts).
6. Replace the sealing rings of the ATF cooling system line nipples, check the reliability of the tube fastening;
7. Be sure to replace the sealing element of the ATF dipstick guide tube.
8. Finally, fill the transmission with the required amount of fresh ATF (see Chapter Routine maintenance) and adjust the selector cable (see Adjusting the gear selection mechanism).
Visitor comments