


The internal axle bolts of the lever mounting must be replaced without fail.
Removal
1. Set the parking brake, jack up the front of the vehicle and place it on stands. Remove the corresponding front wheel.
2. Loosen the clamp bolt securing the lower ball joint pin to the steering knuckle - try to remember the installation position of the bolt.
3. Press the lower arm down, release the support pin from the knuckle, then carefully release the arm - try not to damage the ball joint boot (if necessary, cover it with a piece of cardboard or plastic).
If the finger is tightly clamped in the clamp, spread the lock of the latter with a chisel or a large screwdriver.
4. Please note that the inner axle bolts of the lever should be installed with their heads facing forward on the vehicle. Unscrew the bolts and remove the lever - if necessary, pry the lever with a crowbar to overcome the resistance force developed by the rubber-metal hinges.
Article published on the website [OpelBook.ru]
Repair
1. If necessary, replace the lower ball joint (see Replacing the lower ball joint). The rubber-metal bushings are fitted with tension and can be pressed out if necessary - if there is no press at hand, the bushings can be removed using a bolt, nut, washers and a replaceable socket head or by cutting a metal pipe of a suitable diameter.
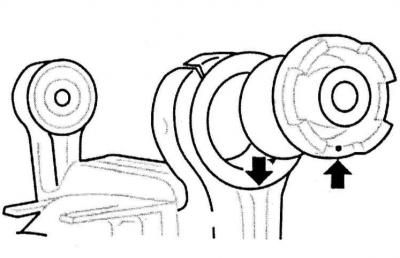
2. Before installing new bushings, lubricate them with silicone grease or a solution of soapy water. Press the bushings into the lever until they stop - when installing the rear bushing, make sure that one of its cutouts is located opposite the edge of the lever assembly.
Installation
1. Install the lower arm onto the subframe and screw in new bolts from the front, tightening them only by hand for now.
2. Place the ball joint pin into the clamp until it stops, screw in the clamp tightening bolt (head first into the car) and tighten it to the required torque.
3. Install the front wheel and lower the vehicle to the ground.
4. Now that the weight of the vehicle is fully transferred to the suspension, tighten the inner control arm mounting bolts to the required torque.
5. Take the vehicle to a specialist workshop to have the front wheel alignment checked and adjusted.
Visitor comments