OpelBook.ru
Cars AvtoVAZ Cars Mitsubishi Cars BMW Cars Mercedes Cars Nissan Cars Toyota Cars Chevrolet
English Русский
Български
Беларускі
Український
Српски
Hrvatski
Română
Polski
Slovenský
Magyar
 |  Sitemap  |  Contacts  |    


Main Astra Corsa Insignia Kadett Omega Vectra Zafira Others Articles
Astra F (1991-1998, petrol) Astra G (1998-2004, petrol) Astra G (1998-2004) Astra H (2004-2009) Astra J (2009-2015, petrol)
  • Main
  • Astra
  • Astra F
  • Power unit
  • Ignition system
  • Ignition distributor (carburetor) — removal, repair and installation

Ignition distributor (carburetor) — removal, repair and installation (Opel Astra F)

            0

Contents: Removal ⬇ Repair ⬇ Installation ⬇

Removal


Disconnect the negative battery terminal.

If necessary, note the exact location of each high voltage wire for subsequent installation, then disconnect the wires from the spark plugs (you can't pull the wires, pull the connectors). Disconnect the high voltage wire from the coil in the same way. Separate the wires from the clamps on the camshaft cover.

Release the two clamps with a screwdriver and remove the distributor cap together with the high voltage wires from the distributor.

Disconnect the distributor plug (Fig. 5.1).
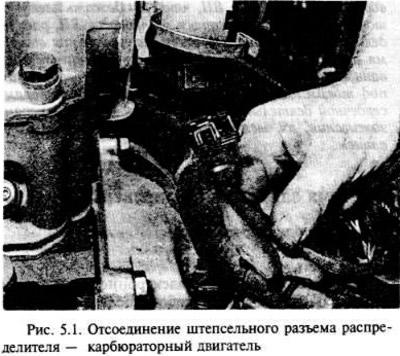
Disconnect the distributor plug (Fig. 5.1).


Disconnect the vacuum hose from the diaphragm assembly on the distributor side.

If you need to install the old distributor, make marks to align them between the distributor housing and the camshaft housing so that the distributor can be installed in the old place.

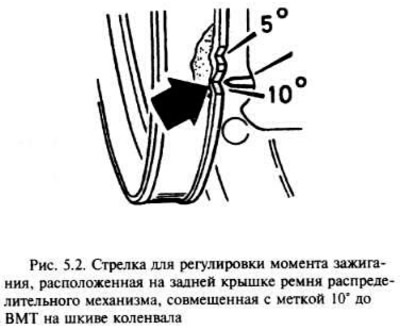
Using the appropriate key and crankshaft pulley bolt, or by engaging the highest gear (manual transmission) and pushing the car back or forward (with the handbrake released), turn the crankshaft to bring piston No.1 to the ignition point. Piston No.1 is at the ignition point if:


  • a) the ignition timing indicator arrow on the rear cover of the timing belt is aligned with the 10° BTDC mark located on the crankshaft pulley (Fig. 5.2);
  • b) the end of the rotating cam indicates the position occupied by the terminal of the high-tension wire to cylinder No.1 in the distributor cap;
  • c) the rotating cam is aligned with the mark on the distributor body (remove the lever and plastic screen, then install the lever to check the alignment with the mark) (Fig. 5.3).
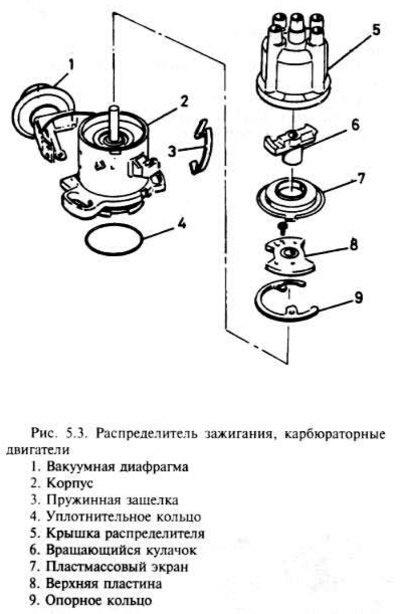
c) the rotating cam is aligned with the mark on the distributor body (remove the lever and plastic…


c) the rotating cam is aligned with the mark on the distributor body (remove the lever and plastic…


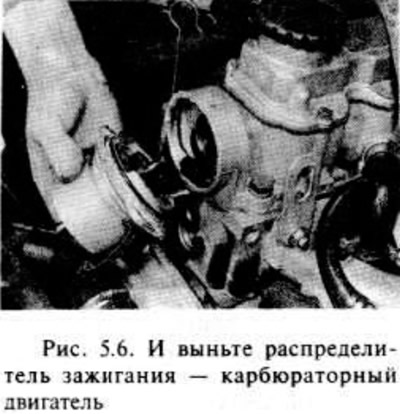
Loosen the nut and remove the clamp plate, then remove the distributor from the camshaft housing (fig. 5.4. 5.5. 5.6).
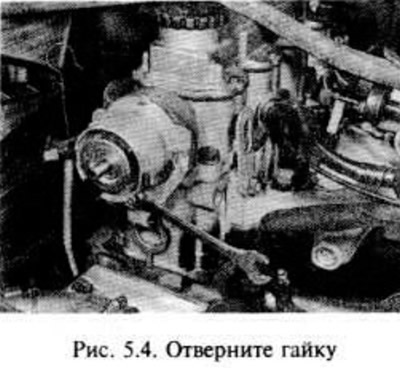
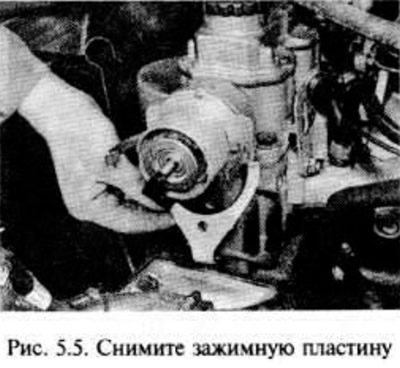
Loosen the nut and remove the clamp plate, then remove the distributor from the camshaft housing…


Loosen the nut and remove the clamp plate, then remove the distributor from the camshaft housing…


Loosen the nut and remove the clamp plate, then remove the distributor from the camshaft housing…


Repair


After removing the distributor, remove the lever and plastic screen.

Although the top support plate can be removed by unscrewing two screws, this is for educational purposes only, and replacement parts are not available for sale.

If desired, the vacuum diaphragm assembly can be removed by removing the two screws and disconnecting the lever from the base of the distributor plate.

The vacuum unit can be tested by sucking through the vacuum port. Turn off the vacuum and check if the operating rod returns to its original position. If not, replace the vacuum unit.

Check the distributor cap for corrosion and scale formation, indicated by a thin black line between the segments. Make sure the carbon brush in the center of the cap moves freely and the surface of the cap is clean. Replace the cap if necessary.

[Material was taken from a resource Opelbook.ru]

If the metal part of the rotating cam is badly burnt or does not fit tightly, replace it. If it is slightly corroded or burnt, it can be cleaned with a velvet file.

Check the sealing ring located on the rear of the distributor housing and replace it if necessary.

Reassembly is done in the reverse order of disassembly, making sure that the vacuum device operating lever engages the pin on the main plate, which may take several attempts.

Installation


Begin installation by checking that the piston in cylinder #1 is still at the firing point. The corresponding timing marks should be aligned. If the engine was cranked while the distributor was removed, check the piston position in cylinder #1 and make sure it is at the firing point by removing the spark plug and pressing your finger against the spark plug hole. Turn the crankshaft until you feel compression (pressure), which indicates that piston #1 is rising on the compression stroke. Continue cranking the crankshaft until the corresponding timing marks are aligned.


Rotate the rotating cam to the position specified in line (c) of the item in this subsection "Rotating cam..." and hold it there while installing the distributor, ensuring that the distributor drive shaft engages with the camshaft. If installing the same distributor, align the marks on the distributor housing and the camshaft housing.

Install the clamp plate and nut, but do not tighten it fully at this stage.

Remove the rotating cam, then install the plastic screen and lever.

Connect the vacuum tube to the diaphragm assembly.

Connect the distributor plug.

Install the distributor cap, checking that the high voltage wires are connected correctly.

Connect the negative battery terminal.

Check and, if necessary, adjust the ignition timing.


This article is available at russian, bulgarian, belarusian, ukrainian, serbian, croatian, romanian, polish, slovak, hungarian
Checking the article: Trifonova Emilia

Share information:

Previous articles
Opel Astra F: Ignition system
Next articles

Ignition system of injection engines — check
Ignition system of carburetor engines — check
General information and warnings
Technical specifications
Ignition distributor (injector 1.4 and 1.6 l) — removal, repair and installation
Ignition distributor (injector 1.8 and 2.0 l) — removal, repair and installation
Ignition coil — removal, inspection and installation
Coil Booster Module — Removal and Installation


See similar ones from other Opel car manuals:
▶ Removal and installation the ignition distributor (engine… Opel Corsa B (1993-2000)
▶ Ignition system of a carburetor engine Opel Kadett E (1984-1995)
▶ Ignition system — carburetor models 1.8 liters Opel Omega A (1986-1993)
▶ Removal and installation the ignition distributor Opel Vectra A (1988-1995)
▶ Introduction to the operation and repair manual Insignia A Opel Insignia A (2008-2017)
Link to this page in different formats

Visitor comments


No comments yet


How much will 41 + 36 =


Astra J (2009-2015, petrol) 
  • General information
  • Vehicle device
  • User manual
  • Faults en route
  • Maintenance
  • Power unit
  • Engine repair
  • Cooling and lubrication system
  • Engine power system
  • Exhaust system
  • Transmission
  • Clutch
  • Car gearbox
  • Drive shafts
  • Chassis
  • Front suspension
  • Rear suspension
  • Steering
  • Brake system
  • Wheels and tires
  • Body
  • Exterior
  • Interior
  • Doors and windows
  • Body Care
  • Heating and air conditioning
  • Security systems
  • Electrical equipment
  • Equipment and devices
  • Lighting and signaling
  • Power devices
  • Electrical circuits
Astra H (2004-2009) 
  • General information
  • Introduction to the guide
  • Troubleshooting
  • User manual
  • Maintenance
  • Power unit
  • Engine repair
  • Cooling and heating
  • Power and exhaust system
  • Ignition system
  • Launch and charge system
  • Transmission
  • Mechanical gearbox
  • Automatic gearbox
  • Drive shafts
  • Chassis
  • Brake system
  • Car suspension
  • Steering
  • Body
  • Interior
  • Exterior
  • Electrical equipment
  • Equipment and devices
  • Electrical circuits
Astra G (1998-2004) 
  • General information
  • Introduction to manual
  • User manual
  • Maintenance
  • Power unit
  • SOHC gasoline engines
  • DOHC gasoline engines
  • Diesel engines 1.7 and 2.0
  • Engine repair
  • Cooling system
  • Supply system
  • Injection system (gasoline)
  • Injection system (diesel)
  • Exhaust system
  • Charge and launch system
  • Ignition system (gasoline)
  • Preheat system (diesel)
  • Transmission
  • Manual gearbox
  • Automatic gearbox
  • Clutch
  • Drive shafts
  • Chassis
  • Brake system
  • Wheel suspension
  • Steering
  • Body
  • Exterior
  • Interior
  • Doors and windows
  • Ventilation and heating
  • Electrical equipment
  • Equipment and devices
  • Electrical circuits
Astra G (1998-2004, petrol) 
  • General information
  • User manual
  • Car care
  • Maintenance
  • Power unit
  • Single shaft engines
  • Twin shaft engines
  • Engine repair
  • Cooling and heating
  • Fuel and exhaust systems
  • Starting and charging system
  • Ignition system
  • Transmission
  • Clutch
  • Mechanical gearbox
  • Automatic gearbox
  • Drive shafts
  • Chassis
  • Brake system
  • Car suspension
  • Steering
  • Body
  • Interior
  • Exterior
  • Electrical equipment
  • Equipment and devices
  • Wiring diagrams Opel Astra
  • Wiring diagrams Opel Zafira
Astra F (1991-1998, petrol) 
  • General information
  • Maintenance
  • Power unit
  • Engine in car
  • Engine removed
  • Cooling system
  • Heating and ventilation
  • Fuel supply (carburetor)
  • Fuel supply (injector)
  • Emission control
  • Ignition system
  • Transmission
  • Clutch
  • Mechanical gearbox
  • Automatic gearbox
  • Drive shafts
  • Chassis
  • Brake system
  • Car suspension
  • Steering
  • Body
  • Exterior
  • Interior
  • Electrical equipment
  • Equipment and devices
  • Electrical circuits
OpelBook.ru © 2017–2026 · Mobile version · · Sitemap: EN BG BY UA RS HR RO PL SK HU · Feedback · Site search
Astra F, petrol · Astra G, petrol · Astra G · Astra H · Astra J, petrol · Corsa B · Corsa C, petrol · Corsa C · Insignia A · Kadett D · Kadett E · Omega A · Omega B · Omega B2 · Vectra A, petrol · Vectra A · Vectra B, petrol · Vectra B · Vectra C · Zafira A, petrol · Frontera A, petrol · Frontera B · Ascona C · Vivaro A ·
We want your visit to be comfortable 🤝! We use cookies 🍪 to make that happen.