
Interior door handle
Remove the interior door trim panel.
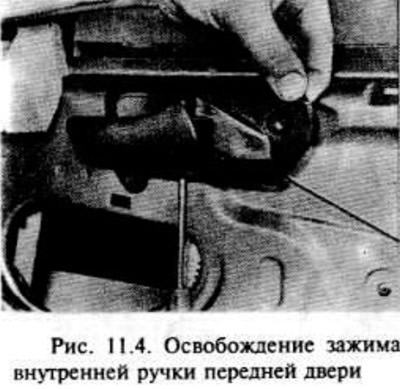
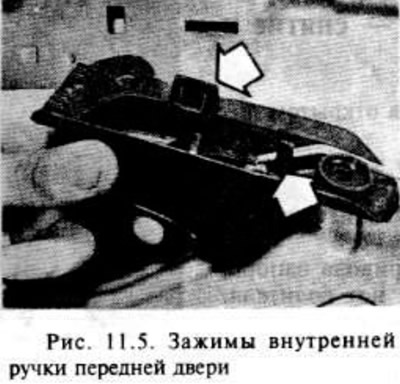
Using a screwdriver, carefully release the clips and pull the handle assembly out of the door, disconnect the leash and remove the assembly (pic. 11.4, 11.5).
Installation is carried out in the reverse order of removal, however, it is necessary to check the operation of the mechanism before installing the inner door trim.
External front door handle
Remove the door interior trim panel and pull back the plastic sheet to access the handle.
Loosen the two nuts securing the outer door handle (pic. 11.6).
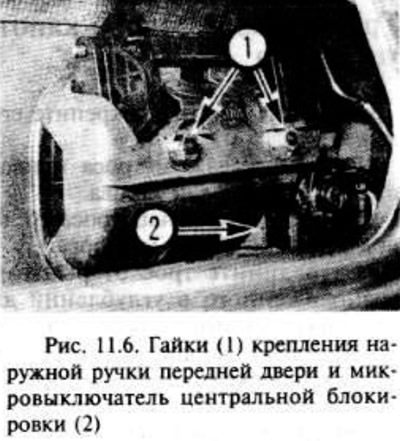
If required, disconnect the central locking microswitch clip from the trailing edge of the outer handle assembly.
Disconnect the two lower clips, then carefully pry out the outer plastic section of the outer door handle assembly and disconnect the drive.
Pull out the inner section of the outer handle assembly from the inside of the door and disconnect the lock cylinder linkage linkage.
Installation is in the reverse order of removal, however, it is necessary to check the operation of the mechanism before installing the inner door panel, then install the trim panel.
Tailgate Outside Handle - Sedan and Hatchback Models
Remove the inner panel and slide out the plastic sheet to access the handle.
Remove the insulating gaskets from the inner and outer edges of the window opening.
Loosen the top rear window rail mounting bolt, which can be reached near the trailing edge of the window opening.
Unscrew the lower bolt of the rear window guide with a Torx wrench, then remove the guide from the door.
Remove the two nuts securing the outer door handle.
Remove the two bottom clips, then carefully pry the outside door handle assembly from the outside of the door and disconnect the linkage linkage.
Installation is carried out in the reverse order of disassembly, with a check of the operation of the assembly before placing the finishing panel in place.
Station wagon rear door exterior handle
Remove the interior door trim panel and move the plastic sheet aside to access the handle.
Remove the two screws securing the outside handle to the door.
Release the two lower clips, then carefully pull out the outer handle assembly and disconnect the linkage linkage.
Installation is carried out in the reverse order of disassembly, with the operation of the assembly checked before being placed on the finishing panel sheet.
Front door lock
Remove the interior trim panel of the door and set aside the plastic sheet from the rear edge of the door.
Loosen the rear window guide bolt at the rear edge of the door, then carefully pry the guide out through the lower door opening.
Where required, disconnect the plastic cover clip from the lock through the doorway.
Working through the window opening of the door, disconnect the three links of the lever mechanism from the lock.
On models with central locking, disconnect the negative battery terminal, then through the doorway, disconnect the connector from the central locking motor.
Remove the three Tox screws securing the lock to the rear edge of the door, then carefully remove the lock assembly (together with lock rod and central locking motor where required) near the power window mechanism out through the lower doorway.
Installation is in the reverse order of removal, however, the operation of the door lock, handle and power window mechanism must be checked before installing the door trim panel. Please note that the linkage linkage of the outer handle can be adjusted using the knurled plastic adjusting wheel. located at the end of the rod.
Tailgate Lock - Sedan and Hatchback Models
Lower the window completely, then remove the door inner lining and plastic sheet.
Remove the gaskets from the inner and outer edges of the window opening.
Loosen the upper window rail retaining bolt near the trailing edge of the window opening.
Loosen the clamp bolt from the inside (Togh type) securing the lower window rail, then remove the rail from the door.
Through the doorway, remove, where required, the clips of the plastic cover from the lock.
Working through the door opening, disconnect the drive links from the lock assembly.
On models with central locking, disconnect the negative battery terminal and the central locking motor connector.
Remove the three Tox type screws that secure the lock to the bottom edge of the door, then remove the lock assembly (together with lock button actuator rod and central locking motor where required) near the power window mechanism to the outside through the lower door opening.
The installation of the rear door lock is carried out in the reverse order of removal, with a check of its operation.
Tailgate Lock - Estate Models
Lower the window completely, then remove the door inner lining and plastic sheet.
At the top of the window opening, remove the two rear screws securing the top rear window rail.
At the bottom of the window opening, remove the screw that secures the lower rear window guide, then the clamping bolt and guide nut, and pull it up through the window opening.
Further, the order of work is as indicated in the four paragraphs above, starting with the words "Through the doorway..." in the previous subsection.
The lock is installed in the reverse order of removal.
Front door lock cylinder
Remove the outside door handle as described earlier in this section.
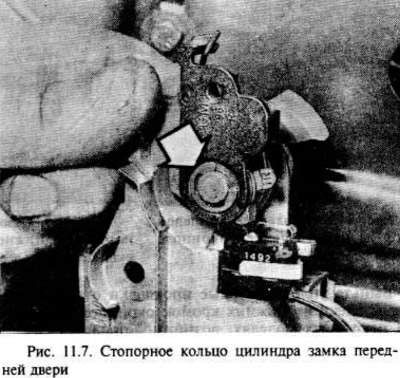
Insert the key into the lock, then remove the snap ring from the end of the lock cylinder (pic. 11.7).
Remove the lock cylinder with the key and the lever mechanism.
Installation is in the reverse order of removal, however it is necessary to check the operation of the door lock, handle and power window before installing the door lining.
Lock latch
Before removing the latch, mark its position so that you can then accurately put it in its original place.
To remove the latch, you just need to unscrew the screw with a socket wrench.
Installation is carried out in the reverse order of removal, however, it is necessary to adjust the position of the latch for normal closing of the door.
Visitor comments