
Corsa C models
Removal and installation
1. Set the rotary switch for outdoor lighting to position «ABOUT» (see chapter «Controls and methods of operation», Section 17) and turn off the ignition. Disconnect the battery (see chapter 5).
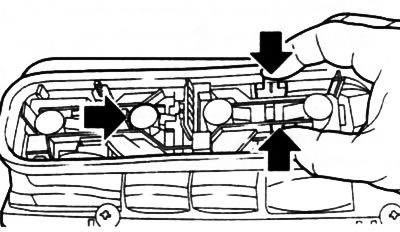
2. Open the tailgate and remove the 2 screws securing the corresponding rear light (see resist. illustration).
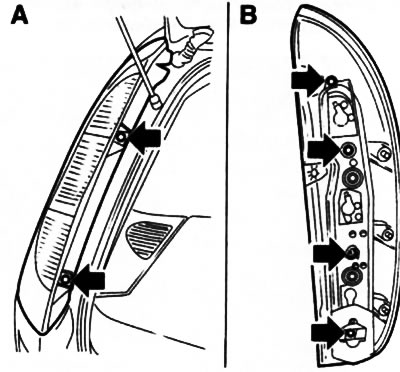
17.2. Mounting screws (indicated by arrows) rear combination lamp (A) and lamp holder (IN) (Corsa C models)
3. Remove the rear combination lamp by pulling the guides out of the sockets of the mounting clips (see resist. illustration), then use a screwdriver to disconnect the wiring connector on the back of the lamp.
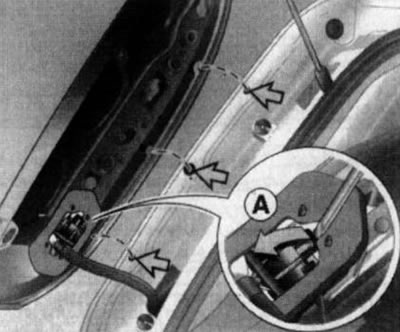
17.3. nests (indicated by arrows) mounting clips (Corsa C models) - inset A shows how to disconnect the wiring connector
4. Installation is carried out in the reverse order. Check the lamps for proper operation.
Lamp replacement
5. Remove the tail light (see above). 6 Remove the 4 fixing screws (arrows B) (see illustration 17.2) and remove the bulb holder from the rear combination lamp housing.
7. Slightly pushing in the corresponding lamp, turn it counterclockwise and remove it from the socket.
8. Installation is carried out in the reverse order.
Corsa Combo models
Removal and installation
9. Set the rotary switch for outdoor lighting to position «ABOUT» (see chapter «Controls and methods of operation», Section 17) and turn off the ignition. Disconnect the battery (see chapter 5).
10. Open the tailgate and, having pressed 2 latches, remove the service cover from the trim of the corresponding sidewall of the luggage compartment (see resist. illustration).
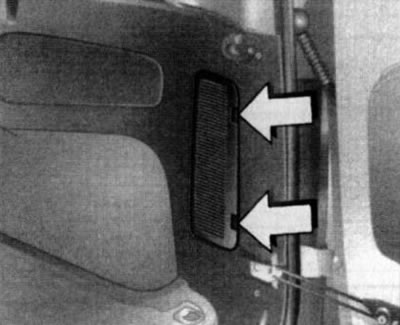
17.10. Fasteners (indicated by arrows) service cover on the side of the luggage compartment (Corsa Combo models)
11. Disunite a socket of an electroconducting of the back combined lantern (see resist. illustration). While holding the lantern from the outside, loosen the 2 nuts and remove the lantern assembly.
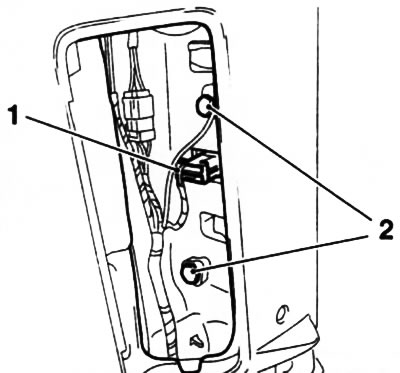
17.11. nuts (2) attaching the rear combination lamp to the side of the luggage compartment (Corsa Combo models): 1. Wiring connector
12. Installation is carried out in the reverse order.
Lamp replacement
13. Remove the tail light (see above).
14. Squeeze the tabs (see resist. illustration) and pull the bulb holder out of the rear combination lamp housing.
17.14. Fasteners (indicated by arrows) rear combination lamp holder (Corsa Combo models)
15. Slightly pushing in the corresponding lamp, turn it counterclockwise and remove it from the socket.
16. Installation is carried out in the reverse order. Check the lamps for proper operation.
Meriva Models
Removal and installation
17. Set the rotary switch for outdoor lighting to position «0» (see chapter «Controls and methods of operation», Section 17) and turn off the ignition. Disconnect the battery (see chapter 5).
18. Open the tailgate, remove the 4 screws securing the corresponding rear light (see resist. illustration) and remove the rear combination lamp together with the mounting panel.
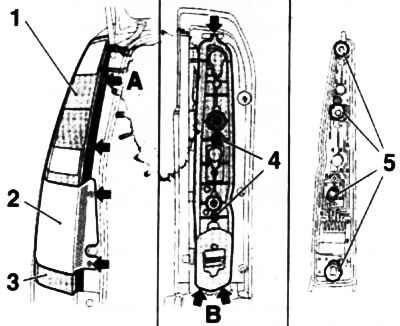
17.18. screws (arrows A) rear combination lamp mounts (1) (Meriva models): 2. Mounting panel; 3. Foggy lantern; 4. Screws for fastening the lamp holder; 5. Lamps; B. Lamp holder clips
19. Disconnect the wiring connector from the back of the lamp.
20. Installation is made in an order, the return to an order of removal. Check the lamps for proper operation.
Lamp replacement
21. Remove the rear combination lamp (see above).
22. Turn out 2 fixing screws, wring out the bottom and top clamps of fastening of the holder of lamps (see illustration 17.18) and remove the bulb holder from the rear combination lamp housing.
23. Slightly press the failed lamp into the cartridge, turn it counterclockwise and remove it from the cartridge.
24. To replace the fog lamp bulb, turn the corresponding bulb holder counterclockwise and remove it from the mounting socket (see resist. illustration). Slightly pressing the lamp, turn it counterclockwise and remove it from the socket.
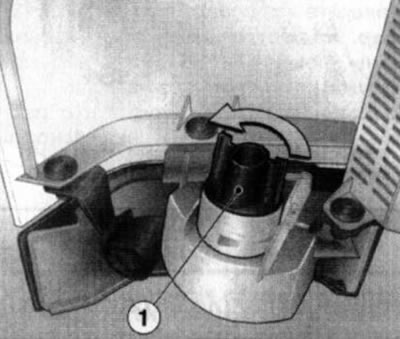
17.24. Cartridge (1) fog lantern llamas (Meriva models)
25. Installation is carried out in the reverse order. Check the lamps for proper operation.
Visitor comments