OpelBook.ru
Cars AvtoVAZ Cars Mitsubishi Cars BMW Cars Mercedes Cars Nissan Cars Toyota Cars Chevrolet
English Русский
Български
Беларускі
Український
Српски
Hrvatski
Română
Polski
Slovenský
Magyar
 |  Sitemap  |  Contacts  |    


Main Astra Corsa Insignia Kadett Omega Vectra Zafira Others Articles
Astra F (1991-1998, petrol) Astra G (1998-2004, petrol) Astra G (1998-2004) Astra H (2004-2009) Astra J (2009-2015, petrol)
  • Main
  • Astra
  • Astra J
  • Power unit
  • Engine power system
  • Removal and installation the throttle assembly

Removal and installation the throttle assembly (Opel Astra J)

            0

Signs of an incompletely closing throttle valve may include increased crankshaft speed at idle and fuel consumption; when the valve does not open completely, the engine does not develop full power, is not responsive enough, and jerks and dips are observed in its operation when the car is moving. Contamination of the throttle valve with deposits from crankcase gases usually leads to unstable engine operation at idle. The throttle valve drive is electric, controlled by the electronic unit of the engine management system. Qualified personnel and special equipment are required to repair the electric drive. Therefore, in case of these malfunctions, first try to flush the throttle valve (for example, with a solvent or a special carburetor cleaner in an aerosol can). If this does not produce a positive result, replace the throttle assembly.

You will need: 7 mm wrenches, TORX T30, pliers.

1. Disconnect the wire from the negative terminal of the battery.

2. Drain the fluid from the engine cooling system (see Replacing the coolant).

Note. If you have some experience, you don't have to drain the coolant. Prepare plugs of the appropriate size and plug the hoses immediately after disconnecting them. The loss of coolant with this method will be insignificant.


Note. If you have some experience, you don't have to drain the coolant. Prepare plugs of the…


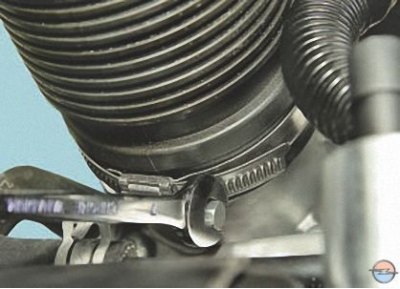
3. Loosen the air supply hose clamp…


3. Loosen the air supply hose clamp…


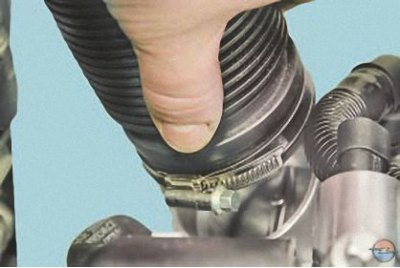
4. …and remove the sleeve from the throttle body neck.

4. …and remove the sleeve from the throttle body neck.


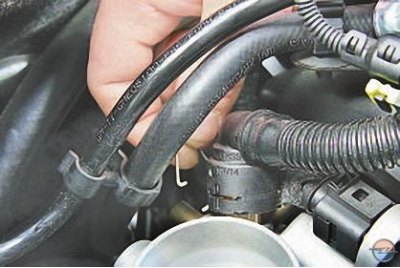
5. Remove the spring retainer from the engine crankcase ventilation hose tip…

5. Remove the spring retainer from the engine crankcase ventilation hose tip…


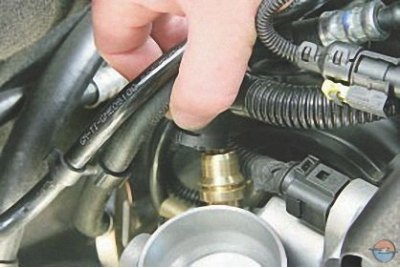
6. …and disconnect the hose from the throttle body fitting.

6. …and disconnect the hose from the throttle body fitting.


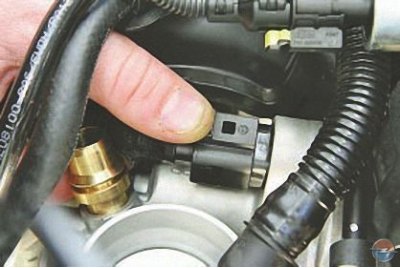
7. Squeeze the wiring harness connector clips…


7. Squeeze the wiring harness connector clips…


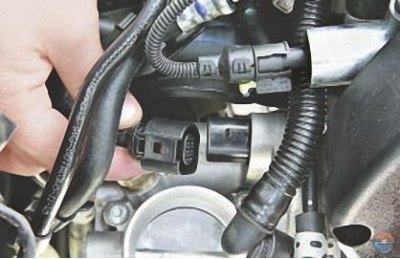
8. …and disconnect the block from the throttle assembly.
8. …and disconnect the block from the throttle assembly.


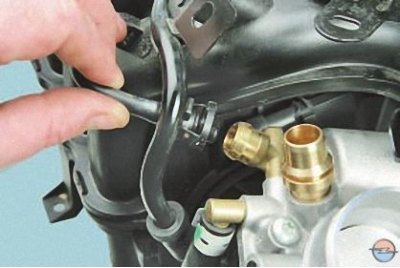
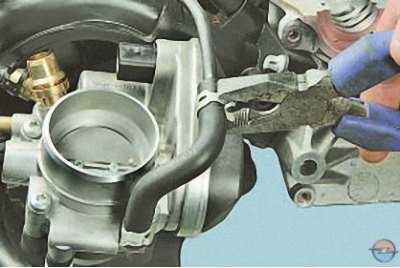
9. Loosen the coolant drain hose clamp…

Note: For clarity, the work here and below is shown on a removed cylinder head.


Note: For clarity, the work here and below is shown on a removed cylinder head.


10. …and disconnect the hose from the intermediate tube
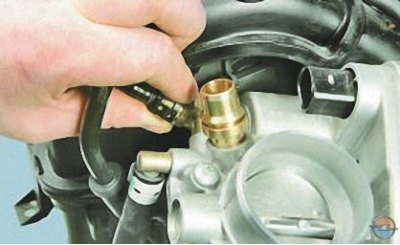
10. …and disconnect the hose from the intermediate tube


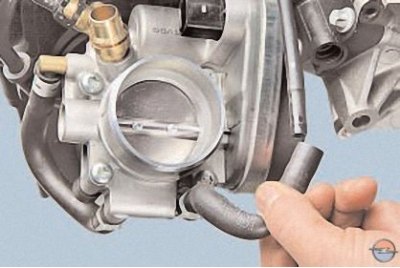
11. Squeeze the coolant supply hose tip retainer…


11. Squeeze the coolant supply hose tip retainer…


12. …and disconnect the hose from the throttle body fitting.

Note: If you have not drained the cooling system, immediately plug the hoses with pre-prepared plugs or bolts of the appropriate size to avoid fluid loss.


Note: If you have not drained the cooling system, immediately plug the hoses with pre-prepared…


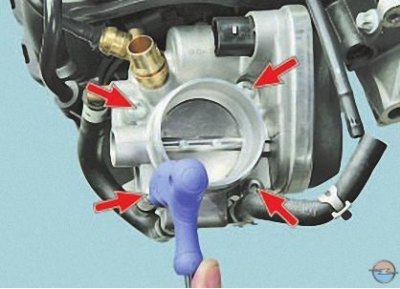
13. Remove the four bolts securing the throttle assembly to the intake manifold…

13. Remove the four bolts securing the throttle assembly to the intake manifold…


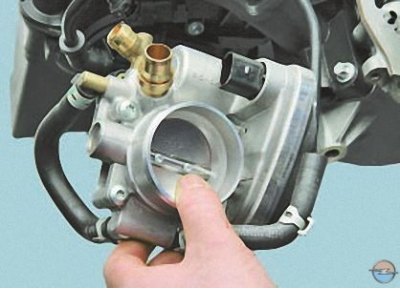
14. …remove the throttle assembly…


14. …remove the throttle assembly…


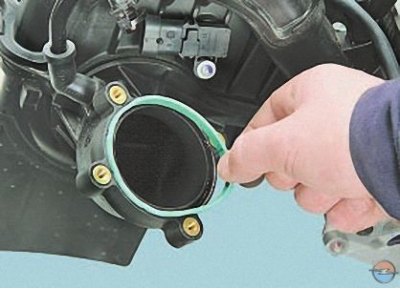
15. …and a sealing ring installed under its flange.

15. …and a sealing ring installed under its flange.


Note: Replace the throttle body flange sealing ring each time the connection is disassembled.


16. If the throttle assembly was not removed for replacement, clean the contaminated throttle assembly with carburetor cleaning fluid.

17. Remove oil and other contaminants from the cavity of the intake pipe.

18. Install the throttle assembly in the reverse order of removal.


This article is available at russian, bulgarian, belarusian, ukrainian, serbian, croatian, romanian, polish, slovak, hungarian
Checking the article: Trifonova Emilia

Share information:

Previous articles
Opel Astra J: Engine power system
Next articles

Removal, inspection and installation of injectors
Removal and installation the fuel rail
Replacing the fuel tank and its filler pipe
Removal, repair and installation of the fuel pump
Removal and installation the air filter, air duct and muffler
Replacing the air filter element
Removal and installation the throttle pedal


See similar ones from other Opel car manuals:
▶ Replacing and adjusting the throttle cable Opel Corsa B (1993-2000)
▶ Adjusting the starting clearance of the carburetor throttle… Opel Kadett E (1984-1995)
▶ Lubrication of the throttle lever rod — every 15,000 km Opel Omega A (1986-1993)
▶ Throttle linkage maintenance Opel Vectra A (1988-1995, petrol)
▶ Throttle assembly — removal, gasket replacement and… Opel Zafira A (1999-2005, petrol)
Link to this page in different formats

Visitor comments


No comments yet


How much will 27 + 41 =


Astra J (2009-2015, petrol) 
  • General information
  • Vehicle device
  • User manual
  • Faults en route
  • Maintenance
  • Power unit
  • Engine repair
  • Cooling and lubrication system
  • Engine power system
  • Exhaust system
  • Transmission
  • Clutch
  • Car gearbox
  • Drive shafts
  • Chassis
  • Front suspension
  • Rear suspension
  • Steering
  • Brake system
  • Wheels and tires
  • Body
  • Exterior
  • Interior
  • Doors and windows
  • Body Care
  • Heating and air conditioning
  • Security systems
  • Electrical equipment
  • Equipment and devices
  • Lighting and signaling
  • Power devices
  • Electrical circuits
Astra H (2004-2009) 
  • General information
  • Introduction to the guide
  • Troubleshooting
  • User manual
  • Maintenance
  • Power unit
  • Engine repair
  • Cooling and heating
  • Power and exhaust system
  • Ignition system
  • Launch and charge system
  • Transmission
  • Mechanical gearbox
  • Automatic gearbox
  • Drive shafts
  • Chassis
  • Brake system
  • Car suspension
  • Steering
  • Body
  • Interior
  • Exterior
  • Electrical equipment
  • Equipment and devices
  • Electrical circuits
Astra G (1998-2004) 
  • General information
  • Introduction to manual
  • User manual
  • Maintenance
  • Power unit
  • SOHC gasoline engines
  • DOHC gasoline engines
  • Diesel engines 1.7 and 2.0
  • Engine repair
  • Cooling system
  • Supply system
  • Injection system (gasoline)
  • Injection system (diesel)
  • Exhaust system
  • Charge and launch system
  • Ignition system (gasoline)
  • Preheat system (diesel)
  • Transmission
  • Manual gearbox
  • Automatic gearbox
  • Clutch
  • Drive shafts
  • Chassis
  • Brake system
  • Wheel suspension
  • Steering
  • Body
  • Exterior
  • Interior
  • Doors and windows
  • Ventilation and heating
  • Electrical equipment
  • Equipment and devices
  • Electrical circuits
Astra G (1998-2004, petrol) 
  • General information
  • User manual
  • Car care
  • Maintenance
  • Power unit
  • Single shaft engines
  • Twin shaft engines
  • Engine repair
  • Cooling and heating
  • Fuel and exhaust systems
  • Starting and charging system
  • Ignition system
  • Transmission
  • Clutch
  • Mechanical gearbox
  • Automatic gearbox
  • Drive shafts
  • Chassis
  • Brake system
  • Car suspension
  • Steering
  • Body
  • Interior
  • Exterior
  • Electrical equipment
  • Equipment and devices
  • Wiring diagrams Opel Astra
  • Wiring diagrams Opel Zafira
Astra F (1991-1998, petrol) 
  • General information
  • Maintenance
  • Power unit
  • Engine in car
  • Engine removed
  • Cooling system
  • Heating and ventilation
  • Fuel supply (carburetor)
  • Fuel supply (injector)
  • Emission control
  • Ignition system
  • Transmission
  • Clutch
  • Mechanical gearbox
  • Automatic gearbox
  • Drive shafts
  • Chassis
  • Brake system
  • Car suspension
  • Steering
  • Body
  • Exterior
  • Interior
  • Electrical equipment
  • Equipment and devices
  • Electrical circuits
OpelBook.ru © 2017–2026 · Mobile version · · Sitemap: EN BG BY UA RS HR RO PL SK HU · Feedback · Site search
Astra F, petrol · Astra G, petrol · Astra G · Astra H · Astra J, petrol · Corsa B · Corsa C, petrol · Corsa C · Insignia A · Kadett D · Kadett E · Omega A · Omega B · Omega B2 · Vectra A, petrol · Vectra A · Vectra B, petrol · Vectra B · Vectra C · Zafira A, petrol · Frontera A, petrol · Frontera B · Ascona C · Vivaro A ·
We want your visit to be comfortable 🤝! We use cookies 🍪 to make that happen.