
OpelBook.ru
Cars AvtoVAZ Cars Mitsubishi Cars BMW Cars Mercedes Cars Nissan Cars Toyota Cars Chevrolet
English Русский
Български
Беларускі
Український
Српски
Hrvatski
Română
Polski
Slovenský
Magyar
 |  Sitemap  |  Contacts  |    


Main Astra Corsa Insignia Kadett Omega Vectra Zafira Others Articles
Omega A (1986-1993) Omega B (1993-1999) Omega B2 (1999-2003)
  • Main
  • Omega
  • Omega B2
  • Transmission
  • Mechanical gearbox
  • Seals — replacement

Seals — replacement (Opel Omega B2)

            0

Contents: Cardan shaft flange seal ⬇ Input shaft seal ⬇

Cardan shaft flange seal


1. See. Section 8 and detach the front end of the propeller shaft from the flange, then remove the vibration damper (where is available). If necessary, remove the shaft to gain easier access to the flange.

2. To lock the shaft when the nut is loosened, make a nut from two pieces of steel strip (one long, one short) and a bolt with a nut split tool; the nut and bolt form a pivot point (see illustration).
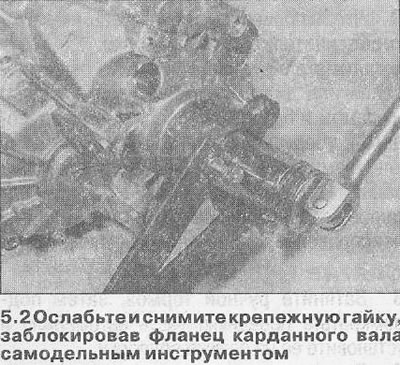
2. To lock the shaft when the nut is loosened, make a nut from two pieces of steel strip (one long,…


3. Lock the flange, then loosen and remove the mounting nut from the end of the transmission output shaft. Remove the tool and remove the flange (see illustration).
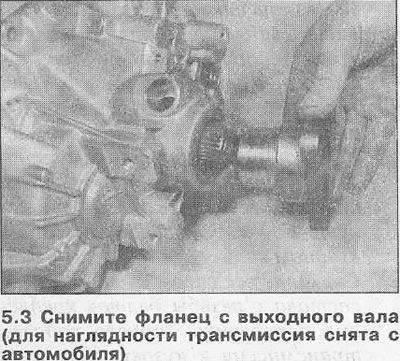
3. Lock the flange, then loosen and remove the mounting nut from the end of the transmission output…


4. Note the depth of the oil seal in the transmission housing, then carefully pry it out using a large flat-head screwdriver.


5. Check the contact surface of the cardan shaft flange with the seal for damage and signs of wear. If any are found, replace the flange.

6. Clean the area around the seal opening and remove all traces of locking compound from the output shaft and flange nut threads.

7. Apply a small amount of grease to the outer sealing lip of the new oil seal, then turn the oil seal with the sealing lip inward and install it onto the end of the output shaft. Using a suitable tubular drift, (should rest only on the solid outer edge of the seal) carefully drive the seal to the depth measured before removing the old component.

8. Lubricate the oil seal with a small amount of transmission oil, then carefully install the propeller shaft flange into the operating position, being careful not to damage the sealing lip of the oil seal.

9. Apply a few drops of blocking compound (Opel recommends using 15 10 181) onto the thread of the flange mounting nut. Install the nut and tighten it to the tightening torque specified in the Specifications.

10. Install the driveshaft as described in Section 8, then check the transmission oil level (see Chapter 2).

Input shaft seal


Note: Leaks around the transmission input shaft may be caused by a leak at the input shaft seal or the clutch release cylinder O-ring. Replace both components regardless of their condition.


11. Remove the clutch release cylinder as described in Section 6.

12. Note the depth of the oil seal in the release cylinder, then carefully press it out using a large flat-head screwdriver.


13. Clean the area around the seal opening and apply a small amount of grease to the outer sealing lip of the new seal. Turn the seal with the sealing lip outward (to the transmission block when the cylinder is installed) and install it into the cylinder to the depth measured before removing the old seal. If necessary, use a suitable tubular drift (it should rest only on the hard outer edge of the gland).

14. Replace the O-ring and install the release cylinder as described in Section 6.


This article is available at russian, bulgarian, belarusian, ukrainian, serbian, croatian, romanian, polish, slovak, hungarian
Checking the article: Shapovalov Yaroslav

Share information:

Previous articles
Opel Omega B2: Mechanical gearbox
Next articles

Gear shift rod — removal and installation
Gear shift rod — adjustment
Transmission oil — draining, filling the block and measuring the level
General description of mechanical transmission
Manual Transmission Specifications
Reverse Light Switch — Checking Serviceability, Removal and Installation
Transmission — removal and installation
Transmission Overhaul — General Description


See similar ones from other Opel car manuals:
▶ Camshaft Seals — Replacement Opel Astra F (1991-1998, petrol)
▶ Replacing crankshaft seals Opel Corsa B (1993-2000)
▶ Replacing the front camshaft seals of a 16-valve engine Opel Kadett E (1984-1995)
▶ Differential Bearing Seals — Removal and Installation Opel Vectra A (1988-1995, petrol)
▶ Camshaft Seals — Replacement Opel Zafira A (1999-2005, petrol)
Link to this page in different formats

Visitor comments


No comments yet


How much will 24 + 25 =


Omega B2 (1999-2003) 
  • General information
  • User manual
  • Maintenance
  • Troubleshooting
  • Power unit
  • Petrol 4-cylinder
  • Petrol 6-cylinder
  • Engine overhaul
  • Diesel engines 2.0 l
  • Diesel engines 2.5 l
  • Cooling and heating
  • Injection system (gasoline)
  • Fuel system (diesel)
  • Fuel system
  • Exhaust system
  • Ignition system
  • Transmission
  • Clutch
  • Mechanical gearbox
  • Automatic gearbox
  • Main gear and shafts
  • Chassis
  • Brake system
  • Car suspension
  • Steering
  • Body
  • Body elements
  • Electrical equipment
  • Equipment and devices
  • Electrical circuits
Omega B (1993-1999) 
  • General information
  • User manual
  • Tips for the car owner
  • Maintenance (gasoline)
  • Maintenance (diesel)
  • Power unit
  • Petrol engine SOHC 2.0 l
  • Petrol engine DOHC 2.0 l
  • Petrol engines 2.5 and 3.0 l
  • Repair of gasoline engines
  • Diesel engine 2.0 l
  • Diesel engine repair 2.0 l
  • Diesel engine 2.5 l
  • Cooling and heating
  • Power system (petrol)
  • Emission reduction
  • Fuel system (diesel 2.0 l)
  • Fuel system (diesel 2.5 l)
  • Launch system
  • Ignition system
  • Transmission
  • Clutch
  • Mechanical gearbox
  • Automatic gearbox
  • Drive shafts
  • Chassis
  • Brake system
  • Wheel suspension
  • Steering
  • Body
  • Exterior
  • Interior
  • Doors and windows
  • Electrical equipment
  • Equipment and devices
  • Wiring diagrams (early)
  • Wiring diagrams (late)
Omega A (1986-1993) 
  • General information
  • User manual
  • Maintenance
  • Changes and additions
  • Troubleshooting
  • Power unit
  • Gasoline engines
  • Diesel engines
  • Cooling system
  • Fuel system (gasoline)
  • Fuel system (diesel)
  • Ignition system
  • Transmission
  • Clutch
  • Mechanical gearbox
  • Automatic gearbox
  • Cardan shaft
  • Drive shafts
  • Chassis
  • Brake system
  • Car suspension
  • Steering
  • Body
  • Exterior
  • Interior
  • Electrical equipment
  • Power devices
  • Lighting and appliances
  • Electrical circuits
OpelBook.ru © 2017–2026 · Mobile version · · Sitemap: EN BG BY UA RS HR RO PL SK HU · Feedback · Site search
Astra F, petrol · Astra G, petrol · Astra G · Astra H · Astra J, petrol · Corsa B · Corsa C, petrol · Corsa C · Insignia A · Kadett D · Kadett E · Omega A · Omega B · Omega B2 · Vectra A, petrol · Vectra A · Vectra B, petrol · Vectra B · Vectra C · Zafira A, petrol · Frontera A, petrol · Frontera B · Ascona C · Vivaro A ·
We want your visit to be comfortable 🤝! We use cookies 🍪 to make that happen.