
OpelBook.ru
Cars AvtoVAZ Cars Mitsubishi Cars BMW Cars Mercedes Cars Nissan Cars Toyota Cars Chevrolet
English Русский
Български
Беларускі
Український
Српски
Hrvatski
Română
Polski
Slovenský
Magyar
 |  Sitemap  |  Contacts  |    


Main Astra Corsa Insignia Kadett Omega Vectra Zafira Others Articles
Kadett D (1979-1984) Kadett E (1984-1995)
  • Main
  • Kadett
  • Kadett E
  • Transmission
  • Gearbox F10 and F13
  • Differential assembly

Differential assembly (Opel Kadett E)

            0

Install the satellites into the differential box using the KM 456 jig, having first put the thrust washers in place.

Install the axle gears together with the thrust washers by turning them in the differential box.
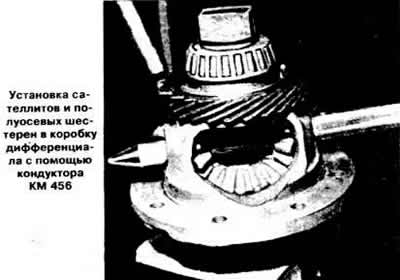
Install the axle gears together with the thrust washers by turning them in the differential box.


Install new retaining rings on the satellite axle.

Heat the new speedometer drive pinion to 80°C and install it on the differential box so that the pinion projections fit into the differential box grooves. Use the KM 459 device to facilitate installation of the pinion.

Lubricate the speedometer drive gear teeth with bearing grease.

Heat the differential driven gear to a temperature of 80°C, monitoring the heating temperature with a thermochromic pencil, press it onto the differential box and secure with new bolts.

Press the inner races of the tapered roller bearings onto the differential box.

Press the outer rings of the tapered roller bearings into the gearbox housing.

(Material copied from this portal: www.opelbook.ru)

Install the seals, filling the space between the working edges with protective grease type 1948 814/90 001 804.

Install the differential box into the gearbox housing.


Apply protective grease to the thread of the adjusting nut. Install the sealing ring and tighten the adjusting nut using the KM 447 tool.

When reusing parts, tighten the adjusting nut to align the marks made during disassembly and obtain a torque of resistance to bearing rotation within 6-10 kgf·m. When installing new bearings, the torque of resistance to rotation should be within 17-19 kgf·m at a rotation speed of 1 rpm. After installing the gearbox housing and differential, ensure that the torque of resistance to bearing rotation is within 17-19 kgf·m for new bearings and 8 kgf·m for worn-in bearings.

Lock the adjusting nut by bending the tabs of the locking plate.

Install plugs into the adjusting nut and into the gearbox housing.

Apply bearing grease to the differential cover gasket, secure it to the cover with grease, install the differential cover and secure it with new bolts.

Note: Assemble the differential taking into account the following:
  • before assembly, lubricate the satellite axle, satellites, and thrust washers with oil intended for highly loaded parts;
  • the driven and driving gears of the main transmission must be replaced simultaneously. When installing new gears, pay attention to the identity of the markings in the form of annular grooves at the tops of the teeth;
  • install the seals flush with the working edge facing outward.


This article is available at russian, bulgarian, belarusian, ukrainian, serbian, croatian, romanian, polish, slovak, hungarian
Checking the article: Shapovalov Yaroslav

Share information:

Previous articles
Opel Kadett E: Gearbox F10 and F13
Next articles

Disassembling the differential
5-speed gearbox device
Features of disassembling a 5-speed gearbox
Disassembling a 4-speed gearbox
4-speed gearbox device
Removal and installation the gearbox
Assembly of a 4-speed gearbox
Gear shift and differential drive device
Assembly Features of a 5-speed Gearbox
Adjusting the gear shift drive
Removal and installation the gear shift lever


See similar ones from other Opel car manuals:
▶ Seals (drive shafts) on the differential side Opel Astra F (1991-1998, petrol)
▶ Checking the oil level in the rear differential clutch of… Opel Insignia A (2008-2017)
▶ Final Drive Differential Bearing Seal — Replacement Opel Omega A (1986-1993)
▶ Differential Bearing Seals — Removal and Installation Opel Vectra A (1988-1995, petrol)
▶ Checking the differential fluid level of the front and rear… Opel Frontera A (1991-1998, petrol)
Link to this page in different formats

Visitor comments


No comments yet


How much will 37 + 19 =


Kadett E (1984-1995) 
  • General information
  • Vehicle description
  • Operation and maintenance
  • OHV power unit
  • Engine design
  • Check and repair
  • Engine work
  • OHC power unit
  • Engine design
  • Engine repair
  • Ignition system
  • Cooling and lubrication
  • Supply system
  • Fuel injection «LE-Jetronic»
  • Fuel injection «LE3-Jetronic»
  • Motronic ML4.1 system
  • Motronic M1.5 system
  • Motronic M2.5 system
  • Transmission
  • Clutch
  • Gearbox F10 and F13
  • Gearbox F16 and F20
  • Automatic gearbox
  • Drive shafts
  • Chassis
  • Front suspension
  • Rear suspension
  • Steering
  • Brake system
  • Electrical equipment
  • Equipment and devices
  • Electrical circuits
Kadett D (1979-1984) 
  • General information
  • Car care
  • Maintenance
  • Power unit
  • Gasoline engines
  • Lubrication system
  • Cooling system
  • Power system (gasoline)
  • Carburetor Solex 35 PDSI
  • Carburetor Varajet II
  • Carburetor 1B1
  • Fuel injection (gasoline)
  • Diesel engines
  • Fuel system (diesel)
  • Transmission
  • Clutch
  • Manual gearbox
  • Chassis
  • Front suspension
  • Rear suspension
  • Steering
  • Brake system
  • Wheels and tires
  • Body
  • Body elements
  • Doors and windows
  • Electrical equipment
  • Equipment and devices
  • Lighting system
  • Power devices
  • Ignition system
  • Electrical circuits
OpelBook.ru © 2017–2026 · Mobile version · · Sitemap: EN BG BY UA RS HR RO PL SK HU · Feedback · Site search
Astra F, petrol · Astra G, petrol · Astra G · Astra H · Astra J, petrol · Corsa B · Corsa C, petrol · Corsa C · Insignia A · Kadett D · Kadett E · Omega A · Omega B · Omega B2 · Vectra A, petrol · Vectra A · Vectra B, petrol · Vectra B · Vectra C · Zafira A, petrol · Frontera A, petrol · Frontera B · Ascona C · Vivaro A ·
We want your visit to be comfortable 🤝! We use cookies 🍪 to make that happen.