
OpelBook.ru
Cars AvtoVAZ Cars Mitsubishi Cars BMW Cars Mercedes Cars Nissan Cars Toyota Cars Chevrolet
English Русский
Български
Беларускі
Український
Српски
Hrvatski
Română
Polski
Slovenský
Magyar
 |  Sitemap  |  Contacts  |    


Main Astra Corsa Insignia Kadett Omega Vectra Zafira Others Articles
Vectra A (1988-1995, petrol) Vectra A (1988-1995) Vectra B (1995-2002, petrol) Vectra B (1995-2002) Vectra C (2002-2008)
  • Main
  • Vectra
  • Vectra C
  • Body
  • Heating and ventilation
  • Removal and installation interior air duct deflectors

Removal and installation interior air duct deflectors (Opel Vectra C)

            0

Contents: Side deflectors ⬇ Central deflectors ⬇ Rear passenger air deflectors ⬇

Side deflectors


1. Remove the instrument panel trim strip (see Chapter 11).

2. Remove the 2 lower screws (see accompanying illustration) fastenings of the corresponding deflector and, having pressed the 2 upper fasteners, remove the deflector from the instrument panel.
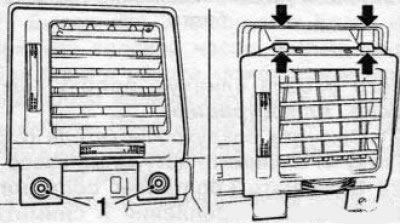
10.2 Unscrew the fastening bolts (1) and press the clamps in the places indicated by the arrows

10.2 Unscrew the fastening bolts (1) and press the clamps in the places indicated by the arrows


3. Installation is carried out in reverse order.

Central deflectors


4. Remove the instrument panel trim strip (see Chapter 11).

5. Remove the 4 lower mounting screws (see accompanying illustration).
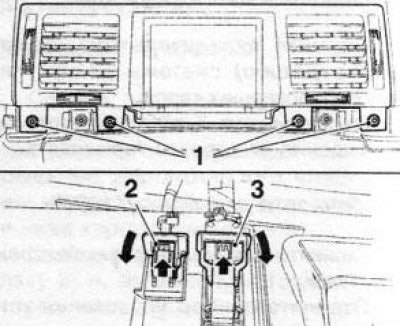
10.5 Bolts (1) for fastening the central deflectors: 2, 3. Infotainment system display wiring…

10.5 Bolts (1) for fastening the central deflectors: 2, 3. Infotainment system display wiring connectors


6. Press the upper clamps (see accompanying illustration) and separate the central deflectors from the instrument panel together with the information display assembly.
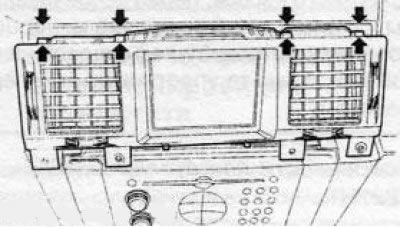
10.6 Upper fasteners (indicated by arrows) central deflectors

10.6 Upper fasteners (indicated by arrows) central deflectors


[Text was copied from the portal: OpelBook]

7. Disconnect the electrical wiring (see illustration 10.5) from the back of the display assembly and remove the deflectors.

8. If necessary, remove the 4 mounting screws from the back of the assembly and separate the information display from the deflectors.

9. Installation is performed in the reverse order of removal. When installing in the upper holders, press the deflectors until they lock. Adjust the information display program using special equipment.

Rear passenger air deflectors


10. Move the deflectors to the lower position.

11. Using a plastic wedge (for example, Hazet 1965-20) (see accompanying illustration) pry up the deflector frame and release it from the outer holder.
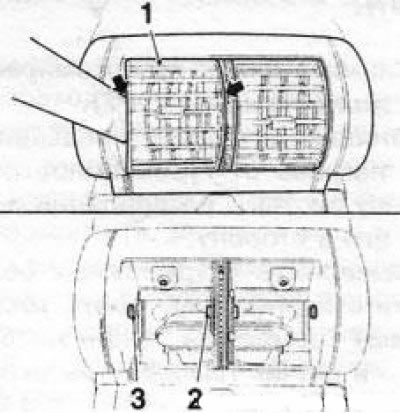
10.11 Inner (2) and outer (3) holders of the deflector (1) for blowing air into the rear passenger…

10.11 Inner (2) and outer (3) holders of the deflector (1) for blowing air into the rear passenger seats


12. Align the deflector and pull it outward, releasing it from the internal holder

13. Remove the second deflector in a similar manner.

14. Remove the rear end cover of the center console (see Chapter 11).

15. Remove the 2 mounting screws (see accompanying illustration), separate the right and left edges of the rear deflectors housing from the center console, insert a plastic wedge and, pressing the deflectors housing, release it from the holders. Remove the deflectors housing from the center console.
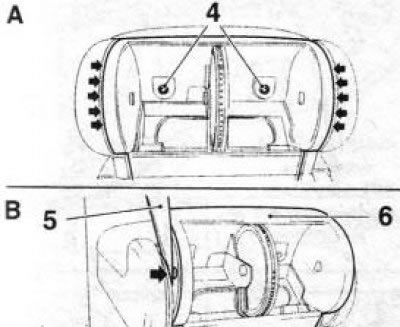
10.15 Removing the housing (6) of the rear deflectors: 4. Mounting screws; 5. Plastic wedge

10.15 Removing the housing (6) of the rear deflectors: 4. Mounting screws; 5. Plastic wedge


16. Installation is carried out in reverse order.


This article is available at russian, bulgarian, belarusian, ukrainian, serbian, croatian, romanian, polish, slovak, hungarian
Checking the article: Meshcheryakov Damir

Share information:

Previous articles
Opel Vectra C: Heating and ventilation
Next articles

Removal and installation of the control panel for the operation of heating systems
Removal and installation the electric motor of the mixing flap drive
Removal and installation the air circulation system flap drive electric motor
Removal and installation the electric motor for the air flow distribution control drive
Removal and installation the air supply hose to the passenger footwell
Removal and installation the HVAC fan drive motor


See similar ones from other Opel car manuals:
▶ Removal and installation air duct deflectors Opel Astra H (2004-2009)
▶ Removal and installation air duct deflectors Opel Corsa B (1993-2000)
▶ Interior air conditioning. Deflectors Opel Omega B2 (1999-2003)
▶ Interior lighting Opel Insignia A (2008-2017)
▶ Interior heater Opel Kadett E (1984-1995)
Link to this page in different formats

Visitor comments


No comments yet


How much will 33 + 33 =


Vectra C (2002-2008) 
  • General information
  • User manual
  • Vehicle device
  • Maintenance
  • Troubleshooting
  • Power unit
  • Engine repair
  • Cooling system
  • Power and control system
  • Engine electrics
  • Transmission
  • Clutch
  • Car gearbox
  • Drive shafts
  • Chassis
  • Car suspension
  • Steering
  • Brake system
  • Body
  • Exterior
  • Interior
  • Doors, locks and windows
  • Heating and ventilation
  • Electrical equipment
  • Equipment and devices
  • Headlights and lighting
  • Electrical circuits
Vectra B (1995-2002) 
  • General information
  • User manual
  • Weekly checks
  • Maintenance (gasoline)
  • Maintenance (diesel)
  • Troubleshooting
  • Power unit
  • SOHC gasoline engine
  • DOHC petrol engine
  • Diesel engine 1.7 liter
  • Diesel engine 2.0 liters
  • Engine repair
  • Cooling system
  • Fuel system (gasoline)
  • Fuel system (diesel)
  • Charging system
  • Launch system
  • Ignition and preheat
  • Transmission
  • Clutch
  • Mechanical gearbox
  • Automatic gearbox
  • Drive shafts
  • Chassis
  • Brake system
  • Wheel suspension
  • Steering
  • Body
  • Exterior
  • Interior
  • Doors and windows
  • Heating and ventilation
  • Electrical equipment
  • Equipment and devices
  • Electrical circuits
Vectra B (1995-2002, petrol) 
  • General information
  • Maintenance
  • Help with malfunctions
  • Power unit
  • Engine repair
  • Exhaust system
  • Cooling system
  • Fuel system
  • Multec injection system
  • Four point injection
  • Transmission
  • Clutch
  • Gearbox and drive
  • Chassis
  • Wheel suspension
  • Steering
  • Brake system
  • Wheels and tires
  • Body
  • Exterior
  • Interior
  • Electrical equipment
  • Fuses and electronics
  • Power devices
  • Ignition system
  • Lighting and signaling
  • Equipment and devices
  • Heating and ventilation
  • Electrical circuits
Vectra A (1988-1995) 
  • Power unit
  • Engine repair
  • Ignition system
  • Lubrication system
  • Cooling system
  • Injection system
  • Fuel system (carburetor)
  • Fuel system (diesel)
  • Exhaust system
  • Transmission
  • Clutch
  • Car gearbox
  • Chassis
  • Front suspension
  • Rear suspension
  • Steering
  • Brake system
  • Wheels and tires
  • Body
  • Exterior
  • Interior
  • Electrical equipment
  • Electrical circuits
Vectra A (1988-1995, petrol) 
  • General information
  • User manual
  • Maintenance
  • Power unit
  • SOHC engine
  • DOHC engine
  • Cooling and ventilation
  • Fuel system (carburetor)
  • Fuel system (injector)
  • Exhaust converter
  • Transmission
  • Clutch
  • Mechanical gearbox
  • Automatic gearbox
  • Drive shafts
  • Chassis
  • Brake system
  • Car suspension
  • Steering
  • Body
  • Body elements
  • Electrical equipment
  • Power devices
  • Equipment and devices
  • Electrical circuits
OpelBook.ru © 2017–2026 · Mobile version · · Sitemap: EN BG BY UA RS HR RO PL SK HU · Feedback · Site search
Astra F, petrol · Astra G, petrol · Astra G · Astra H · Astra J, petrol · Corsa B · Corsa C, petrol · Corsa C · Insignia A · Kadett D · Kadett E · Omega A · Omega B · Omega B2 · Vectra A, petrol · Vectra A · Vectra B, petrol · Vectra B · Vectra C · Zafira A, petrol · Frontera A, petrol · Frontera B · Ascona C · Vivaro A ·
We want your visit to be comfortable 🤝! We use cookies 🍪 to make that happen.