


Warning! To check the installation of the valve timing mechanism and fuel pump, it is necessary to use special tools:
- camshaft locking tool KM932;
- fuel pump protrusion locking pin KM927;
- crankshaft locking pin KM929;
- camshaft sprocket wrench KM933.
Tools for adjusting the gas distribution mechanism
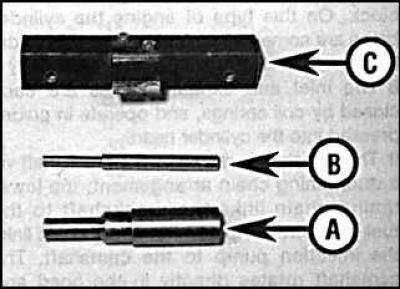
A. Crankshaft locking pin
B. Fuel pump protrusion locking pin
C. Camshaft Locking Tool
Crankshaft Locking Pin Dimensions
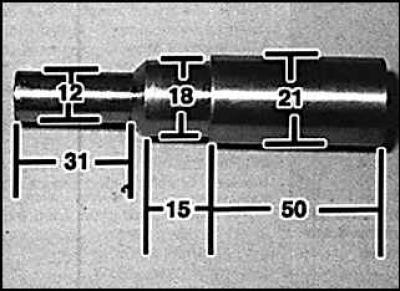
Fuel Pump Protrusion Locking Pin Dimensions
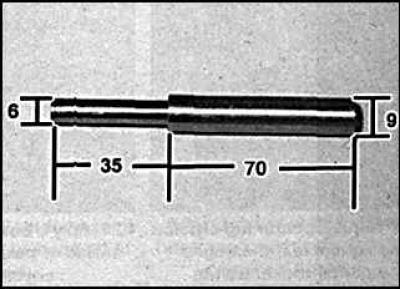
Checking and adjusting
1. Remove the auxiliary drive belt. Unscrew the auxiliary tensioner pulley stand, the lower bolt and the pivot bolt of the pulley support plate, and remove the tensioner.
2. Remove the brake vacuum pump.
3. To improve access to the fuel pump sprocket housing and pump, follow these steps:
- remove the air filter housing and exhaust inlet pipe;
- remove the nut from the top of the right engine mount and raise the right side of the engine as far as possible.
4. Remove the cylinder head cover and set the piston of the first cylinder to the top dead center in the compression stroke.
5. Remove the crankshaft sensor.
6. Remove the screws and remove the fuel pump sprocket housing from the chain housing.
7. Check that the crankshaft pulley mark is aligned with the pointer and insert the crankshaft lock pulley into the crankshaft sensor hole and fix the crankshaft from turning.
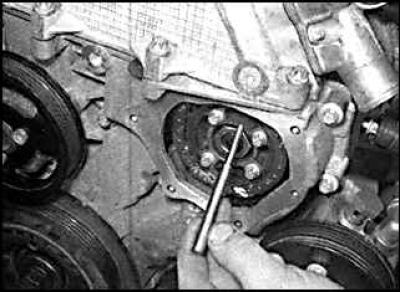
8. Insert the fuel pump lug lock pulley into the hole in the lug and move the pulley into the hole in the pump body.
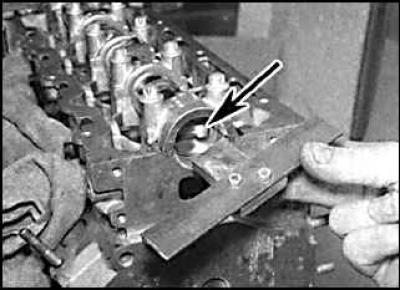
9. Insert the camshaft locking tool into the hole on the left end of the camshaft (indicated by the arrow).
10. If all the locking pins are installed normally, then no adjustment of the valve timing mechanism is required. If at least one of the locking pins is not installed, it is necessary to adjust the valve timing mechanism.
11. Remove the pump lock pin and remove the bolt from the right side of the suspension from the cylinder head.
12. Unscrew the top head of the chain tensioner and remove the plunger, noting the position in which it is installed.
13. Secure the camshaft from turning and unscrew the camshaft sprocket mounting bolt. Install a new bolt, tightening it by hand.
Original posted on the website [opelbook]
14. Loosen the bolts securing the fuel pump sprocket to the pump boss.
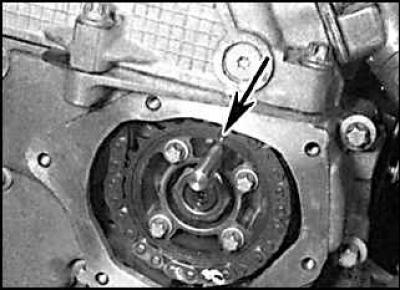
15. Check the position of the installation mark (indicated by the arrow) on the fuel pump. In this case, the upper sprocket of the timing chain should be aligned with the projection of the pump. Insert the pin locking the projection of the fuel pump and tighten the bolts of the sprocket mounting to the required torque.
16. Install the camshaft lock pin.
17. After installing all the locking pins, seat the camshaft sprocket in place by tightening the sprocket mounting bolt. While doing this, support the sprocket so that the slack in the chain is on the side of the chain tensioner.
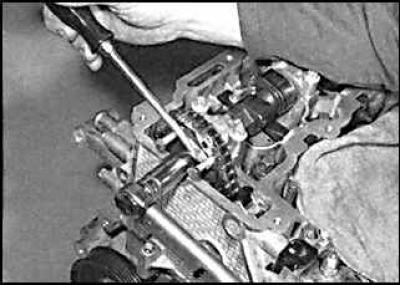
18. Secure the camshaft from turning with a wrench and tighten the camshaft sprocket mounting bolt in several steps to the required torque.
19. Remove all locking pins, install a new O-ring to the upper head of the timing chain tensioner. Insert the plunger into the cylinder head and tighten it to the specified torque.
20. Rotate the engine crankshaft two full revolutions and check that all locking pins can be installed.
21. Check that the mating surfaces of the fuel pump sprocket housing and chain housing are clean and dry.
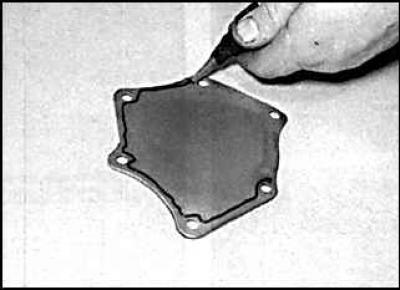
22. Install the fuel pump sprocket housing onto the gasket or sealant bead and secure with bolts, tightening them to the specified torque.
23. Install the tensioning mechanism.
24. Install the powertrain support. Install the cylinder head cover.
25. Install the exhaust pipe and air cleaner housing.
26. Install the brake system vacuum pump.
27. Install the crankshaft sensor into the cylinder block and connect the battery.
Visitor comments