


Attention.
Set the vehicle wheels to the straight-ahead position, then lock the steering wheel relative to the steering column to prevent rotation. Locking the steering column prevents possible damage and malfunctions in the airbag system. The steering wheel must be locked before removing the following components:
- Steering column.
- Steering shaft couplings.
- Intermediate shaft(s).
After disconnecting these components, do not turn the steering wheel or move the front wheels of the vehicle. Failure to do so may result in the contact disc becoming misaligned and, as a result, damage to the contact disc during further driving of the vehicle. If there is a suspicion that the contact disc is not centered, it is necessary to perform the contact disc centering procedure (see Chapter "Passive safety").
1. Set the front wheels of the car to the straight-ahead position, then lock the steering column.
2. Disconnect the intermediate steering shaft from the steering gear.
3. Raise and secure the vehicle.
4. Perform the following procedures to lower the rear of the subframe:
- Remove the front wheels from the vehicle.
- Disconnect the anti-roll bar struts from the suspension struts.
- Disconnect the front exhaust pipe.
- Support the subframe with a jack.
- Loosen the gearbox mounting bolts.
- Loosen the rear bolts securing the subframe to the body.
- Lower the rear of the subframe no more than 50 mm to gain access to the steering gear.
5. Unscrew the two nuts (1) of the outer steering rod ends.
Caution: This component is equipped with fasteners that are tightened to the yield point. When installing the component, new fasteners must be used. Failure to do so may result in damage to the vehicle.
Note.
- Replace nuts (2) with new ones after each removal.
- Tightening torque: 35 Nm + 30°.
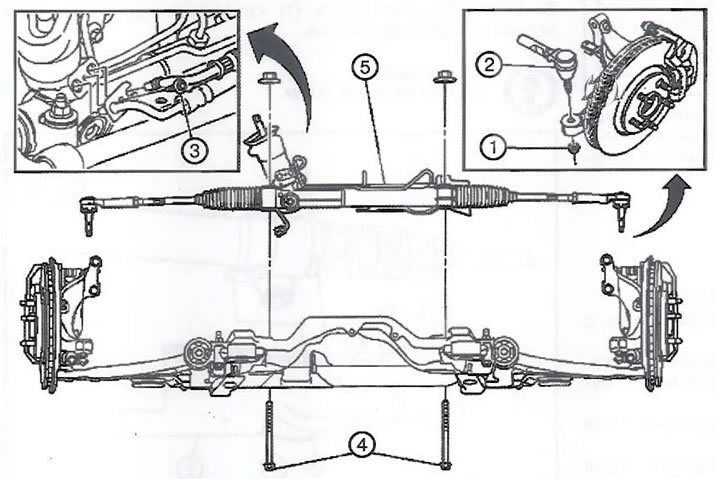
6. Disconnect the two outer tie rod ends (2) from the steering knuckles.
7. Place a drip tray under the vehicle to collect the fluid.
8. Loosen the bolt (3) securing the inlet and outlet hoses of the steering gear and disconnect the hoses.
Note: Tightening torque: 9 Nm.
9. Remove the two hose connector seals from the steering gear.
Note: Use new seals during installation.
10. Unscrew the two nuts and remove the two bolts (4) securing the steering gear
Note.
- Do not reuse steering gear mounting bolts and nuts.
- When tightening, hold the nuts from turning and tighten only the bolts.
- Tightening torque: 110 Nm + 150°.
11. If necessary, disconnect all electrical connectors.
12. Turn the front anti-roll bar over to gain access to the steering gear. Do not loosen the anti-roll bar clamp bolts.
13. Remove the steering gear through the opening in the left front wheel arch.
14. If necessary, transfer components from the old to the new steering gear.
15. Installation is carried out in the reverse order of removal.
16. After installation, fill the power steering reservoir with working fluid and bleed the system.
17. Measure and adjust the front wheel alignment.
Note: Make sure that the inner and outer steering column seals on the body bulkhead are installed correctly.
Visitor comments