OpelBook.ru
Cars AvtoVAZ Cars Mitsubishi Cars BMW Cars Mercedes Cars Nissan Cars Toyota Cars Chevrolet
English Русский
Български
Беларускі
Український
Српски
Hrvatski
Română
Polski
Slovenský
Magyar
 |  Sitemap  |  Contacts  |    


Main Astra Corsa Insignia Kadett Omega Vectra Zafira Others Articles
Omega A (1986-1993) Omega B (1993-1999) Omega B2 (1999-2003)
  • Main
  • Omega
  • Omega B
  • Power unit
  • Petrol engines 2.5 and 3.0 l
  • Oil pump

Oil pump (Opel Omega B)

            0

Contents: Removal ⬇ Bulkhead ⬇ Installation ⬇
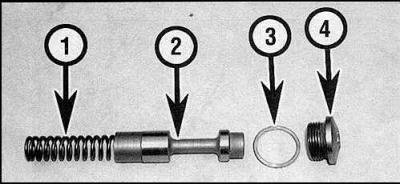
Pressure reducing valve

1. Spring

1. Spring

2. Piston

3. Sealing washer

4. Valve plug


Safety valve
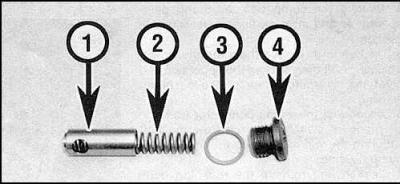
1. Piston

1. Piston

2. Spring

3. Sealing washer

4. Valve plug


Removal


1. Remove the timing belt.

2. Remove all camshaft sprockets, crankshaft sprocket, idler pulleys and tensioner pulley.

[Information taken from the website: opelbook.ru]

3. Remove the rear timing belt cover.

4. Remove the oil pan and oil pickup pipe.

5. Remove the lower generator bolt, loosen the upper bolt and move the generator to the side.

6. Disconnect the wire from the oil pressure sensor switch.

Bulkhead


Bulkhead


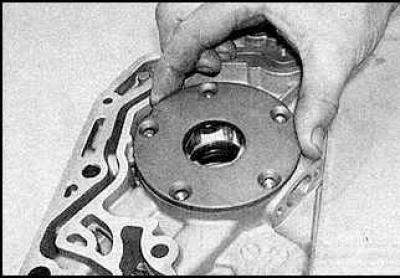
1. Remove the screws and remove the oil pump cover.


1. Remove the screws and remove the oil pump cover.


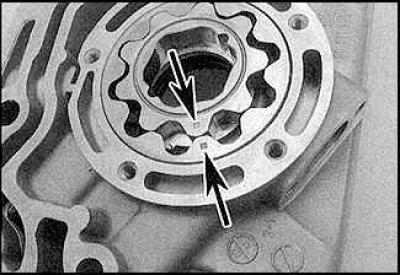
2. Mark the correct installation position of the pump gears (indicated by arrows).
2. Mark the correct installation position of the pump gears (indicated by arrows).


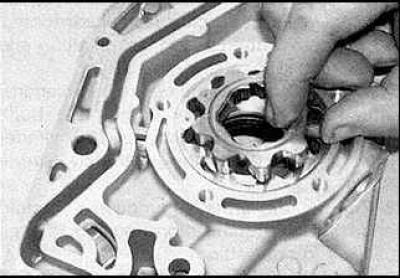
3. Remove the gear wheels.
3. Remove the gear wheels.


3. Remove the gear wheels.


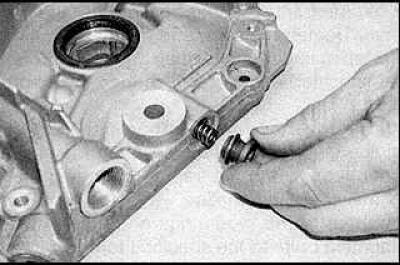
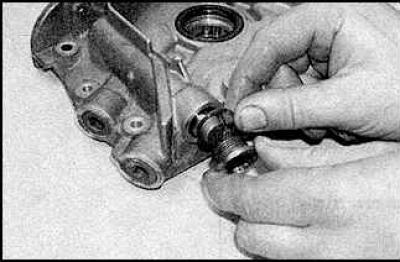
4. Unscrew the plugs of the reduction valve (drawing on the left) and safety (drawing on the right) valves.
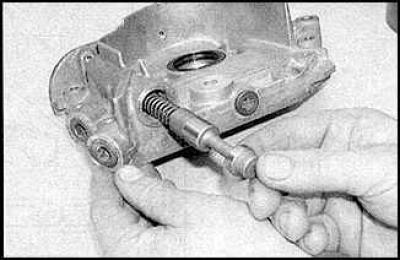
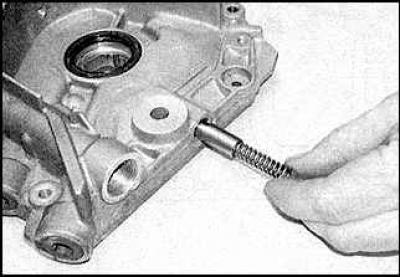

4. Unscrew the plugs of the reduction valve (drawing on the left) and safety (drawing on the right)…


4. Unscrew the plugs of the reduction valve (drawing on the left) and safety (drawing on the right)…


5. Remove the valve springs and pistons.

6. Clean all oil pump parts thoroughly and inspect them for signs of wear and damage. If the gears or pump housing are damaged, the pump must be replaced.

7. Assemble the pump in reverse order.

Oil pump with M6 bolts
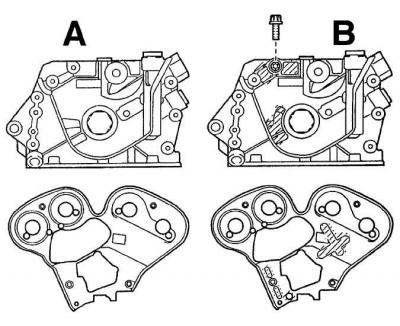
A. Conventional pump and timing cover

A. Conventional pump and timing cover

B. Modified pump and timing cover


Tightening sequence of M6 bolts
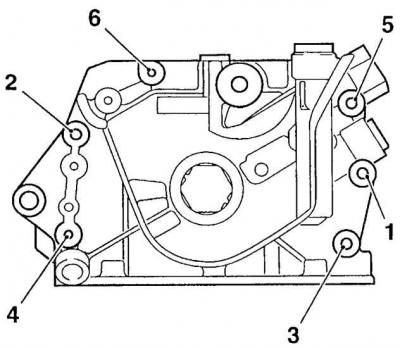
Tightening sequence of M6 bolts


Tightening sequence of M8 bolts
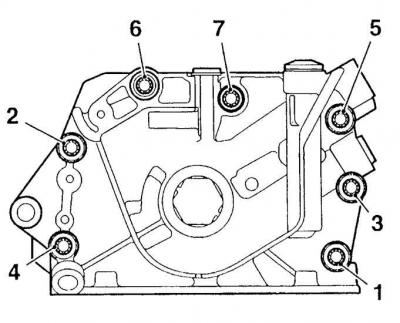
Tightening sequence of M8 bolts


Before you begin installation, you need to determine which type of oil pump is installed on your engine. Check the diameters of the pump bolts. If they are M6 bolts, you will need to determine the types of the rear timing belt covers and oil pump.

Installation


Oil pump with M6 bolts and regular cover
Oil pump with M6 bolts and regular cover


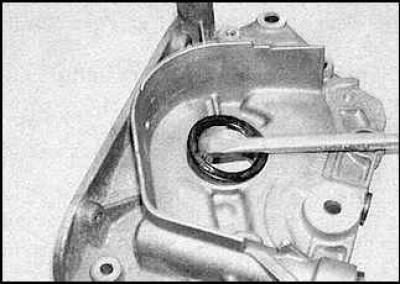
1. Remove the old crankshaft oil seal.


1. Remove the old crankshaft oil seal.


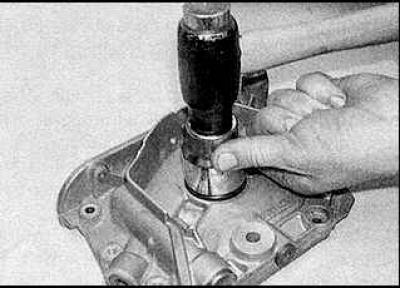
2. Drive in a new seal.
2. Drive in a new seal.


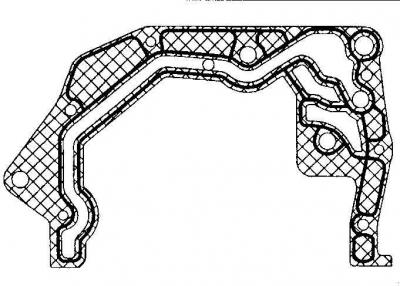
3. Apply sealant N15 03 170 to the shaded areas of the oil pump gasket.
3. Apply sealant N15 03 170 to the shaded areas of the oil pump gasket.


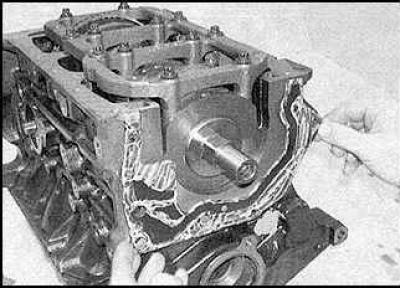
4. Install the gasket on the cylinder block
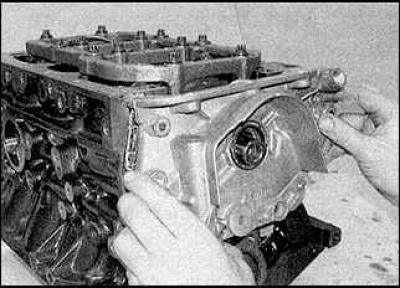
4. Install the gasket on the cylinder block


5. Install the oil pump


6. Insert and tighten the pump bolts in the sequence shown (see illustration Tightening sequence for M6 bolts).

7. After ten minutes, when the pump gasket sealant has dried, tighten the pump bolts further to the required tightening torque in the specified sequence.

8. Install the remaining parts in the reverse order of removal.

Oil pump with M6 bolts and modified cover

9. Perform the operations described in pp. 1–6.

10. Insert and tighten the pump bolts in the sequence shown (see illustration Tightening sequence for M6 bolts).

11. Install the remaining parts. Before installing the outer timing belt cover, tighten the pump bolts further to the required torque in the sequence shown.

Oil pump with M8 bolts

12. Perform the operations described in the points pp. 1–6.

13. Apply sealant N15 10 181 to the threads of the pump bolts.

14. Insert and tighten the bolts in the sequence shown (see illustration Tightening sequence for M8 bolts).

15. Install the remaining parts.


This article is available at russian, bulgarian, belarusian, ukrainian, serbian, croatian, romanian, polish, slovak, hungarian
Checking the article: Fedorova Varvara

Share information:

Previous articles
Opel Omega B: Petrol engines 2.5 and 3.0 l
Next articles

Oil pan
Cylinder head
Camshafts and tappets
Camshaft Seals — Replacement
Belt tensioner, sprockets and idler pulleys
Gas distribution belt
Oil radiator
Flywheel and drive disk
Crankshaft oil seals
Engine and gearbox mounts


See similar ones from other Opel car manuals:
▶ Oil pump — removal and installation Opel Astra F (1991-1998, petrol)
▶ Removal, maintenance and installation of the oil pump Opel Corsa B (1993-2000)
▶ Replacing the secondary drive chain (drive chain of the… Opel Insignia A (2008-2017)
▶ Fuel pump Opel Kadett E (1984-1995)
▶ Checking the Power Steering Pump Drive Belt Opel Vectra A (1988-1995, petrol)
Link to this page in different formats

Visitor comments


No comments yet


How much will 12 + 26 =


Omega B2 (1999-2003) 
  • General information
  • User manual
  • Maintenance
  • Troubleshooting
  • Power unit
  • Petrol 4-cylinder
  • Petrol 6-cylinder
  • Engine overhaul
  • Diesel engines 2.0 l
  • Diesel engines 2.5 l
  • Cooling and heating
  • Injection system (gasoline)
  • Fuel system (diesel)
  • Fuel system
  • Exhaust system
  • Ignition system
  • Transmission
  • Clutch
  • Mechanical gearbox
  • Automatic gearbox
  • Main gear and shafts
  • Chassis
  • Brake system
  • Car suspension
  • Steering
  • Body
  • Body elements
  • Electrical equipment
  • Equipment and devices
  • Electrical circuits
Omega B (1993-1999) 
  • General information
  • User manual
  • Tips for the car owner
  • Maintenance (gasoline)
  • Maintenance (diesel)
  • Power unit
  • Petrol engine SOHC 2.0 l
  • Petrol engine DOHC 2.0 l
  • Petrol engines 2.5 and 3.0 l
  • Repair of gasoline engines
  • Diesel engine 2.0 l
  • Diesel engine repair 2.0 l
  • Diesel engine 2.5 l
  • Cooling and heating
  • Power system (petrol)
  • Emission reduction
  • Fuel system (diesel 2.0 l)
  • Fuel system (diesel 2.5 l)
  • Launch system
  • Ignition system
  • Transmission
  • Clutch
  • Mechanical gearbox
  • Automatic gearbox
  • Drive shafts
  • Chassis
  • Brake system
  • Wheel suspension
  • Steering
  • Body
  • Exterior
  • Interior
  • Doors and windows
  • Electrical equipment
  • Equipment and devices
  • Wiring diagrams (early)
  • Wiring diagrams (late)
Omega A (1986-1993) 
  • General information
  • User manual
  • Maintenance
  • Changes and additions
  • Troubleshooting
  • Power unit
  • Gasoline engines
  • Diesel engines
  • Cooling system
  • Fuel system (gasoline)
  • Fuel system (diesel)
  • Ignition system
  • Transmission
  • Clutch
  • Mechanical gearbox
  • Automatic gearbox
  • Cardan shaft
  • Drive shafts
  • Chassis
  • Brake system
  • Car suspension
  • Steering
  • Body
  • Exterior
  • Interior
  • Electrical equipment
  • Power devices
  • Lighting and appliances
  • Electrical circuits
OpelBook.ru © 2017–2026 · Mobile version · · Sitemap: EN BG BY UA RS HR RO PL SK HU · Feedback · Site search
Astra F, petrol · Astra G, petrol · Astra G · Astra H · Astra J, petrol · Corsa B · Corsa C, petrol · Corsa C · Insignia A · Kadett D · Kadett E · Omega A · Omega B · Omega B2 · Vectra A, petrol · Vectra A · Vectra B, petrol · Vectra B · Vectra C · Zafira A, petrol · Frontera A, petrol · Frontera B · Ascona C · Vivaro A ·
We want your visit to be comfortable 🤝! We use cookies 🍪 to make that happen.