OpelBook.ru
Cars AvtoVAZ Cars Mitsubishi Cars BMW Cars Mercedes Cars Nissan Cars Toyota Cars Chevrolet
English Русский
Български
Беларускі
Український
Српски
Hrvatski
Română
Polski
Slovenský
Magyar
 |  Sitemap  |  Contacts  |    


Main Astra Corsa Insignia Kadett Omega Vectra Zafira Others Articles
Corsa B (1993-2000) Corsa C (2000-2006, petrol) Corsa C (2000-2006)
  • Main
  • Corsa
  • Corsa C
  • Body
  • Doors and windows
  • Removal and installation the tailgate seal

Removal and installation the tailgate seal (Opel Corsa C)

            0

Contents: Removal ⬇ Installation ⬇ Replacing the outer door trim and…⬇ Removal ⬇ Installation ⬇

Removal


Pull the rear hatch seal off.

Installation


Installation


Install the tailgate seal.

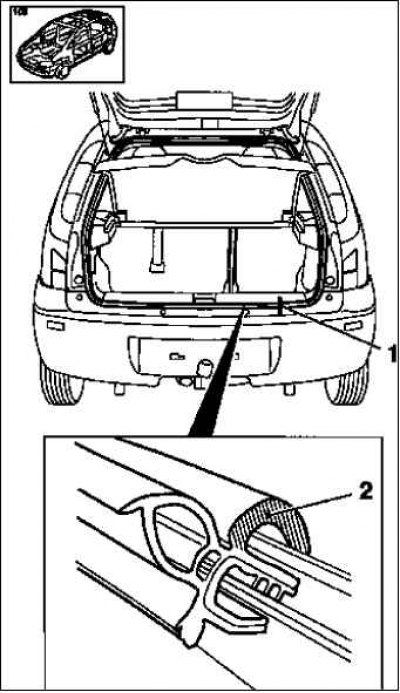
Note: If the joint 1 of the tailgate seal is damaged, glue the joint with rubber glue. Apply super glue (cyanoacrylate based) onto the adapter. Connect the ends of the seal.


The inner sealing edge 2 of the tailgate seal is located above the inner trim panels.

Replacing the outer door trim and rear hatch


Removal


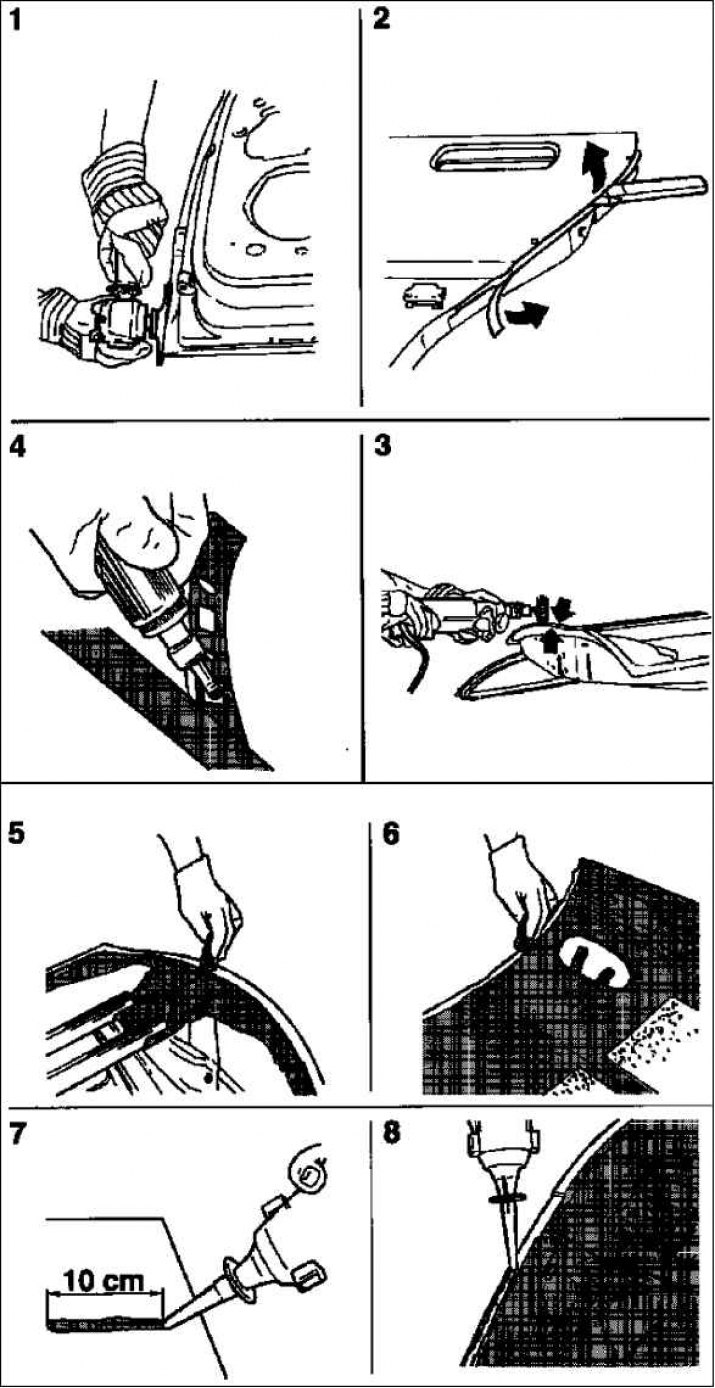
Remove the sealing compound.

Drill out the welding spots.

Sand the folded edges 1.

Remove the outer door trim 2 from the frame and remove the remaining edge.

Remove any remaining glue 3 from the frame and sand the glue edges.

Sand the adhesive edges of the 4 new pieces.

Note: Sand only in the weld spot area, new flange adhesive will bond to the primer of the new part.

Note: Sand only in the weld spot area, new flange adhesive will bond to the primer of the new part.


Installation


Align the frame if necessary.

Fit the new part to the frame and mating areas.

Apply the activator from the adhesive kit to the butt edge of the door frame, on both sides 5, to the outer door trim, on one side 6.

Apply a bead of glue (diameter 4 mm) on the butt edge of the door frame 8.

Note: Insert the glue tube from the glue kit into the BETAGUN 2000 glue gun, apply a test bead of glue (for example, on cardboard) length 10 cm 7.


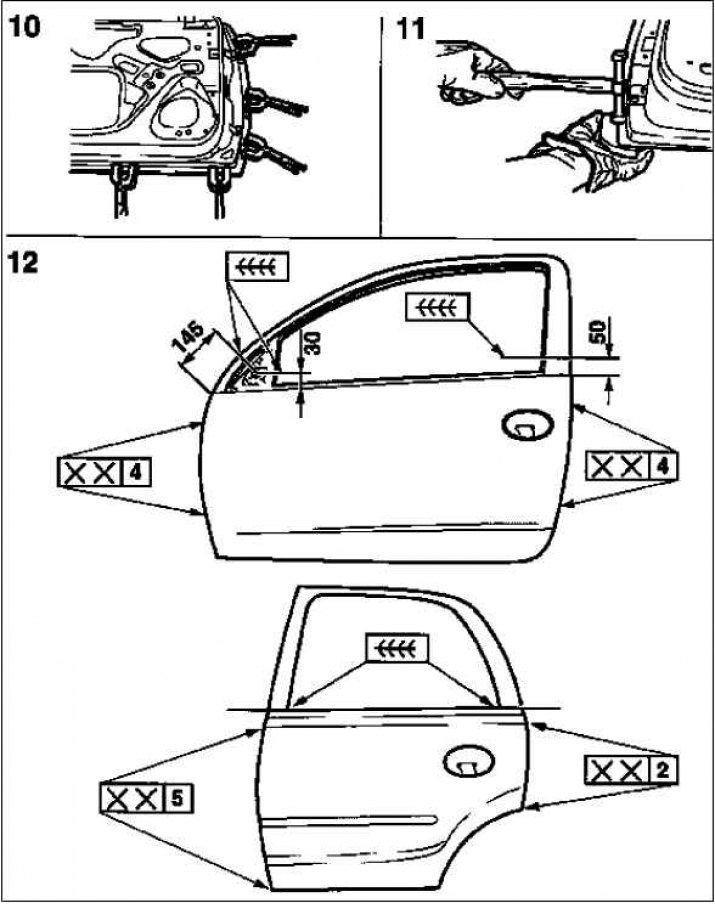
Align the outer door trim on the frame and secure it 10.

Bend back the edge of the outer door trim.

Note: Use a straightening hammer and smoothing block while holding the edge firmly with your fist or block 11.


Apply glue as a seam sealant and anti-corrosion protection.
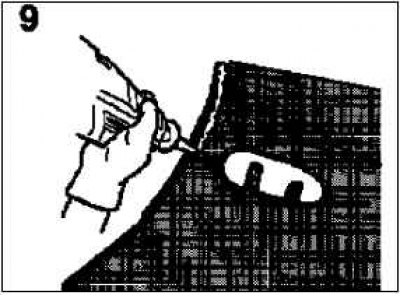
Apply glue as a seam sealant and anti-corrosion protection.


Spread the glue over all sanded areas using a spatula or flat brush.

Remove excess glue.

Note: Additional sealing compound is not necessary.

Note: Additional sealing compound is not necessary.


Perform spot welding of the outer door trim 12.


Note: To avoid imprinting on the outer door skin, work with copper plate.


Note: In the area of the separation points, weld as before with gas shielding. In the area of the separation points, it is necessary to protect the glue from burning with heat-insulating paste. Check the visible surface area and, if necessary, rework it.


Seal the cavities.

Install the mounting parts.

Install door 12.
Install door 12.


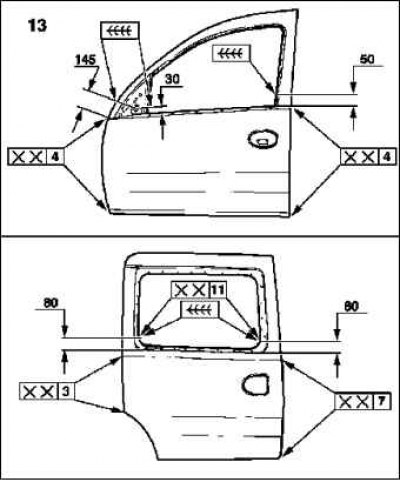
Install door 13.

Install door 13.


Install the rear door.

Install the rear hatch.
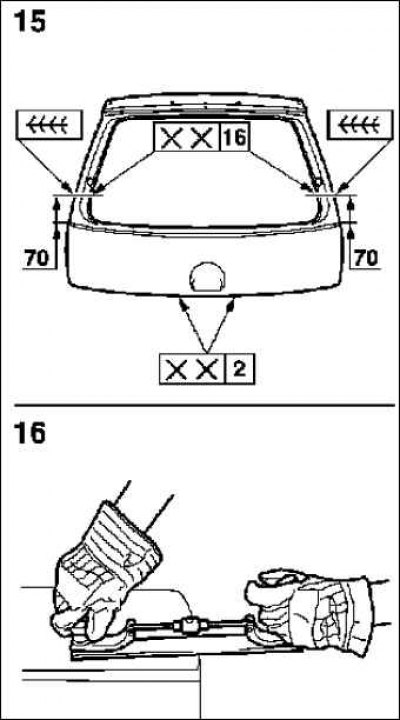
Install the rear hatch.


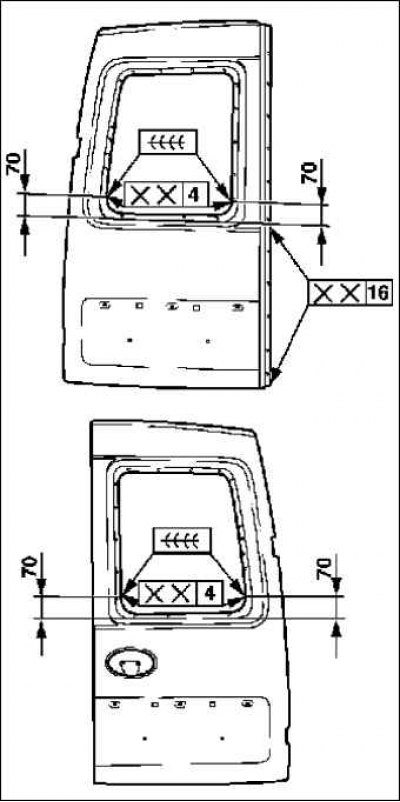
Check the visible surface area and, if necessary, refine it 16.


This article is available at russian, bulgarian, belarusian, ukrainian, serbian, croatian, romanian, polish, slovak, hungarian
Checking the article: Kornev Georgy

Share information:

Previous articles
Opel Corsa C: Doors and windows
Next articles

Removal and installation the rear tailgate air spring
Removal and installation the outer handle of the rear hatch
Removal and installation the rear hatch lock
Removal and installation the rear hatch
Removal and installation the rear door seal
Removal and installation the rear door interior trim
Removal and installation the rear hatch interior trim
Removal and installation the glass seal in the rear hatch
Replacing the control element of the outside rearview mirror, adjustable from the inside
Removal and installation or replacement of windshield


See similar ones from other Opel car manuals:
▶ Camshaft Seal — Replacement Opel Astra G (1998-2004, petrol)
▶ Replacement of the tailgate Opel Insignia A (2008-2017)
▶ Removal and installation the front crankshaft oil seal Opel Kadett D (1979-1984)
▶ Trunk lid, tailgate Opel Omega A (1986-1993)
▶ Front camshaft oil seal — removal and installation Opel Vectra A (1988-1995, petrol)
Link to this page in different formats

Visitor comments


No comments yet


How much will 45 + 30 =


Corsa C (2000-2006) 
  • General information
  • Introduction to guide
  • Troubleshooting
  • Vehicle device
  • User manual
  • Maintenance
  • Power unit
  • Engine repair
  • Cooling system
  • Power and exhaust system
  • Control system
  • Engine electrical equipment
  • Transmission
  • Clutch
  • Mechanical gearbox
  • Automatic gearbox
  • Drive shafts
  • Chassis
  • Brake system
  • Wheel suspension
  • Steering
  • Body
  • Exterior
  • Interior
  • Doors and windows
  • Heating and air conditioning
  • Electrical equipment
  • Equipment and devices
  • Lamps and lighting
  • Electrical circuits
Corsa C (2000-2006, petrol) 
  • User manual
  • Car access
  • Governing bodies
  • Seat control
  • Heating and air conditioning
  • Driving and maintenance
  • Engines 1.0 and 1.2 l
  • Engine repair
  • Cooling and lubrication system
  • Injection system
  • Engines 1.4, 1.6 and 1.8 l
  • Engine repair
  • Cooling and lubrication system
  • Injection system
  • Transmission
  • Clutch
  • Mechanical gearbox
  • Automatic gearbox
  • Drive shafts
  • Chassis
  • Wheels and tires
  • Wheel suspension
  • Steering
  • Brake system
  • Body
  • Exterior
  • Doors and windows
  • Electrical equipment
  • Equipment and devices
  • Lighting system
  • Electrical circuits
Corsa B (1993-2000) 
  • General information
  • Introduction to guide
  • User manual
  • Maintenance
  • Power unit
  • SOHC gasoline engines
  • DOHC gasoline engines
  • Diesel engines
  • Engine repair
  • Cooling system
  • Supply system
  • Injection system (gasoline)
  • Injection system (diesel)
  • Exhaust systems
  • Control system (gasoline)
  • Preheat system (diesel)
  • Charge and launch system
  • Transmission
  • Mechanical gearbox
  • Automatic gearbox
  • Clutch and drive shafts
  • Chassis
  • Brake system
  • Front suspension
  • Rear suspension
  • Steering
  • Body
  • Ventilation and heating
  • Exterior
  • Interior
  • Doors and windows
  • Electrical equipment
  • Equipment and devices
  • Lamps and lighting
  • Electrical circuits
OpelBook.ru © 2017–2026 · Mobile version · · Sitemap: EN BG BY UA RS HR RO PL SK HU · Feedback · Site search
Astra F, petrol · Astra G, petrol · Astra G · Astra H · Astra J, petrol · Corsa B · Corsa C, petrol · Corsa C · Insignia A · Kadett D · Kadett E · Omega A · Omega B · Omega B2 · Vectra A, petrol · Vectra A · Vectra B, petrol · Vectra B · Vectra C · Zafira A, petrol · Frontera A, petrol · Frontera B · Ascona C · Vivaro A ·
We want your visit to be comfortable 🤝! We use cookies 🍪 to make that happen.