OpelBook.ru
Cars AvtoVAZ Cars Mitsubishi Cars BMW Cars Mercedes Cars Nissan Cars Toyota Cars Chevrolet
English Русский
Български
Беларускі
Український
Српски
Hrvatski
Română
Polski
Slovenský
Magyar
 |  Sitemap  |  Contacts  |    


Main Astra Corsa Insignia Kadett Omega Vectra Zafira Others Articles
Astra F (1991-1998, petrol) Astra G (1998-2004, petrol) Astra G (1998-2004) Astra H (2004-2009) Astra J (2009-2015, petrol)
  • Main
  • Astra
  • Astra H
  • Body
  • Exterior
  • Removal and installation of body trims (moldings)

Removal and installation of body trims (moldings) (Opel Astra H)

            0

Contents: Side door trims ⬇ Bumper pads ⬇ Decorative trim on the tailgate ⬇

Side door trims


1. To remove the door molding, carefully pry up its edge with a plastic wedge, which is then inserted between the door and the molding. Gradually moving the wedge along the edge of the trim along the entire perimeter, detach it from the door.

2. The new door molding has an adhesive surface on the back. Before gluing, clean the mating surface of the door from silicone residue and dirt using a special solvent or gasoline, then wipe dry with a clean rag.

3. Remove the protective film from the back of the molding, heat the adhesive surface with a hair dryer and apply the overlay to the gluing area. Do not press the overlay with great force at first, so that you can correct it in case of imprecise application. After the molding has taken its place, press it firmly to the door.

Bumper pads


4. On Astra models, the front bumper moldings are made as an element of the overall bumper trim and are removed together with it (see Section 7).

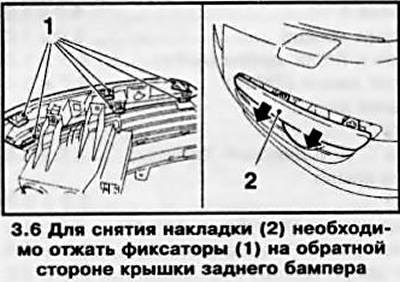
5. To remove the rear bumper molding, you must first remove the polystyrene foam insert from the rear bumper trim.

6. Press the fasteners on the back of the bumper cover (see accompanying illustration) and remove the overlay.

6. Press the fasteners on the back of the bumper cover (see accompanying illustration) and remove…


7. On Zafira models, to remove the pads, you need to pry them up with a plastic wedge and remove them from the mounting sockets.


8. Installation is carried out in reverse order.

Decorative trim on the tailgate


9. Disconnect the cable from the negative terminal of the battery (see Chapter 5).

10. Remove the tailgate trim (see Section 15).

11. On Estate and Zafira models, remove the trims from the sides of the tailgate.

12. Disconnect the tailgate electrical wiring connector near the trim panel.

13. Loosen the mounting nuts (see accompanying illustration) and remove the decorative trim.
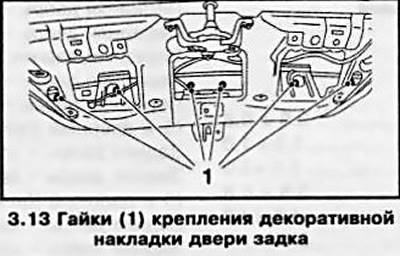
13. Loosen the mounting nuts (see accompanying illustration) and remove the decorative trim.


14. Installation is carried out in reverse order.

Note: The central pins of the decorative strip are additionally lubricated with sealant during installation.


This article is available at russian, bulgarian, belarusian, ukrainian, serbian, croatian, romanian, polish, slovak, hungarian
Checking the article: Simonov Timofey

Share information:

Previous articles
Opel Astra H: Exterior
Next articles

Minor damage to windshield caused by stone impact
Exterior Equipment and Body Parts. General Information
Specifications
Removal and installation the fairing grille
Removal and installation the rear bulkhead cover of the engine compartment (Zafira models)
Removal and installation of wheel arch protection (lockers)
Removal and installation the front bumper/bumper trim
Removal and installation the rear bumper/bumper trim
Removal and installation the decorative radiator grille


See similar ones from other Opel car manuals:
▶ Removal and installation of side (door) trims (moldings) Opel Corsa C (2000-2006)
▶ Replacement of the lower and upper trims of the central… Opel Insignia A (2008-2017)
▶ Removal and installation of side (door) trims (moldings) Opel Vectra C (2002-2008)
▶ Body checkpoints Opel Kadett E (1984-1995)
▶ Structural safety of the body Opel Omega A (1986-1993)
Link to this page in different formats

Visitor comments


No comments yet


How much will 39 + 13 =


Astra J (2009-2015, petrol) 
  • General information
  • Vehicle device
  • User manual
  • Faults en route
  • Maintenance
  • Power unit
  • Engine repair
  • Cooling and lubrication system
  • Engine power system
  • Exhaust system
  • Transmission
  • Clutch
  • Car gearbox
  • Drive shafts
  • Chassis
  • Front suspension
  • Rear suspension
  • Steering
  • Brake system
  • Wheels and tires
  • Body
  • Exterior
  • Interior
  • Doors and windows
  • Body Care
  • Heating and air conditioning
  • Security systems
  • Electrical equipment
  • Equipment and devices
  • Lighting and signaling
  • Power devices
  • Electrical circuits
Astra H (2004-2009) 
  • General information
  • Introduction to the guide
  • Troubleshooting
  • User manual
  • Maintenance
  • Power unit
  • Engine repair
  • Cooling and heating
  • Power and exhaust system
  • Ignition system
  • Launch and charge system
  • Transmission
  • Mechanical gearbox
  • Automatic gearbox
  • Drive shafts
  • Chassis
  • Brake system
  • Car suspension
  • Steering
  • Body
  • Interior
  • Exterior
  • Electrical equipment
  • Equipment and devices
  • Electrical circuits
Astra G (1998-2004) 
  • General information
  • Introduction to manual
  • User manual
  • Maintenance
  • Power unit
  • SOHC gasoline engines
  • DOHC gasoline engines
  • Diesel engines 1.7 and 2.0
  • Engine repair
  • Cooling system
  • Supply system
  • Injection system (gasoline)
  • Injection system (diesel)
  • Exhaust system
  • Charge and launch system
  • Ignition system (gasoline)
  • Preheat system (diesel)
  • Transmission
  • Manual gearbox
  • Automatic gearbox
  • Clutch
  • Drive shafts
  • Chassis
  • Brake system
  • Wheel suspension
  • Steering
  • Body
  • Exterior
  • Interior
  • Doors and windows
  • Ventilation and heating
  • Electrical equipment
  • Equipment and devices
  • Electrical circuits
Astra G (1998-2004, petrol) 
  • General information
  • User manual
  • Car care
  • Maintenance
  • Power unit
  • Single shaft engines
  • Twin shaft engines
  • Engine repair
  • Cooling and heating
  • Fuel and exhaust systems
  • Starting and charging system
  • Ignition system
  • Transmission
  • Clutch
  • Mechanical gearbox
  • Automatic gearbox
  • Drive shafts
  • Chassis
  • Brake system
  • Car suspension
  • Steering
  • Body
  • Interior
  • Exterior
  • Electrical equipment
  • Equipment and devices
  • Wiring diagrams Opel Astra
  • Wiring diagrams Opel Zafira
Astra F (1991-1998, petrol) 
  • General information
  • Maintenance
  • Power unit
  • Engine in car
  • Engine removed
  • Cooling system
  • Heating and ventilation
  • Fuel supply (carburetor)
  • Fuel supply (injector)
  • Emission control
  • Ignition system
  • Transmission
  • Clutch
  • Mechanical gearbox
  • Automatic gearbox
  • Drive shafts
  • Chassis
  • Brake system
  • Car suspension
  • Steering
  • Body
  • Exterior
  • Interior
  • Electrical equipment
  • Equipment and devices
  • Electrical circuits
OpelBook.ru © 2017–2026 · Mobile version · · Sitemap: EN BG BY UA RS HR RO PL SK HU · Feedback · Site search
Astra F, petrol · Astra G, petrol · Astra G · Astra H · Astra J, petrol · Corsa B · Corsa C, petrol · Corsa C · Insignia A · Kadett D · Kadett E · Omega A · Omega B · Omega B2 · Vectra A, petrol · Vectra A · Vectra B, petrol · Vectra B · Vectra C · Zafira A, petrol · Frontera A, petrol · Frontera B · Ascona C · Vivaro A ·
We want your visit to be comfortable 🤝! We use cookies 🍪 to make that happen.