


Contents: Lighting and signaling equipment ⬇ Checking the wear of brake pads and…⬇ Drive belt ⬇ Hoses and connections - checking for…⬇ Determining the source of the leak…⬇ Anti-corrosion body coating ⬇ Handbrake - checking and adjustment ⬇ Checking the front suspension and…⬇ Checking the rear suspension ⬇ Checking shock absorbers ⬇ Wheel mounting bolt tightening…⬇ Adjusting headlights and sidelights ⬇ Checking the car in road conditions ⬇ Wheel adjustment ⬇ Exhaust system ⬇
Lighting and signaling equipment
Check all signal lights and lighting devices of the car. Replace burnt out light bulbs. Check the operation of the horn.
Checking the wear of brake pads and brake discs
Front brakes
1. Remove the front wheels.
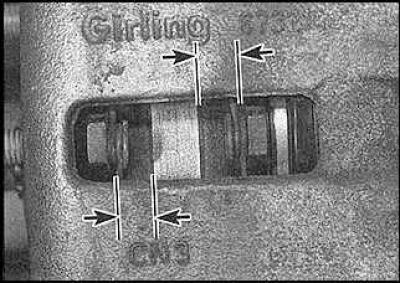
2. To check the condition of the brake pads, caliper and brake disc, the brake pads must be removed. The approximate thickness of the brake pads can be checked through the hole in the caliper.
3. If the thickness of any brake lining is less than the minimum permitted, all four brake linings on both wheels must be replaced.
Rear brakes
1. Remove the rear wheels.
2. To check the condition of the brake pads, caliper and brake disc, the brake pads must be removed. The approximate thickness of the brake pads can be checked through the hole in the caliper.
3. If the thickness of any brake lining is less than the minimum permitted, all four brake linings on both wheels must be replaced.
Drive belt
Examination
The drive belt must be inspected regularly along its entire length and, if worn or damaged, it must be replaced.
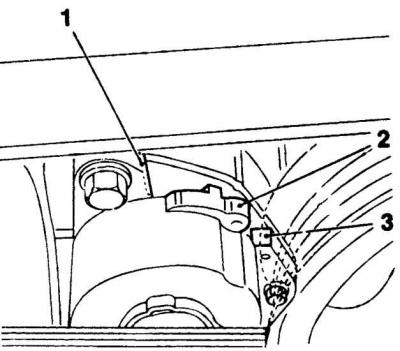
1. On a 2.0L engine, check that the tensioner arm pointer (2) is positioned between the stops (1 and 3). Replace the belt if it is worn or the tensioner arm touches the stop.
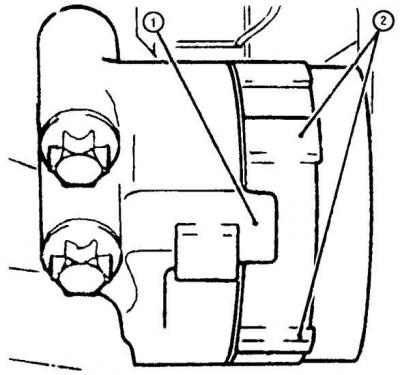
2. On 2.5L and 3.0L engines, check that the stop (1) is between the projections (2) on the lever. Replace the belt if it is worn or the tensioner lever touches the stop.
Replacement
2.0L engine
1. Move the tensioner pulley to the side using a wrench on the pulley's center bolt and remove the belt. Lock the tensioner in this position and put on a new belt. Release the tensioner.
(Original article on the web portal: OPELBOOK.ru)
2.5 and 3.0 liter engines
2. Remove the air chamber and the front air intake tube.
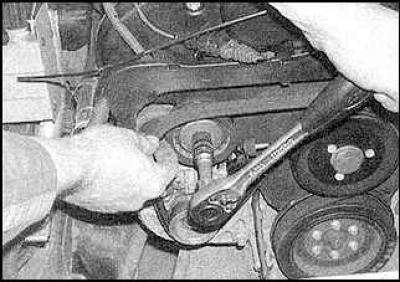
3. Move the tensioner pulley aside by placing a wrench on the center bolt of the pulley and remove the belt. Put on a new belt and release the tensioner.
Hoses and connections - checking for leaks
Cooling system
1. Check the radiator and heater hoses along their entire length. Replace worn hoses. Check the reliability of the clamps and the condition of the hoses underneath them.
2. Inspect all cooling system components for leaks. A leak in the cooling system is indicated by white or rusty deposits in the area of the leak. Replace the relevant components or gaskets if necessary.
Power supply system
1. Raise the vehicle and inspect the fuel tank and filler hose for punctures, cracks, or other damage. Check for secure connections.
2. Check all rubber hoses and metal tubes coming from the fuel tank. Check the reliability of connections and fasteners.
Motor oil
Inspect the area around the valve cover, cylinder head, oil filter and oil pan for leaks. Replace the appropriate gaskets or seals.
Automatic transmission fluid
Inspect the automatic transmission coolant hoses for damage or leaks.
Power steering system
1. Check the condition of the hoses connecting the hydraulic fluid reservoir, pump and steering gear.
2. Check the reliability of the connections and the tightness of the clamps.
Air conditioning refrigerant
The air conditioning system is filled with liquid refrigerant under pressure. If you discover a leak in the air conditioning system, contact a professional immediately.
Brake fluid
1. Inspect the area around the brake line connections on the master cylinder and the base of the brake fluid reservoir for leaks. Check the line connections on the ABS hydraulic module.
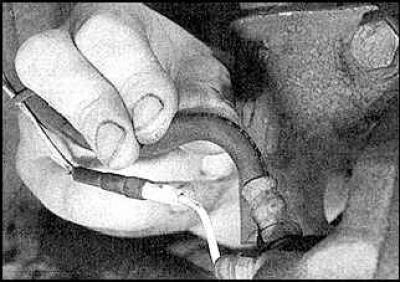
2. Check the brake calipers and brake lines under the vehicle.
Manual transmission oil
Inspect the area around the propeller shaft seal at the rear of the transmission for signs of leakage. Check the oil level and replace the seal if necessary.
Final drive fluid
Inspect the area around the driveshaft and axle shaft seals and oil seals for leaks. Check the oil level and replace the seals if necessary.
Determining the source of the leak and the type of liquid
If the source of the leak and the type of fluid are difficult to determine immediately, leave the car overnight and place a piece of clean cardboard under the suspected leak. Even a small leak will be noticeable in the morning.
Vacuum hoses
Under the influence of high temperatures inside the engine compartment, rubber and plastic hoses that ensure the operation of various engine units and the exhaust gas toxicity reduction system gradually harden and deteriorate. The condition of the hoses, the presence of cracks and hardening, loose connections, and loss of tightness should be checked periodically.
Some hoses are fastened with clamps. Check the tightness of the clamps, as loosening of the fastening leads to a breach of the tightness. In those places where clamps are not provided, check the reliability of the hose seal on the fittings, loss of elasticity in such connections due to swelling or hardening of the hoses is not allowed, otherwise the tightness of the connection is broken.
Vacuum hoses can be identified by their color or by the colored stripes glued to them. Vacuum hoses with different wall thicknesses, resistance to atmospheric pressure compression, and heat resistance are used for different engine systems. When replacing, make sure that the new vacuum hoses exactly match the ones being replaced.
Often, a hose can only be checked after it has been removed from the vehicle. If several hoses are being removed, mark the mating fittings and hoses first to avoid disturbing their relative position later.
When checking the condition of the vacuum hoses, also inspect the plastic tees. Check for cracks on them, as well as deformation of the hose where it meets the tee fitting, which may be the cause of a leak.
To check for leaks by the characteristic sound, you can use a section of vacuum hose with an internal diameter of about 6.0 mm. Put the end of the hose to the place being checked, and listen through the opposite hole in the hose. The characteristic "hissing" will indicate the presence of a leak.
Fuel hoses
Check the condition of the rubber fuel hoses for signs of wear or deterioration in appearance. Pay particular attention to hoses where they are kinked and near connections, such as where they connect to the fuel filter.
When replacing the fuel line on injection engines, the new line must exactly match the one used in the fuel system of the engine of this type.
Fuel line hoses are usually secured with spring clamps, which lose their elasticity over time. When disassembling the connection, such a clamp must be straightened, after which the elasticity is completely lost. When replacing hoses, always replace spring clamps with clamps with screw fastening.
Metal tubes
Metal tubes are commonly used in the fuel line to connect the fuel pump to the fuel pressure regulator on the injector comb. Check for any deformed or dented tubes (twisted) areas and small incipient cracks.
When replacing, only seamless steel tubes should be installed. Copper or aluminum tubes are not suitable, as they cannot withstand vibration loads from the engine.
Check the condition of the metal tubes and fittings of the brake hydraulic system at the point of connection with the master brake cylinder and the dispenser (if provided), cracks and loose connections are not allowed. If any signs of brake fluid leakage are detected, immediately thoroughly check the entire circuit of the brake hydraulic drive system.
Anti-corrosion body coating
To check the anti-corrosion coating of the bottom and body, you need to contact specialists.
Handbrake - checking and adjustment
1. Raise the rear of the vehicle and support it on stands.
2. Raise the handbrake lever 6 clicks and check that both rear wheels are locked.
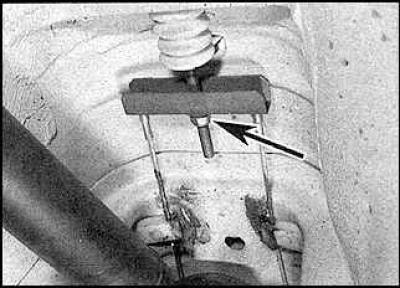
3. If adjustment is necessary, lift the handbrake lever 3 clicks and loosen the adjusting nut on the balancer (indicated by the arrow).
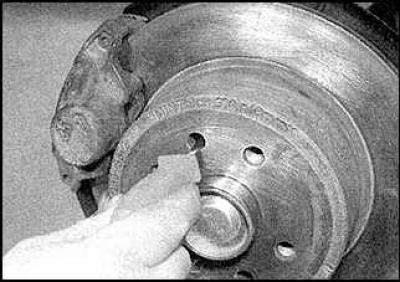
4. Rotate the brake disc so that the hole in the disc is positioned above the adjusting nut on the brake shield. Insert a screwdriver into the hole and turn the adjusting nut until the brake pads lock the brake disc. Then unscrew the nut until the brake disc can rotate again. Repeat the same operation on the other wheel.
5. Tighten the adjusting nut on the balancer until the pads begin to lock the brake disc.
6. Check the handbrake adjustment.
Checking the front suspension and steering
1. Raise the front of the vehicle and support it on jack stands.
2. Inspect the dust boots and covers for cracks or signs of wear.
3. On models with a power steering system, inspect the system hoses, pipes, and connections for leaks.
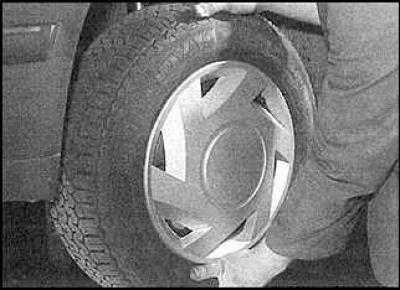
4. Grasp the wheel from above and below and try to shake it. If the free play is too great, have an assistant press the brake pedal and shake the wheel again. If the free play has decreased or disappeared, then the hub bearings need to be replaced. If the free play remains, then the suspension joints or mounts are worn out.
5. Grasp the sides of the wheel and try to shake it. Excessive free play may be caused by worn hub bearings or ball joints of the steering rods.
6. Check the condition of the suspension element mounting bushings.
7. Lower the vehicle to the ground and turn the steering wheel 1/8 of a turn in either direction. If the steering wheel play is too great, check the steering joints and connections.
Checking the rear suspension
1. Raise the rear of the vehicle and support it on stands.
2. Check the hub bearings, bushings and rear suspension component mountings as described higher for front suspension.
Checking shock absorbers
1. Inspect the shock absorbers for signs of fluid leakage. If there is a leak, the shock absorber must be replaced.
2. Check the effectiveness of the shock absorbers by rocking the car up and down.
Wheel mounting bolt tightening torques
1. Loosen the mounting bolts and clean the bolt threads.
2. Tighten the bolts to the required tightening torque.
Adjusting headlights and sidelights
For precise adjustment of headlights, you should contact specialists. If necessary, you can use adjusting screws.
All models are equipped with an electric drive for adjusting the headlights depending on the vehicle load. The switch must be set to the following position depending on the vehicle load:
| 0 | The front seats are occupied |
| 1 | All seats are occupied |
| 2 | All seats are occupied and cargo is in the luggage compartment |
| 3 | The driver's seat is occupied and there is cargo in the luggage compartment |
Checking the car in road conditions
Instruments and electrical equipment
1. Check the operation of all devices and electrical equipment.
2. Check the accuracy of the sensor readings. Turn on all electrical equipment elements one by one to check their operation.
Steering and suspension
Check the operation of the steering and suspension. Check that there is no vibration or noise when driving.
Transmission
Check the operation of the engine, clutch, gearbox and axle shafts. Check that they do not make unusual noise when driving.
Checking the brake system
1. Check that the vehicle does not pull to one side when braking and that the wheels do not lock too early.
2. Check that the steering wheel does not shake when braking.
3. Check the operation of the handbrake and brake booster. To do this, press the brake pedal several times and start the engine. The pedal should drop slightly. Let the engine run for a few minutes and turn it off. Press the brake pedal. You should hear the hiss of the vacuum booster. After several presses, it should stop, and the pedal should become much harder.
Wheel adjustment
Proper wheel alignment is essential for good vehicle handling and extended tire life.
To check the kingpin caster angle, wheel camber and kingpin lateral caster angle, it is recommended to contact specialists.
Exhaust system
1. Place the vehicle on an inspection pit, overpass, or lift it and place it on supports.
2. Inspect the exhaust pipes along their entire length for damaged or missing fasteners, check the mounting clamps and pipes for rust.
3. Check pipes for leaks and repair if necessary.
Visitor comments