


Contents: J60 ⬇ J61, J62 ⬇
J60
1. Raise and secure the vehicle.
2. Remove the rear wheel from the vehicle.
3. Loosen the parking brake cable.
4. Disconnect the parking brake cable from the drive lever on the brake caliper.
5. Unscrew the hollow bolt (1) securing the brake hose.
Note.
- If installing a new brake caliper, hand-tighten the hollow bolt with new gaskets onto the inverted new brake caliper to prevent brake fluid leakage.
- Tightening torque: 40 Nm.
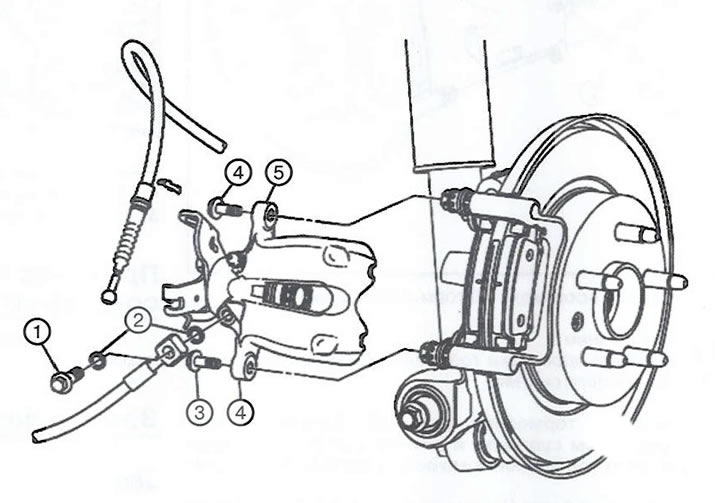
6. Remove the two brake hose gaskets (2).
Note: Replace the brake hose gaskets with new ones after each removal.
7. Disconnect the brake hose (3). Plug the holes in the brake caliper and hose to prevent brake fluid from leaking out and dirt from getting in.
8. Loosen the two bolts (4) of the brake caliper guide pins.
Note: Tightening torque: 32 Nm.
9. Using a large C-clamp, lightly press in the brake caliper piston to facilitate removal. Do not press the caliper piston more than 1 mm.
10. Remove the rear brake caliper (5).
11. Installation is carried out in the reverse order of removal.
Note: The new brake caliper is pre-filled with brake fluid. Do not drain the brake fluid from the new brake caliper before installation as this will prevent the brake system from being completely bled of air.
12. Bleed the brake system.
13. With the engine off, gradually press the brake pedal approximately ⅔ of the total travel and slowly release the brake pedal.
14. Wait 15 seconds, then repeat the previous step two or three more times. This will ensure that the pistons and pads are correctly positioned in the working position.
15. Fill the expansion tank of the master brake cylinder to the required level.
16. Connect the parking brake drive cable to the caliper drive lever.
J61, J62
1. Raise and secure the vehicle.
2. Remove the rear wheel from the vehicle.
3. Loosen the tension of the parking brake cable.
4. Disconnect the parking brake cable from the drive lever on the brake caliper.
5. Unscrew the hollow bolt (1) of the brake hose.
Note.
- If installing a new brake caliper, hand-tighten the hollow bolt with new gaskets onto the inverted new brake caliper to prevent brake fluid leakage.
- Tightening torque: 40 Nm.
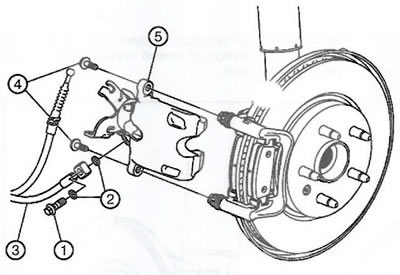
6. Remove the two brake hose gaskets (2).
Note: Replace the brake hose gaskets with new ones after each removal.
7. Disconnect the brake hose (3). Plug the holes in the brake caliper and hose to prevent brake fluid from leaking out and dirt from getting in.
8. Loosen the two bolts (4) of the brake caliper guide pins.
Note: Tightening torque: 27 Nm.
9. Remove the rear brake caliper (5).
10. Installation is carried out in the reverse order of removal.
Note.
- To compress the brake caliper piston, it must be screwed in with long-nose pliers.
- The new brake caliper is pre-filled with brake fluid. Do not drain the brake fluid from the new brake caliper before installation, as this will prevent the brake system from being completely purged of air.
11. Bleed the brake system.
12. With the engine off, gradually press the brake pedal approximately ⅔ of the total travel and slowly release the brake pedal.
13. Wait 15 seconds, then repeat the previous step two or three more times. This will ensure that the pistons and pads are correctly positioned in the working position.
14. Fill the expansion tank of the master brake cylinder to the required level.
15. Connect the parking brake drive cable to the caliper drive lever.
Visitor comments