OpelBook.ru
Cars AvtoVAZ Cars Mitsubishi Cars BMW Cars Mercedes Cars Nissan Cars Toyota Cars Chevrolet
English Русский
Български
Беларускі
Український
Српски
Hrvatski
Română
Polski
Slovenský
Magyar
 |  Sitemap  |  Contacts  |    


Main Astra Corsa Insignia Kadett Omega Vectra Zafira Others Articles
Astra F (1991-1998, petrol) Astra G (1998-2004, petrol) Astra G (1998-2004) Astra H (2004-2009) Astra J (2009-2015, petrol)
  • Main
  • Astra
  • Astra G
  • General information
  • User manual
  • Control devices on the panel

Control devices on the panel (Opel Astra G)

            0

Contents: Tachometer ⬇ Speedometer ⬇ Total distance traveled counter ⬇ Trip odometer ⬇ Hours in the trip meter ⬇ Setting the time ⬇ Service interval display ⬇ Coolant temperature gauge ⬇ Fuel level indicator ⬇ Display with three types of…⬇
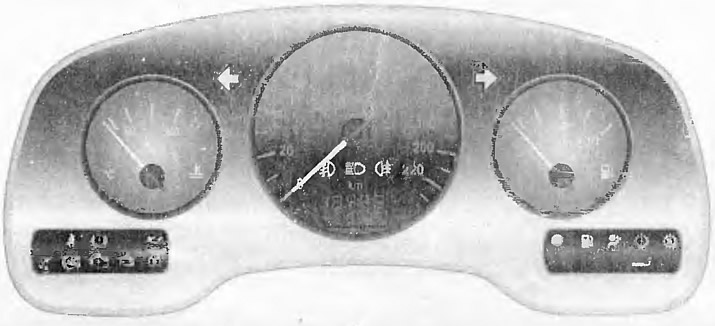
Control devices on the panel


Control devices on the panel


Tachometer


Indicates engine speed in thousands of rpm. It is not allowed to increase engine speed above the maximum indicated on the right side of the scale. The most preferable engine speed is from 2000 to 3000 rpm.

Speedometer


Indicates the speed of the vehicle.

Total distance traveled counter


Indicates the total distance traveled in miles or kilometers.

After turning off the ignition, you can display the distance traveled on the counter display by pressing the reset button and quickly releasing it. The information on the display is reset after 15 seconds.


Trip odometer


To reset the trip information, press the reset button with the ignition on.

Hours in the trip meter


Switching the contents of the counter display to the time setting is achieved by pressing the button, which is located on the instrument panel.

When the lights are on, the brightness of the display is adjusted using the handle under the ignition switch.

Setting the time


Activate the display to the time setting mode.

Set the time using the button on the instrument panel:
  • Press the button for at least 2 seconds,
  • by pressing the button briefly, set the time in hours,
  • press the button again for at least 2 seconds,
  • by pressing the button briefly, set the time in minutes,
  • press the button again for at least 2 seconds.

The clock will start counting time from 0 sec.

Service interval display
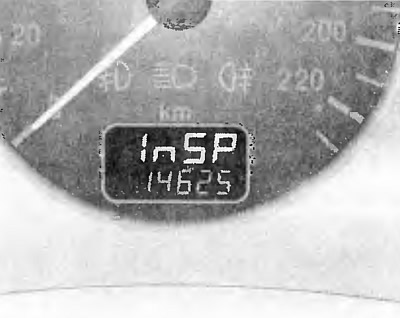


Service interval display


If after turning on the ignition the message InSP appears on the trip display, then the next maintenance should be performed within a week or after 500 km of travel.

When the maintenance notice is displayed, the period of time the vehicle is parked with the battery disconnected is not taken into account. Therefore, please refer to the time and mileage specified in the vehicle's maintenance manual.


Coolant temperature gauge
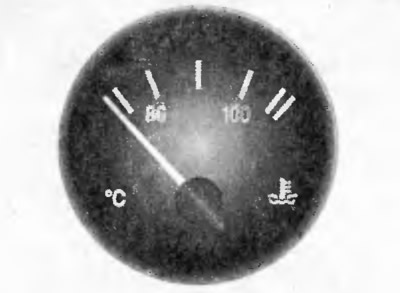


Coolant temperature gauge


(the pointer may differ in appearance from that shown in the illustration).

Arrow position:
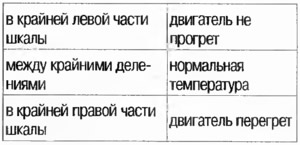
Arrow position:

If overheating occurs, stop the engine immediately and check the coolant level.

If the liquid level is insufficient, the temperature indicator does not show.

Fuel level indicator
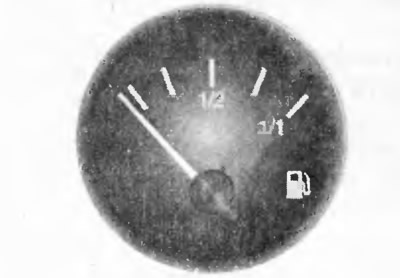


Fuel level indicator


If the arrow is in the red part of the scale, then the car should be refueled.


Display with three types of information output
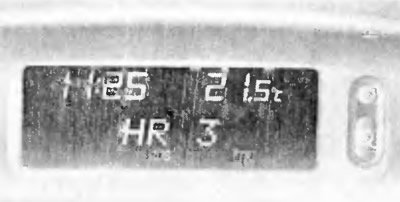


Display with three types of information output


Displays information about time, outside temperature, phone and range.

After turning off the ignition information (except for phone information) can be displayed for 15 seconds by pressing any of the two buttons above the display.


This article is available at russian, bulgarian, belarusian, ukrainian, serbian, croatian, romanian, polish, slovak, hungarian
Checking the article: Kornev Georgy

Share information:

Previous articles
Opel Astra G: User manual
Next articles

Control lights on the instrument panel
Automatic transmission
Manual transmission
Switches and buttons
Decoding nomograms on controls
Controls and instruments
Setting the time and date
Jump starting the engine from another car's battery
Towing a car
Using a vehicle as a towing vehicle
Place for attaching the warning triangle and first aid kit
Spare wheel


See similar ones from other Opel car manuals:
▶ Replacing the backlight lamp of the heating control unit… Opel Corsa B (1993-2000)
▶ Control indicators on the instrument panel Opel Insignia A (2008-2017)
▶ Electronic control and measuring devices Opel Kadett E (1984-1995)
▶ Controls and monitoring devices on the instrument panel Opel Omega B2 (1999-2003)
▶ Central control panel — removal and installation Opel Vectra A (1988-1995, petrol)
Link to this page in different formats

Visitor comments


No comments yet


How much will 43 + 14 =


Astra J (2009-2015, petrol) 
  • General information
  • Vehicle device
  • User manual
  • Faults en route
  • Maintenance
  • Power unit
  • Engine repair
  • Cooling and lubrication system
  • Engine power system
  • Exhaust system
  • Transmission
  • Clutch
  • Car gearbox
  • Drive shafts
  • Chassis
  • Front suspension
  • Rear suspension
  • Steering
  • Brake system
  • Wheels and tires
  • Body
  • Exterior
  • Interior
  • Doors and windows
  • Body Care
  • Heating and air conditioning
  • Security systems
  • Electrical equipment
  • Equipment and devices
  • Lighting and signaling
  • Power devices
  • Electrical circuits
Astra H (2004-2009) 
  • General information
  • Introduction to the guide
  • Troubleshooting
  • User manual
  • Maintenance
  • Power unit
  • Engine repair
  • Cooling and heating
  • Power and exhaust system
  • Ignition system
  • Launch and charge system
  • Transmission
  • Mechanical gearbox
  • Automatic gearbox
  • Drive shafts
  • Chassis
  • Brake system
  • Car suspension
  • Steering
  • Body
  • Interior
  • Exterior
  • Electrical equipment
  • Equipment and devices
  • Electrical circuits
Astra G (1998-2004) 
  • General information
  • Introduction to manual
  • User manual
  • Maintenance
  • Power unit
  • SOHC gasoline engines
  • DOHC gasoline engines
  • Diesel engines 1.7 and 2.0
  • Engine repair
  • Cooling system
  • Supply system
  • Injection system (gasoline)
  • Injection system (diesel)
  • Exhaust system
  • Charge and launch system
  • Ignition system (gasoline)
  • Preheat system (diesel)
  • Transmission
  • Manual gearbox
  • Automatic gearbox
  • Clutch
  • Drive shafts
  • Chassis
  • Brake system
  • Wheel suspension
  • Steering
  • Body
  • Exterior
  • Interior
  • Doors and windows
  • Ventilation and heating
  • Electrical equipment
  • Equipment and devices
  • Electrical circuits
Astra G (1998-2004, petrol) 
  • General information
  • User manual
  • Car care
  • Maintenance
  • Power unit
  • Single shaft engines
  • Twin shaft engines
  • Engine repair
  • Cooling and heating
  • Fuel and exhaust systems
  • Starting and charging system
  • Ignition system
  • Transmission
  • Clutch
  • Mechanical gearbox
  • Automatic gearbox
  • Drive shafts
  • Chassis
  • Brake system
  • Car suspension
  • Steering
  • Body
  • Interior
  • Exterior
  • Electrical equipment
  • Equipment and devices
  • Wiring diagrams Opel Astra
  • Wiring diagrams Opel Zafira
Astra F (1991-1998, petrol) 
  • General information
  • Maintenance
  • Power unit
  • Engine in car
  • Engine removed
  • Cooling system
  • Heating and ventilation
  • Fuel supply (carburetor)
  • Fuel supply (injector)
  • Emission control
  • Ignition system
  • Transmission
  • Clutch
  • Mechanical gearbox
  • Automatic gearbox
  • Drive shafts
  • Chassis
  • Brake system
  • Car suspension
  • Steering
  • Body
  • Exterior
  • Interior
  • Electrical equipment
  • Equipment and devices
  • Electrical circuits
OpelBook.ru © 2017–2026 · Mobile version · · Sitemap: EN BG BY UA RS HR RO PL SK HU · Feedback · Site search
Astra F, petrol · Astra G, petrol · Astra G · Astra H · Astra J, petrol · Corsa B · Corsa C, petrol · Corsa C · Insignia A · Kadett D · Kadett E · Omega A · Omega B · Omega B2 · Vectra A, petrol · Vectra A · Vectra B, petrol · Vectra B · Vectra C · Zafira A, petrol · Frontera A, petrol · Frontera B · Ascona C · Vivaro A ·
We want your visit to be comfortable 🤝! We use cookies 🍪 to make that happen.