


Contents: Fuses ⬇ Fuse box ⬇ Color coding and current strength of…⬇ Replacing lamps ⬇ Headlight adjustment ⬇ Replacing low beam lamps ⬇ Replacing high beam bulbs ⬇ Halogen headlight system…⬇ Halogen headlight system (replacing…⬇ Elliptical headlight system…⬇ Elliptical headlight system…⬇ Xenon headlight system (replacement…⬇ Xenon headlight system (replacing…⬇ Direction indicators, brake lights,…⬇ Brake lights, tail lights, direction…⬇ License plate light (Corsa) ⬇ Combo ⬇ Interior lights, rear reading…⬇ Front interior lights and reading…⬇
Electronic ignition systems operate with very high discharge power. Do not touch them, it is dangerous to life.
Fuses
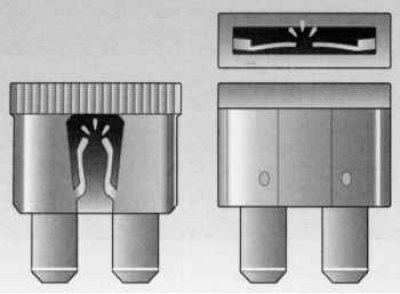
A defective fuse can be identified by a burnt-out fuse thread. Replace the fuse only after eliminating the cause of the malfunction.
Fuse box
The fuse box is located in the engine compartment next to the coolant expansion tank.
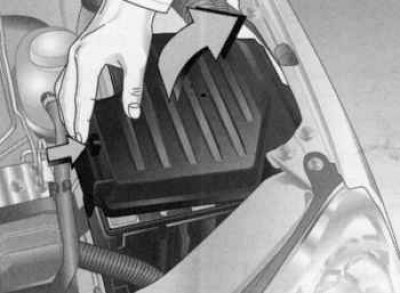
Secure the main fuse box cover by the hinge and lift it up.
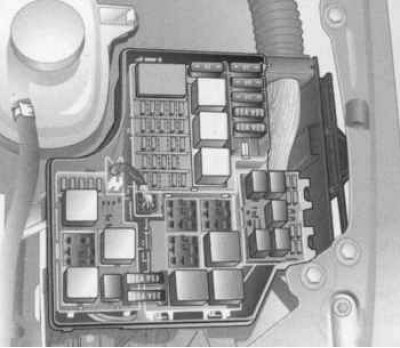
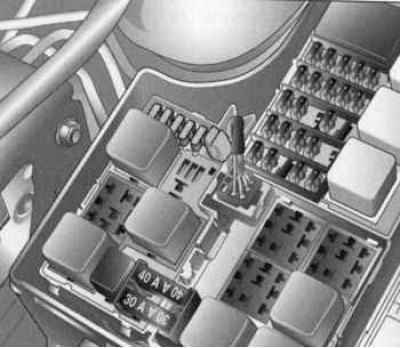
Remove the additional cover.
It is recommended to always carry a complete set of fuses with you.
Place spare fuses in the fuse box in the designated place, to the right of which is the fuse replacement tool.
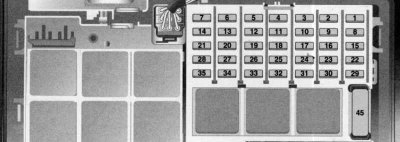
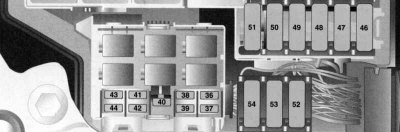
Before replacing a fuse, turn off the corresponding switch or turn off the ignition.
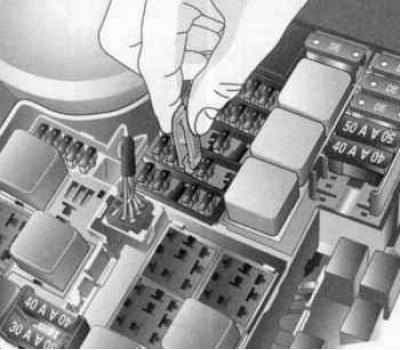
Place the fuse puller on the fuse and pull it out.
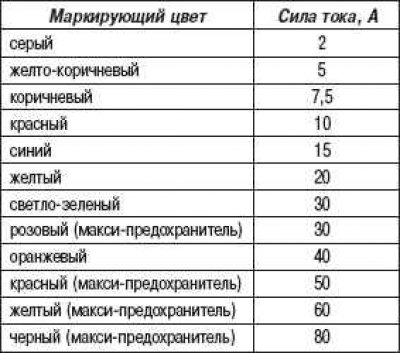
Insert fuses only with the specified nominal current. Its value is indicated on each fuse and is additionally marked with a color, and is also indicated on the seat in the fuse box.
Fuses and essential circuits with fuses
Color coding and current strength of fuses
Original posted on the website: OpelBook.ru
Note: Some electrical circuits may be protected by multiple fuses.
Caution! Before replacing the lamp, turn off the ignition and the corresponding switch.
Replacing lamps
Handle the new lamp only by the base. Do not handle the lamp by the glass with bare hands, as this will leave fingerprints on the glass. Dirt settles on the reflector and impairs its reflectivity. Remove traces of contact with a clean, non-lint cloth soaked in alcohol.
Select a replacement lamp in accordance with the marking on the base of the defective lamp. Do not exceed the specified power in watts.
The outer lamps of the front headlight unit are replaced through the openings in the front wheel arch. To do this, turn the wheels in the desired direction, release the lock and remove the cover.
Headlight adjustment
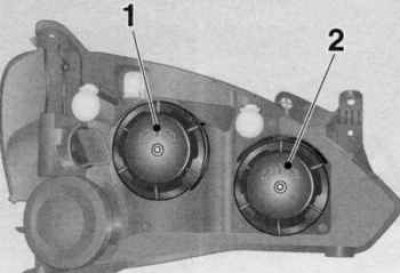
When adjusting the headlights, the headlight range adjustment should be set to 0.
The figure shows headlights with separate low beam systems 1 (outdoor lamps) and high beam 2 (internal pumps).
Replacing low beam lamps
Open and support the hood.
When replacing the lamp on the left side, open the fuse box cover.
When replacing the bulb on the right side, remove the hose from the air filter. Pull up the filler pipe of the headlight washer reservoir.
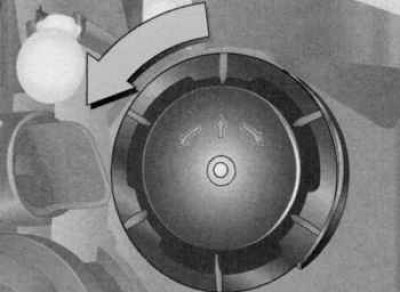
Turn the cover to the left and remove it.
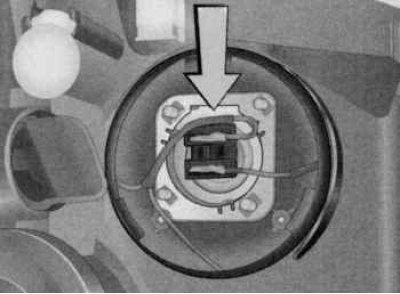
Press the pump down by the plug.
Remove the incandescent lamp with the plug from the reflector housing.
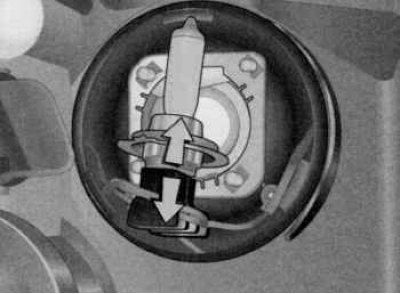
Remove the plug from the lamp base.
Insert the plug into the new bulb without touching the glass of the bulb.
Insert the new bulb with the plug so that the locking tab fits into the recess on the reflector.
Install and close the headlight protective cap.
After replacing the bulb on the left side, close the fuse box cover.
After replacing the bulb on the right side, install and secure the hose to the air filter. Install the headlight washer reservoir filler pipe in place.
Replacing high beam bulbs
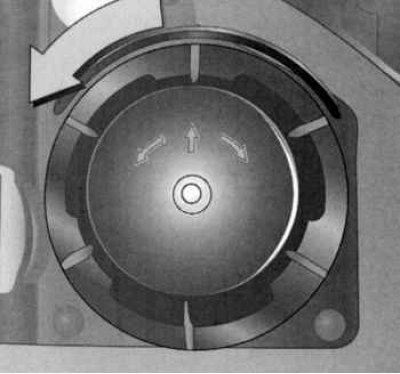
Open and support the hood.
When replacing the bulb on the left side, open the fuse box cover.
When replacing the lamp on the right side, remove the hose from the air filter.
Turn the cover to the left and remove it.
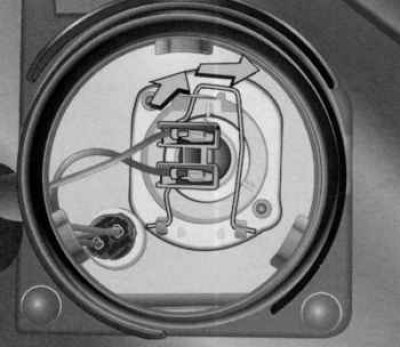
Disconnect the plug from the lamp.
Release the spring clip from the mounting lug forward and turn it to the side.
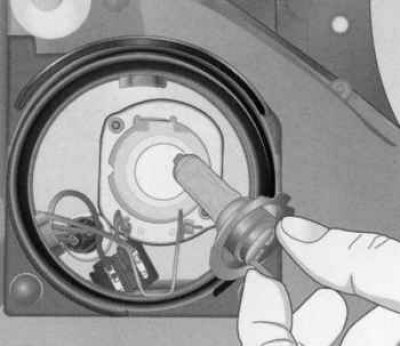
Remove the incandescent light bulb from the socket.
When installing a new lamp, insert the retaining tabs into the reflector slots, being careful not to touch the lamp glass.
Fix the spring wire clip, insert the plug into the lamp.
Install and close the headlight protective cap.
After replacing the lamp on the left side, close the fuse box cover.
After replacing the pump on the right side, install and secure the hose to the air filter.
Halogen headlight system (replacement of parking light bulbs)
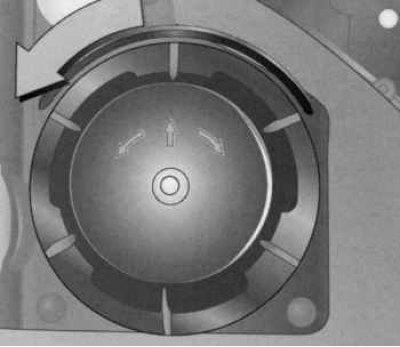
Open and support the hood.
When replacing the lamp on the left side, open the fuse box cover.
When replacing the lamp on the right side, remove the hose from the air filter.
Turn the high beam headlight cover to the left and remove it.
Remove the plug from the high beam bulb.
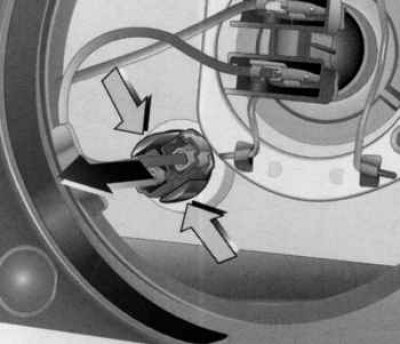
Remove the parking light bulb socket from the reflector.
Remove the lamp from the socket.
Insert the new bulb without touching the glass of the bulb.
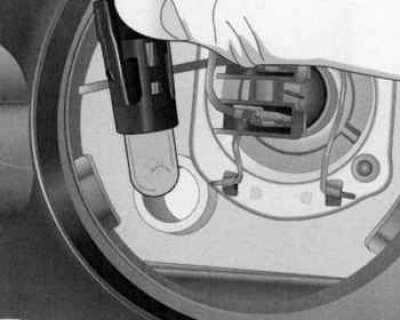
Insert the lamp socket into the reflector.
Place the plug onto the high beam bulb.
Install and close the headlight protective cap.
After replacing the lamp on the left side, close the fuse box cover.
After replacing the lamp on the right side, install and secure the hose to the air filter.
Halogen headlight system (replacing front turn signal bulbs)
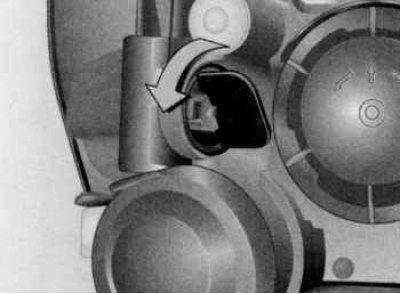
Open and support the hood.
When replacing the lamp on the left side, open the fuse box cover.
When replacing the bulb on the right side, remove the hose from the air filter. Pull up the filler neck of the headlight washer reservoir*.
Turn to the left and release the lamp holder from the lock.
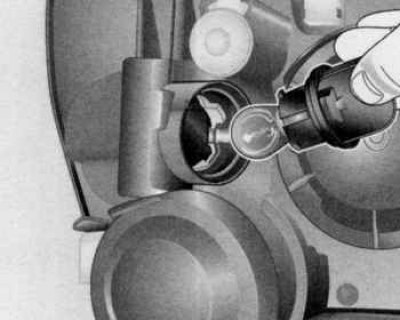
Press the bulb lightly into the socket, turn it to the left and remove it.
Insert the new bulb without touching the glass of the bulb.
Fix the cartridge into the reflector by turning it to the right.
After replacing the bulb on the left side, close the fuse box cover.
After replacing the bulb on the right side, install and secure the hose to the air filter. Install the headlight washer reservoir filler pipe in place.
Elliptical headlight system (replacement of low beam lamps)
Open and support the hood.
When replacing the lamp on the left side, open the fuse box cover.
When replacing the bulb on the right side, remove the hose from the air filter. Pull up the filler pipe of the headlight washer reservoir.
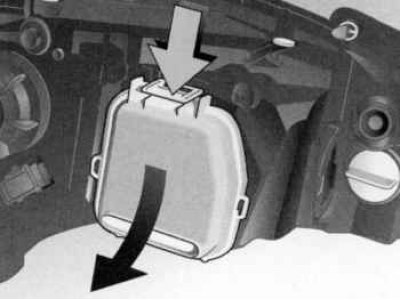
Remove the headlight cover by pressing the latch and pulling the cover down.
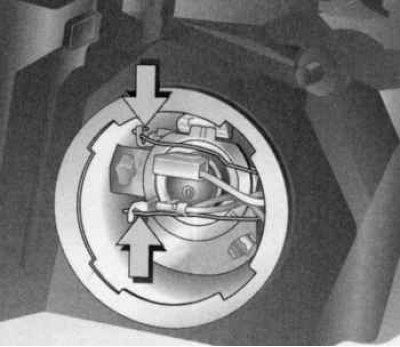
Disconnect the plug from the lamp.
Remove the spring clip from the mounting lug and turn it to the side.
Remove the incandescent light bulb from the socket.
When installing a new lamp, insert the retaining tabs into the reflector slots, being careful not to touch the lamp glass.
Fix the spring wire clip, insert the plug into the lamp.
Install and close the headlight protective cap.
After replacing the bulb on the left side, close the fuse box cover.
After replacing the pump on the right side, install and secure the hose to the air filter. Install the headlight washer reservoir filler pipe in place.
Elliptical headlight system (replacing front turn signal bulbs)
Open and support the hood.
When replacing the bulb on the left side, open the fuse box cover. On vehicles with a Z 13 DT engine, also remove the relay box located in front of the fuse box from its guides.
When replacing the lamp on the right side, remove the hose from the air filter.
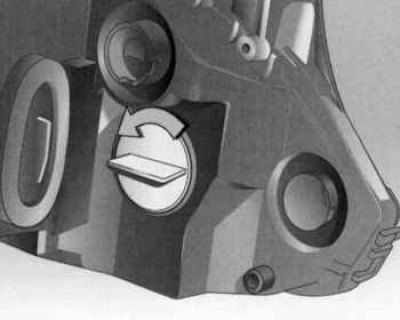
Turn to the left and release the lamp holder from the lock.
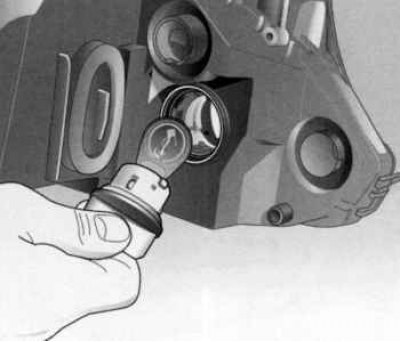
Press the pump lightly into the chuck, turn it to the left and remove it.
Insert the new bulb without touching the glass of the bulb.
Fix the cartridge into the reflector by turning it to the right.
After replacing the lamp on the left side, close the fuse box cover. On cars with a Z 13 DT engine, also install the relay box in place and secure it in the guides.
After replacing the lamp on the right side, install and secure the hose to the air filter.
Xenon headlight system (replacement of low beam lamps)
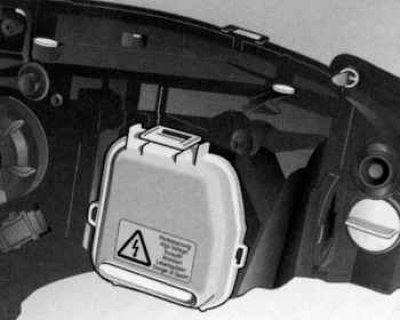
The low beam of the xenon headlights operates at very high electrical voltage. Do not touch, it is dangerous to life. It is recommended to entrust the replacement of the lamps to an Opel partner.
Xenon headlight system (replacing front turn signal bulbs)
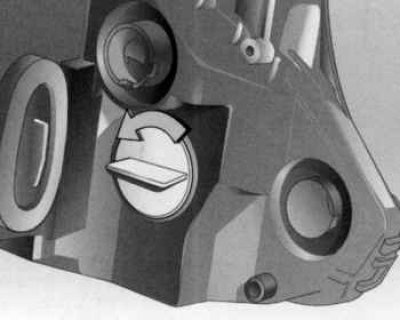
Open and support the hood.
When replacing the bulb on the left side, open the fuse box cover. On vehicles with a Z 13 DT engine, also remove the relay box located in front of the fuse box from its guides.
When replacing the lamp on the right side, remove the hose from the air filter.
Turn to the left and release the lamp holder from the lock.
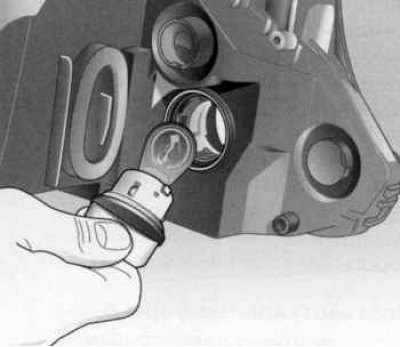
Press the pump lightly into the chuck, turn it to the left and remove it.
Insert the new bulb without touching the glass of the bulb.
Fix the cartridge into the reflector by turning it to the right.
After replacing the bulb on the left side, close the fuse box cover. On cars with a Z 13 DT engine, also install the relay box in place and secure it in the guides.
After replacing the pump on the right side, install and secure the hose to the air filter.
Direction indicators, brake lights, tail lights and reversing lights (Corsa)
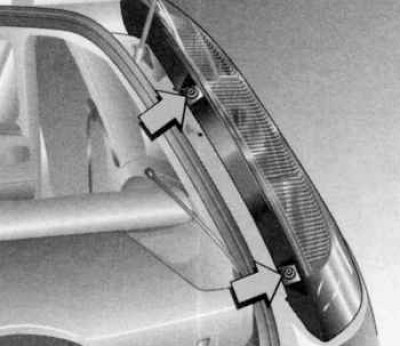
Use a screwdriver to unscrew both screws on the lamp housing.
Pull the lamp housing downwards out of the clips.
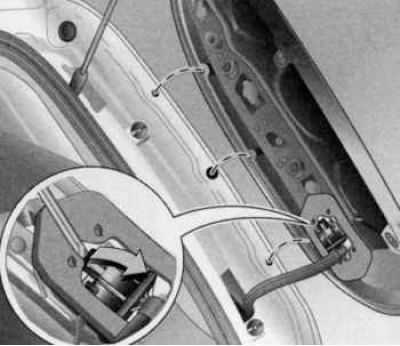
Disconnect the cable plug with a screwdriver and remove it from the lamp holder.
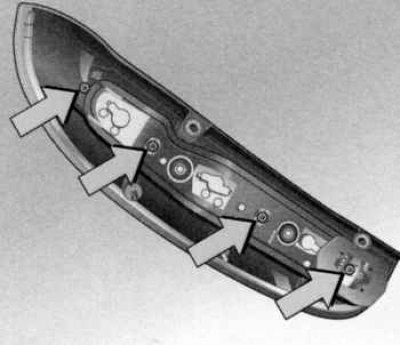
Use a screwdriver to remove the four screws on the lamp holder. Remove the lamp holder from the lamp housing.
Lamps from top to bottom: turn signal lamp tail light/brake light lamp reversing lamp
Remove the lamp from the socket.
Insert the new bulb without touching the glass of the bulb, install the bulb holder into the bulb housing and screw it tightly with screws, fix the cable plug, insert the bulb housing with the fixing pins into the body and secure.
Brake lights, tail lights, direction indicators, reversing lights, rear fog lights (Combo)
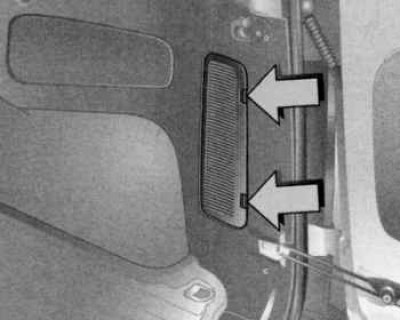
Press the locking tabs to release and remove the closing cover.
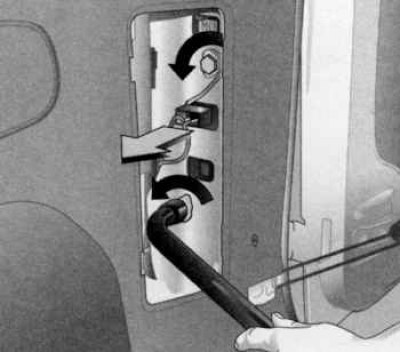
Remove the cable plug from the pump holder.
While holding the lamp housing from the outside, loosen both mounting nuts with a wheel bolt wrench and unscrew by hand.
Remove the lamp housing.
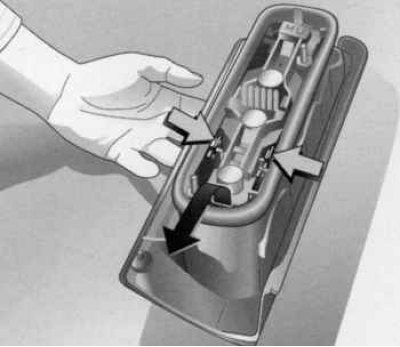
Press the locking tabs on the lamp holder together and remove the lamp holder as shown in the figure.
Lamps from top to bottom: tail light/brake light, turn signal light, reversing light, rear fog light.
Remove the pump from the cartridge.
Insert the new bulb without touching the glass of the bulb. Fix the bulb holder in the housing. Insert the bulb housing into the car body. Screw the fastening nuts onto the threaded studs by hand and tighten them tightly. Insert the cable plug. Install the cover and close it.
Special version for certain countries: rear fog lamp on the left side only.
License plate light (Corsa)
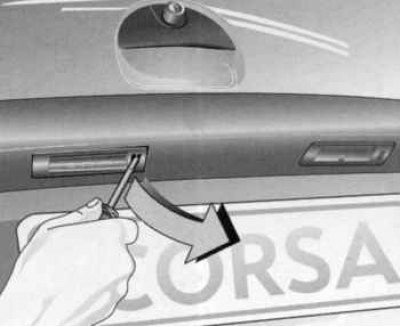
Insert the screwdriver vertically from the right side of the lamp housing, press to the right and unlock the spring. Remove the lamp housing by pushing it down.
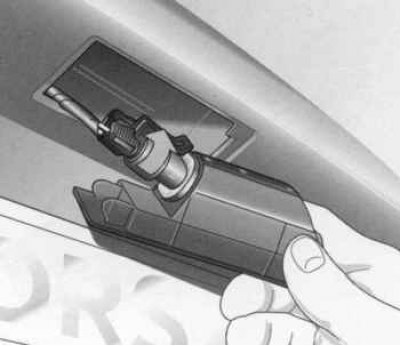
Turn to the left and release the lamp holder from the lock.
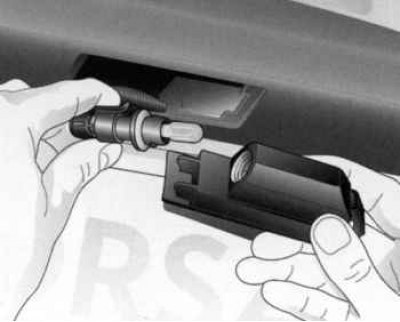
Remove the lamp from the socket.
Insert the new bulb without touching the glass of the bulb.
Turn the lamp holder to the right and lock it. Insert the lamp housing and secure it.
Combo
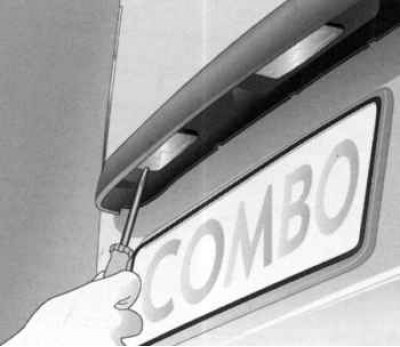
Unscrew both screws. Remove the lamp holder.
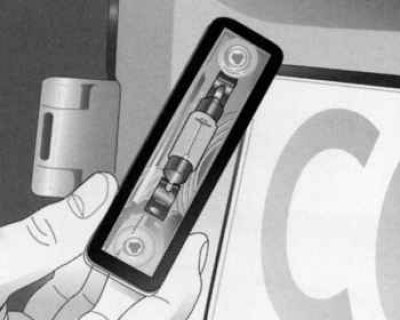
Press the bulb lightly towards the spring terminal and remove the bulb.
Insert the new bulb without touching the glass of the bulb.
Insert the lamp socket and secure with a screwdriver.
Interior lights, rear reading lights, trunk lights
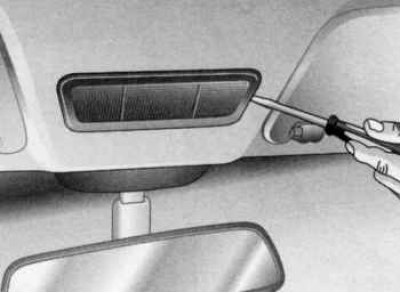
To de-energize the light, close the doors or hold down the limit switch before removing it.
Press out the bulb with a screwdriver and remove it.
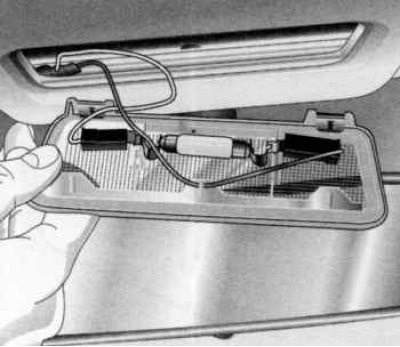
Press the bulb lightly towards the spring terminal and remove the bulb.
Insert the new bulb without touching the glass of the bulb.
Insert the lamp into the hole and fix it.
Front interior lights and reading lights
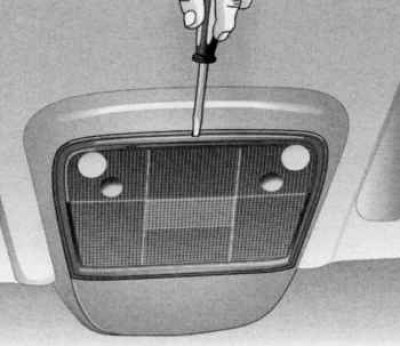
To de-energize the light fixture, close the doors before removing it.
Press the reflector glass out of the housing.
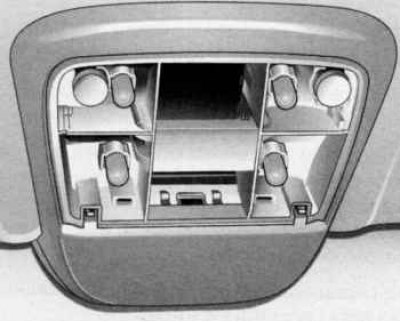
Remove the lamp from the socket.
Insert a new bulb.
Install and secure the reflector glass.
Visitor comments