OpelBook.ru
Cars AvtoVAZ Cars Mitsubishi Cars BMW Cars Mercedes Cars Nissan Cars Toyota Cars Chevrolet
English Русский
Български
Беларускі
Український
Српски
Hrvatski
Română
Polski
Slovenský
Magyar
 |  Sitemap  |  Contacts  |    


Main Astra Corsa Insignia Kadett Omega Vectra Zafira Others Articles
Insignia A (2008-2017)
  • Main
  • Insignia
  • Insignia A
  • Power unit
  • Diesel engines 2.0 l
  • Replacing the timing belt

Replacing the timing belt (Opel Insignia A)

            0

Contents: Removal ⬇ Installation ⬇

Removal


1. Open the hood.

2. Cover the car fenders with a protective coating.

3. Remove the battery cover and disconnect the negative battery terminal.

4. Remove the engine cover.

5. Remove the front wheel arch liners.

6. Remove the engine mounting bracket.

Caution: Avoid contact of the timing belt with coolant and engine oil, as this may damage it and make it impossible to use it further.


7. Set the piston of the first cylinder to the top dead center position:
  • Remove the camshaft housing plug bolt.
  • Install the EN-46789 locking tool (1) into the camshaft housing.
  • Turn the engine crankshaft clockwise until the FN-46789 (1) locking pin audibly engages.
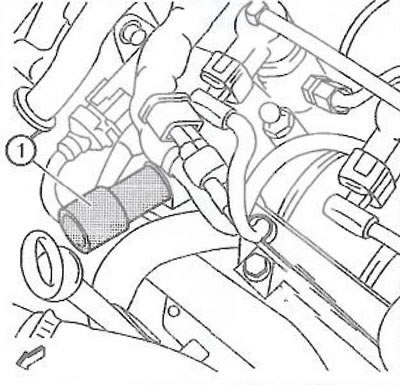
Turn the engine crankshaft clockwise until the FN-46789 (1) locking pin audibly engages.


8. Loosen the oil pump bolt (1).
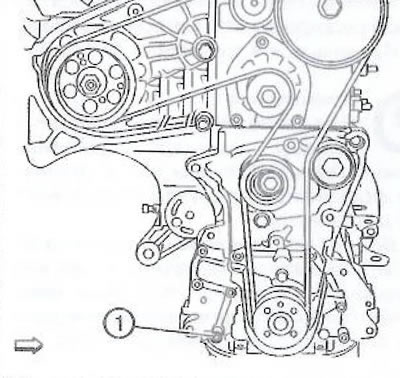
8. Loosen the oil pump bolt (1).


9. Install the pin (1) of the EN-46788 fixing device.
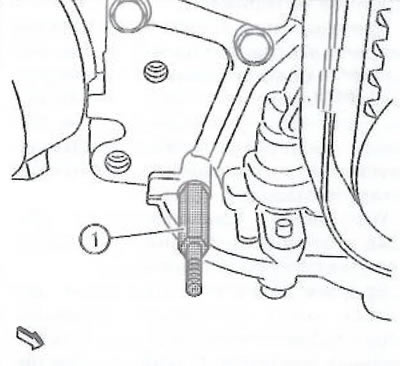


9. Install the pin (1) of the EN-46788 fixing device.


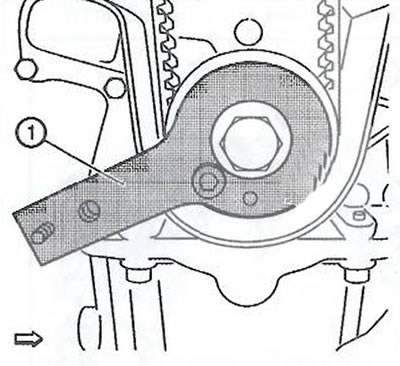
10. Fix the crankshaft using the EN-46788 tool (1).
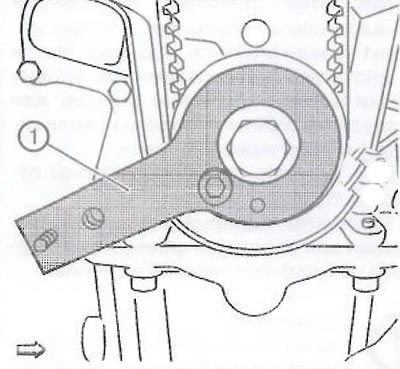
10. Fix the crankshaft using the EN-46788 tool (1).


11. Install the EN-47634 holding wrench (2) with the EN-956-1 extension (3) onto the camshaft timing pulley (1).
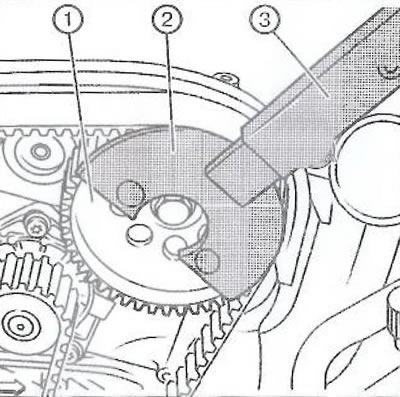
11. Install the EN-47634 holding wrench (2) with the EN-956-1 extension (3) onto the camshaft…


12. Loosen the camshaft toothed pulley bolt.

13. Loosen the tensioner bolt (2) to relieve tension from the toothed belt (1).
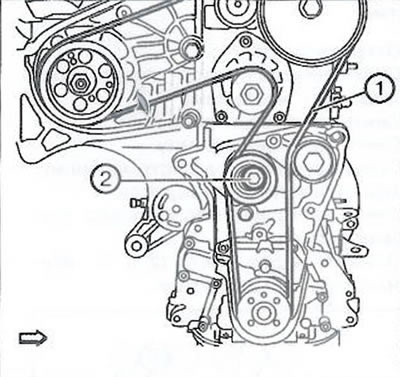
13. Loosen the tensioner bolt (2) to relieve tension from the toothed belt (1).


14. Remove the EN-46788 retainer.


15. Remove the toothed belt (1), having first marked the direction of its rotation.

Caution: Be careful not to damage the timing belt. A damaged timing belt cannot be reused.


Installation


1. Fix the crankshaft using the EN-46788 locking device:
  • Install a new timing belt onto the crankshaft timing pulley.
  • Install the EN-46788 retainer (1).

Install the EN-46788 retainer (1).


Material was taken from a resource [opelbook.ru]

Note: Make sure that the belt does not fall off the timing pulley while installing the retainer.


2. Install the timing belt in the following sequence:

Note: The marks on the timing belt must match the marks on the timing pulleys (see arrows in the picture).


The timing belt tensioner must be loosened.
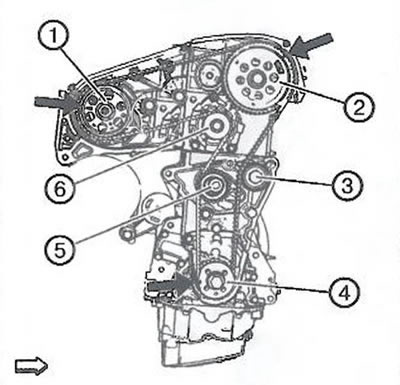
The timing belt tensioner must be loosened.

  • Start installing the timing belt from the crankshaft pulley (4).
  • Install the belt on the tensioner pulley (5).
  • Install the belt on the water pump pulley (6).
  • Install the belt on the high pressure fuel pump toothed pulley (1).
  • Install the belt on the camshaft toothed pulley (2).
  • Finally, install the toothed belt on the idler pulley (3).

3. Return the tensioner (1) to the working position:


3. Return the tensioner (1) to the working position:

  • Loosen the tensioner bolt.
  • Return the movable pointer to the marked position (hole), as shown in the figure by arrows.
  • Tighten the tensioner bolt to 25 Nm.

4. Tighten the camshaft timing pulley bolt:
  • Install the EN-47634 holding wrench (2) with the EN-956-1 extension (3) onto the camshaft timing pulley (1).
  • Tighten the camshaft timing pulley bolt to 120 Nm.
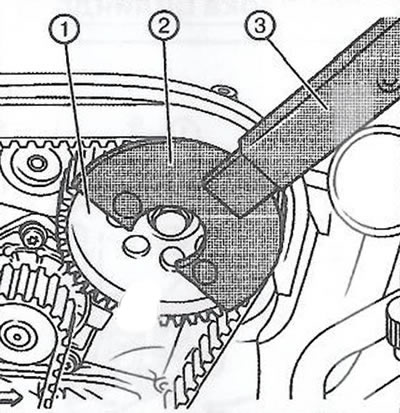
Tighten the camshaft timing pulley bolt to 120 Nm.


5. Remove the EN-47634 retaining key (2) with the EN-956-1 extension (3).

6. Remove the EN-46788 and EN-46789 fasteners.

Attention. Turn the engine crankshaft ONLY clockwise!


7. Turn the engine crankshaft 720° (two turns).

8. Check the correct installation of the timing belt by inserting the EN-46789 and EN-46788 fasteners.

9. Remove the EN-46788 and EN-46789 fasteners.


10. Install the oil pump bolt and tighten to 9 Nm.
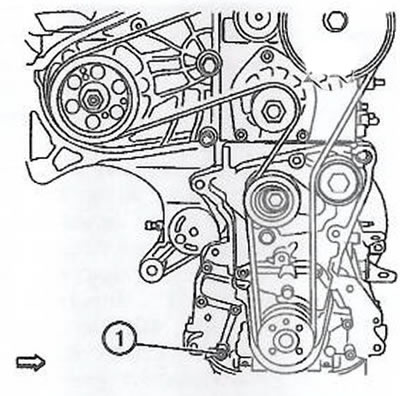
10. Install the oil pump bolt and tighten to 9 Nm.


11. Install the engine mounting bracket.

12. Install the front wheel arch liners.

13. Install the engine cover.

14. Connect the negative battery terminal and install the battery cover.

15. Remove protective coverings from the vehicle fenders.

16. Close the hood.


This article is available at russian, bulgarian, belarusian, ukrainian, serbian, croatian, romanian, polish, slovak, hungarian
Checking the article: Zinoviev Kirill

Share information:

Previous articles
Opel Insignia A: Diesel engines 2.0 l
Next articles

Gas distribution mechanism drive belt
Replacing the alternator drive belt, air conditioning compressor and power steering pump
Checking engine compression
General information
Cylinder head structure
Replacing the camshaft housing
Replacing the cylinder head
Disassembling the cylinder head
Cleaning and checking the technical condition of the cylinder head
Construction of the cylinder block and crank mechanism


See similar ones from other Opel car manuals:
▶ Replacing the timing belt Opel Astra J (2009-2015, petrol)
▶ Replacing the timing belt Opel Vectra B (1995-2002, petrol)
▶ Timing Belt — Checking Condition, Adjusting Tension and… Opel Zafira A (1999-2005, petrol)
▶ Replacing the engine timing belt Opel Frontera A (1991-1998, petrol)
▶ Checking the condition and replacing the auxiliary drive… Opel Corsa B (1993-2000)
Link to this page in different formats

Visitor comments


No comments yet


How much will 31 + 44 =


Insignia A (2008-2017) 
  • General information
  • Repair on the road
  • Daily checks
  • Operation and maintenance
  • Safety and tool
  • Power unit
  • Petrol engines 1.6 l
  • Petrol engines 2.0 l
  • Diesel engines 2.0 l
  • Diesel engines 2.8 l
  • Cooling system
  • Lubrication system
  • Supply system
  • Engine management
  • Intake and exhaust system
  • Engine electrical equipment
  • Transmission
  • Clutch
  • Mechanical gearbox
  • Automatic gearbox
  • Transfer case
  • Drive shafts
  • Chassis
  • Wheel suspension
  • Brake system
  • Steering
  • Body
  • Exterior
  • Interior
  • Passive safety
  • Heater and air conditioner
  • Electrical equipment
  • Electrical circuits
OpelBook.ru © 2017–2026 · Mobile version · · Sitemap: EN BG BY UA RS HR RO PL SK HU · Feedback · Site search
Astra F, petrol · Astra G, petrol · Astra G · Astra H · Astra J, petrol · Corsa B · Corsa C, petrol · Corsa C · Insignia A · Kadett D · Kadett E · Omega A · Omega B · Omega B2 · Vectra A, petrol · Vectra A · Vectra B, petrol · Vectra B · Vectra C · Zafira A, petrol · Frontera A, petrol · Frontera B · Ascona C · Vivaro A ·
We want your visit to be comfortable 🤝! We use cookies 🍪 to make that happen.