
OpelBook.ru
Cars AvtoVAZ Cars Mitsubishi Cars BMW Cars Mercedes Cars Nissan Cars Toyota Cars Chevrolet
English Русский
Български
Беларускі
Український
Српски
Hrvatski
Română
Polski
Slovenský
Magyar
 |  Sitemap  |  Contacts  |    


Main Astra Corsa Insignia Kadett Omega Vectra Zafira Others Articles
Insignia A (2008-2017)
  • Main
  • Insignia
  • Insignia A
  • Power unit
  • Diesel engines 2.0 l
  • Replacing the turbocharger. Engines LBS/A20DTH, LBX/A20DTJ, LCD/A20DTC

Replacing the turbocharger. Engines LBS/A20DTH, LBX/A20DTJ, LCD/A20DTC (Opel Insignia A)

            0

Contents: Removal ⬇ Installation ⬇

Removal


1. Open the hood.

2. Remove the rear air cleaner outlet duct.

3. The turbocharger pressure oil line has been removed.

4. Remove the turbocharger return oil hose.

5. Disconnect the electrical connector of the damper actuator.

6. Loosen the nut (1) and remove the catalytic converter clamp (2).
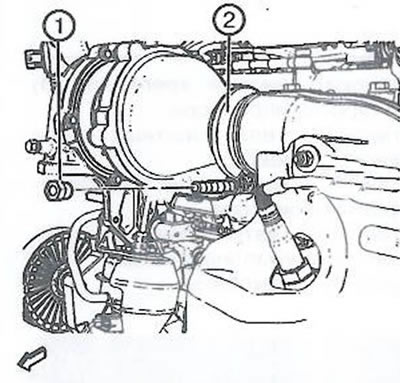
6. Loosen the nut (1) and remove the catalytic converter clamp (2).


7. Raise and secure the vehicle.

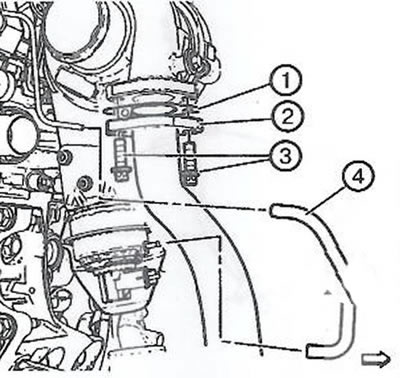
8. Loosen the two bolts (3) of the air intake hose.
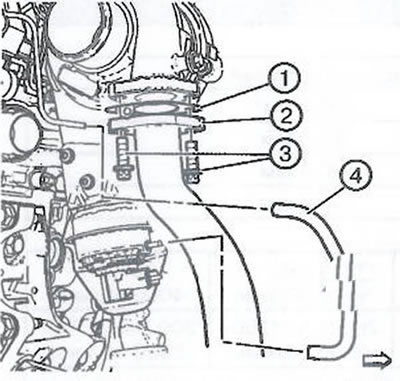
8. Loosen the two bolts (3) of the air intake hose.


9. Remove the air inlet hose (2) and set it aside.

10. Remove the gasket (1) of the air intake hose.

11. Remove the hose of the electromagnetic valve controlling the turbocharger flap vacuum drive (4).
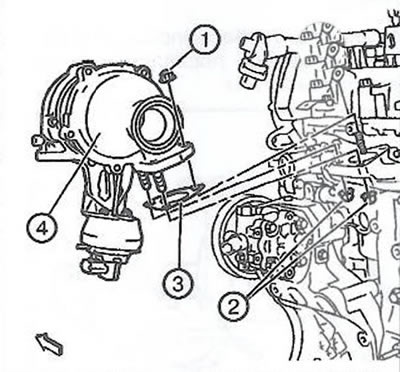
11. Remove the hose of the electromagnetic valve controlling the turbocharger flap vacuum drive (4).


12. Unscrew the two exhaust manifold nuts (2).


13. Lower the vehicle.

14. Unscrew the nut (1) of the exhaust manifold.

15. Remove the turbocharger (4).

16. Remove the turbocharger gasket (3).

17. Clean all contact surfaces from gasket residue.

Installation


1. Install a new turbocharger gasket.

2. Install the turbocharger.

3. Hand tighten the three new exhaust manifold nuts to align the turbocharger with the catalytic converter.

4. Install the catalytic converter clamp (2) and tighten the nut (1) to 20 Nm.
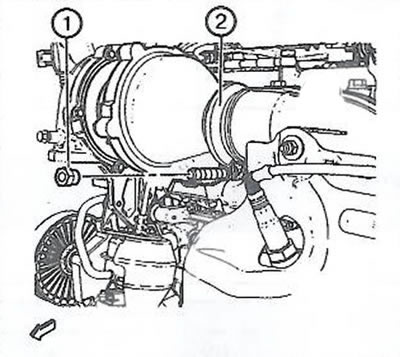
4. Install the catalytic converter clamp (2) and tighten the nut (1) to 20 Nm.


5. Tighten the three exhaust manifold nuts in two stages in the following sequence:
  • First stage: nut No.2 with a torque of 15 Nm, nut No.1 with a torque of 15 Nm, nut No.3 with a torque of 15 Nm.
  • Second stage: nut No.2 with a torque of 28 Nm, nut No.1 with a torque of 28 Nm, nut No.3 with a torque of 28 Nm.

Note: Following the tightening sequence is necessary to prevent damage to the gasket between the turbocharger and the exhaust manifold.


6. Raise the car.

7. Install the hose (4) of the electromagnetic valve for controlling the turbocharger flap vacuum drive.
7. Install the hose (4) of the electromagnetic valve for controlling the turbocharger flap vacuum…


8. Install a new air intake hose gasket (1).


9. Install the air inlet hose (2) and tighten the two bolts (3) to 25 Nm.

10. Connect the electrical connector of the damper drive.

11. Install the turbocharger oil return hose.

12. Install the turbocharger pressure oil line.

13. Install the rear air filter outlet duct.

Material copied from this portal opelbook

14. Close the hood.


This article is available at russian, bulgarian, belarusian, ukrainian, serbian, croatian, romanian, polish, slovak, hungarian
Checking the article: Zinoviev Kirill

Share information:

Previous articles
Opel Insignia A: Diesel engines 2.0 l
Next articles

Cleaning and checking the technical condition of the cylinder block
Cleaning and checking the technical condition of the connecting rod and piston group
Replacing the crankshaft and main bearing shells
Replacing the connecting rod and piston group
Construction of the cylinder block and crank mechanism
Cleaning and checking the technical condition of the cylinder head
Replacing the turbocharger. Engine LBY/A20DTR
Specification
Special tools and accessories
Operating materials
Tightening torques for threaded connections


See similar ones from other Opel car manuals:
▶ Replacing the camshaft oil seal (1.7L engines) Opel Astra G (1998-2004)
▶ Replacing the fuel filter (petrol engines) Opel Corsa C (2000-2006, petrol)
▶ Replacing the spark plug (SOHC engines) Opel Vectra A (1988-1995, petrol)
▶ Checking the condition, adjusting the tension and replacing… Opel Frontera A (1991-1998, petrol)
▶ Replacing the valve timing tappets Opel Kadett E (1984-1995)
Link to this page in different formats

Visitor comments


No comments yet


How much will 30 + 50 =


Insignia A (2008-2017) 
  • General information
  • Repair on the road
  • Daily checks
  • Operation and maintenance
  • Safety and tool
  • Power unit
  • Petrol engines 1.6 l
  • Petrol engines 2.0 l
  • Diesel engines 2.0 l
  • Diesel engines 2.8 l
  • Cooling system
  • Lubrication system
  • Supply system
  • Engine management
  • Intake and exhaust system
  • Engine electrical equipment
  • Transmission
  • Clutch
  • Mechanical gearbox
  • Automatic gearbox
  • Transfer case
  • Drive shafts
  • Chassis
  • Wheel suspension
  • Brake system
  • Steering
  • Body
  • Exterior
  • Interior
  • Passive safety
  • Heater and air conditioner
  • Electrical equipment
  • Electrical circuits
OpelBook.ru © 2017–2026 · Mobile version · · Sitemap: EN BG BY UA RS HR RO PL SK HU · Feedback · Site search
Astra F, petrol · Astra G, petrol · Astra G · Astra H · Astra J, petrol · Corsa B · Corsa C, petrol · Corsa C · Insignia A · Kadett D · Kadett E · Omega A · Omega B · Omega B2 · Vectra A, petrol · Vectra A · Vectra B, petrol · Vectra B · Vectra C · Zafira A, petrol · Frontera A, petrol · Frontera B · Ascona C · Vivaro A ·
We want your visit to be comfortable 🤝! We use cookies 🍪 to make that happen.