
OpelBook.ru
Cars AvtoVAZ Cars Mitsubishi Cars BMW Cars Mercedes Cars Nissan Cars Toyota Cars Chevrolet
English Русский
Български
Беларускі
Український
Српски
Hrvatski
Română
Polski
Slovenský
Magyar
 |  Sitemap  |  Contacts  |    


Main Astra Corsa Insignia Kadett Omega Vectra Zafira Others Articles
Insignia A (2008-2017)
  • Main
  • Insignia
  • Insignia A
  • Body
  • Interior
  • Replacing the front floor console

Replacing the front floor console (Opel Insignia A)

            0

1. Loosen the six screws (1) and remove the front floor console (2).

Note: To remove the screws securing the front floor console, move the front seats to the desired position.


Note: To remove the screws securing the front floor console, move the front seats to the desired…


2. Unhook the upper trim panel (1) from the lower part of the front floor console. Disconnect the electrical connectors.
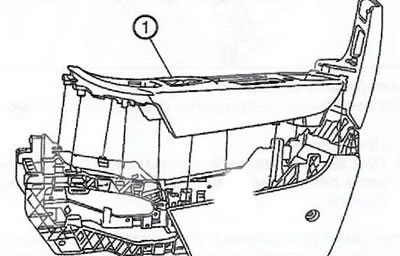
2. Unhook the upper trim panel (1) from the lower part of the front floor console. Disconnect the…


Note: If the front floor console upper trim panel is to be replaced, transfer all necessary parts to the new panel.


3. Unhook and remove the side covers (1) from the bottom of the front floor console.
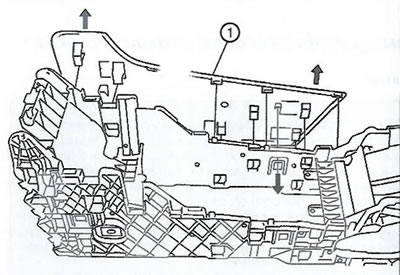
3. Unhook and remove the side covers (1) from the bottom of the front floor console.


4. Remove the front floor console rear air duct.


5. Remove the air vent housing from the rear cover of the front floor console.

6. Remove the rear cover (1) of the front floor console.
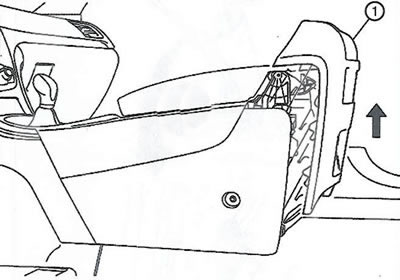
6. Remove the rear cover (1) of the front floor console.


7. Disconnect the electrical connectors and completely remove the rear cover of the front floor console.

8. Remove the two pins (1) and remove the armrest (2) from the dampers.
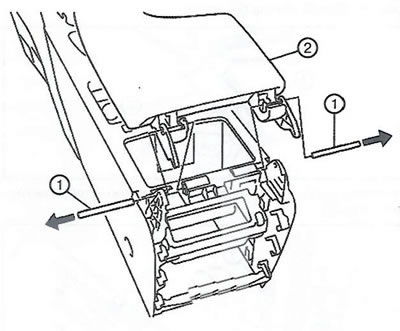
8. Remove the two pins (1) and remove the armrest (2) from the dampers.


9. Remove the front floor console wiring harness.

10. Remove the lower part of the front floor console (1).
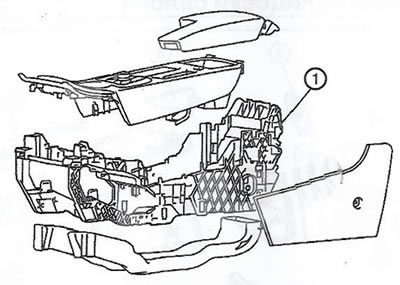
10. Remove the lower part of the front floor console (1).


Note: If the lower portion of the front floor console is to be replaced, transfer all necessary components to the new part.


11. Installation is carried out in the reverse order of removal.


This article is available at russian, bulgarian, belarusian, ukrainian, serbian, croatian, romanian, polish, slovak, hungarian
Checking the article: Zinoviev Kirill

Share information:

Previous articles
Opel Insignia A: Interior
Next articles

Replacing the dashboard strut
Replacing the headlight switch trim
Replacing the lower center trim panel
Replacing the upper center trim panel
Windshield Blower Nozzle Replacement
Replacing the instrument panel assembly
Replacing the Trim Frame of a Ceiling Reading Lamp
Replacement of the ceiling console
The device of the interior trim panels
Replacing the front and rear door sill trims
Replacing the windshield pillar trim
Replacement of the lower and upper trims of the central body pillar


See similar ones from other Opel car manuals:
▶ Replacing constant velocity joints of front wheel drives Opel Astra J (2009-2015, petrol)
▶ Replacing the gear shift indicator bulb in the gear shift… Opel Corsa C (2000-2006, petrol)
▶ Replacing the front camshaft seals of a 16-valve engine Opel Kadett E (1984-1995)
▶ Replacing the front brake pads Opel Vectra B (1995-2002, petrol)
▶ Front Anti-Roll Bar — Replacing Struts Opel Zafira A (1999-2005, petrol)
Link to this page in different formats

Visitor comments


No comments yet


How much will 45 + 37 =


Insignia A (2008-2017) 
  • General information
  • Repair on the road
  • Daily checks
  • Operation and maintenance
  • Safety and tool
  • Power unit
  • Petrol engines 1.6 l
  • Petrol engines 2.0 l
  • Diesel engines 2.0 l
  • Diesel engines 2.8 l
  • Cooling system
  • Lubrication system
  • Supply system
  • Engine management
  • Intake and exhaust system
  • Engine electrical equipment
  • Transmission
  • Clutch
  • Mechanical gearbox
  • Automatic gearbox
  • Transfer case
  • Drive shafts
  • Chassis
  • Wheel suspension
  • Brake system
  • Steering
  • Body
  • Exterior
  • Interior
  • Passive safety
  • Heater and air conditioner
  • Electrical equipment
  • Electrical circuits
OpelBook.ru © 2017–2026 · Mobile version · · Sitemap: EN BG BY UA RS HR RO PL SK HU · Feedback · Site search
Astra F, petrol · Astra G, petrol · Astra G · Astra H · Astra J, petrol · Corsa B · Corsa C, petrol · Corsa C · Insignia A · Kadett D · Kadett E · Omega A · Omega B · Omega B2 · Vectra A, petrol · Vectra A · Vectra B, petrol · Vectra B · Vectra C · Zafira A, petrol · Frontera A, petrol · Frontera B · Ascona C · Vivaro A ·
We want your visit to be comfortable 🤝! We use cookies 🍪 to make that happen.