
OpelBook.ru
Cars AvtoVAZ Cars Mitsubishi Cars BMW Cars Mercedes Cars Nissan Cars Toyota Cars Chevrolet
English Русский
Български
Беларускі
Український
Српски
Hrvatski
Română
Polski
Slovenský
Magyar
 |  Sitemap  |  Contacts  |    


Main Astra Corsa Insignia Kadett Omega Vectra Zafira Others Articles
Insignia A (2008-2017)
  • Main
  • Insignia
  • Insignia A
  • Body
  • Interior
  • Replacing the windshield pillar trim

Replacing the windshield pillar trim (Opel Insignia A)

            0

Contents: Removal ⬇ Installation ⬇

Removal


Attention.
  • If the vehicle is equipped with a curtain airbag, make sure that the curtain airbag module and the limiter are not damaged. If any damage or defects are found, the corresponding components must be replaced with new ones.
  • Be careful when working in the area of the curtain airbag module. A sharp tool can puncture the curtain airbag. If the curtain airbag module is damaged in any way, it must be replaced.


1. Deactivate the additional passive safety system.

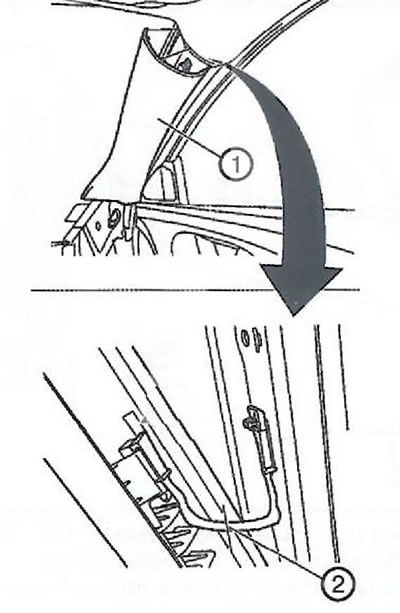
2. First, detach the upper part of the windshield pillar trim (1) by carefully pulling the upper part of the trim towards you.
2. First, detach the upper part of the windshield pillar trim (1) by carefully pulling the upper…


3. Cut the retainer along the line shown in the figure (2).

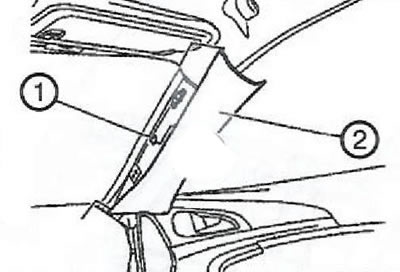
4. Disconnect the lower retainer (1) and remove the windshield pillar trim (2) upwards.
4. Disconnect the lower retainer (1) and remove the windshield pillar trim (2) upwards.


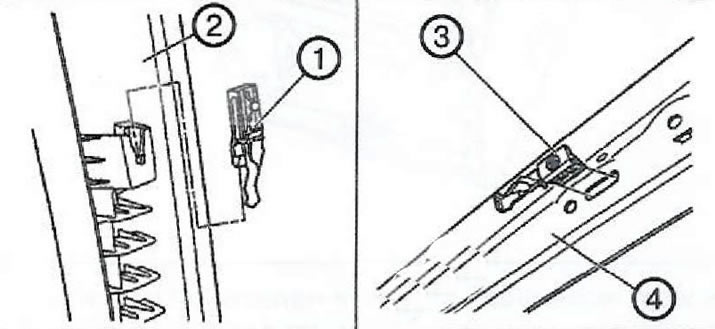
5. Remove the retainer support (1) from the windshield pillar trim (2).


5. Remove the retainer support (1) from the windshield pillar trim (2).


6. Remove the retainer support (3) of the windshield pillar trim from the inner panel of the front body pillar (4).

Installation


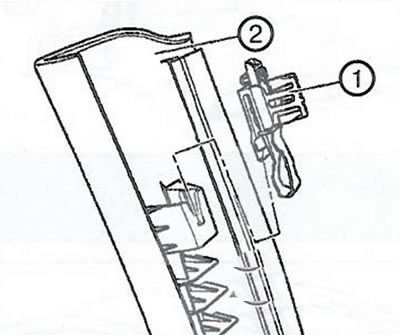
1. Install the new retainer support (1) onto the windshield pillar trim (2).
1. Install the new retainer support (1) onto the windshield pillar trim (2).


2. Place the windshield pillar trim (4), using the guides (2) as a guide.
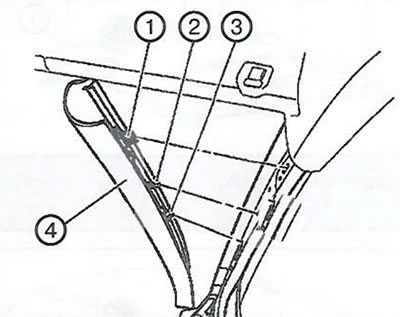
2. Place the windshield pillar trim (4), using the guides (2) as a guide.


3. Snap the lower retainer (3) of the windshield pillar trim into place.

4. Carefully press the upper part of the windshield pillar trim onto the A-pillar panel. The retainer (1) should click into place.


This article is available at russian, bulgarian, belarusian, ukrainian, serbian, croatian, romanian, polish, slovak, hungarian
Checking the article: Zinoviev Kirill

Share information:

Previous articles
Opel Insignia A: Interior
Next articles

Replacing the front and rear door sill trims
The device of the interior trim panels
Replacement of the ceiling console
Replacing the Trim Frame of a Ceiling Reading Lamp
Replacing the front floor console
Replacing the dashboard strut
Replacement of the lower and upper trims of the central body pillar
Replacing the ceiling panel
Replacing the front floor covering
Replacing the rear floor covering
Replacing the interior door trim
Replacing door waterproofing


See similar ones from other Opel car manuals:
▶ Checking the condition and replacing the windshield wipers Opel Astra H (2004-2009)
▶ Removal and installation the B-pillar trim Opel Corsa C (2000-2006)
▶ Checking the condition and replacing the windshield wipers Opel Vectra C (2002-2008)
▶ Checking the condition and replacing the windshield wipers Opel Frontera A (1991-1998, petrol)
▶ Replacing the valve timing tappets Opel Kadett E (1984-1995)
Link to this page in different formats

Visitor comments


No comments yet


How much will 46 + 23 =


Insignia A (2008-2017) 
  • General information
  • Repair on the road
  • Daily checks
  • Operation and maintenance
  • Safety and tool
  • Power unit
  • Petrol engines 1.6 l
  • Petrol engines 2.0 l
  • Diesel engines 2.0 l
  • Diesel engines 2.8 l
  • Cooling system
  • Lubrication system
  • Supply system
  • Engine management
  • Intake and exhaust system
  • Engine electrical equipment
  • Transmission
  • Clutch
  • Mechanical gearbox
  • Automatic gearbox
  • Transfer case
  • Drive shafts
  • Chassis
  • Wheel suspension
  • Brake system
  • Steering
  • Body
  • Exterior
  • Interior
  • Passive safety
  • Heater and air conditioner
  • Electrical equipment
  • Electrical circuits
OpelBook.ru © 2017–2026 · Mobile version · · Sitemap: EN BG BY UA RS HR RO PL SK HU · Feedback · Site search
Astra F, petrol · Astra G, petrol · Astra G · Astra H · Astra J, petrol · Corsa B · Corsa C, petrol · Corsa C · Insignia A · Kadett D · Kadett E · Omega A · Omega B · Omega B2 · Vectra A, petrol · Vectra A · Vectra B, petrol · Vectra B · Vectra C · Zafira A, petrol · Frontera A, petrol · Frontera B · Ascona C · Vivaro A ·
We want your visit to be comfortable 🤝! We use cookies 🍪 to make that happen.