
- flat horizontal platform (preferably near the wall of the house, fence or gate);
- tape measure 5 m long;
- cardboard sheet (to cover the second headlight when adjusting).
We work with an assistant.
Recommendation. Adjustment is desirable to carry out in the dark. The vehicle must be in running order (fully loaded and without additional cargo). Since it is not easy to find a suitable surface as a screen, it is easier to use a 1x2 m plywood shield with markings applied to it. In this case, it is necessary to prepare an emphasis or stand in order to install the shield vertically.
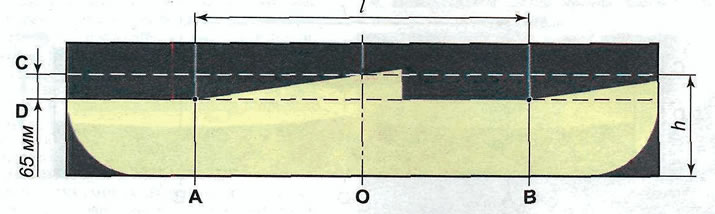
Screen layout for headlight adjustment:
A - a vertical line indicating the location of the low beam lamp of the left headlight;
B - a vertical line indicating the location of the dipped beam lamp of the right headlight;
C - a horizontal line indicating the location of the dipped beam headlights;
D is a line indicating the height of the horizontal boundary of the beams of light;
About - axial line;
l \u003d 1250 mm - the distance between the centers of the dipped beam lamps;
h is the distance from the surface of the platform on which the car is installed to the dipped beam headlights
Headlight adjustment sequence
1. We install the car on a flat horizontal platform perpendicular to the surface selected as a screen, and at a distance of 5 feet. You can install a sheet of plywood in front of the car under the same conditions.
2. We mark the screen according to the figure.
Comment. The necessary measurements can be made using a tape measure.
3. Check the tire pressure, if necessary, bring it to normal (see «Checking tire pressure»).
4. Turn the headlight corrector control to the position corresponding to the minimum vehicle load («0»).
5. The assistant sits on the driver's seat, after which we vigorously shake the car from the side to self-adjust the suspension.
6. Turning on the dipped headlights, close one of the block headlights, for example, the right one, with a sheet of cardboard.
Comment. The operation is shown on the Astra model; on the Zafira model, the work is performed similarly.
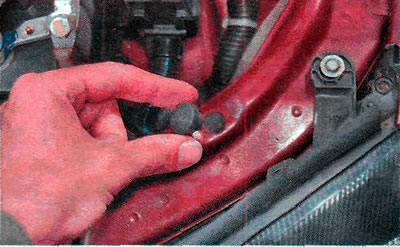
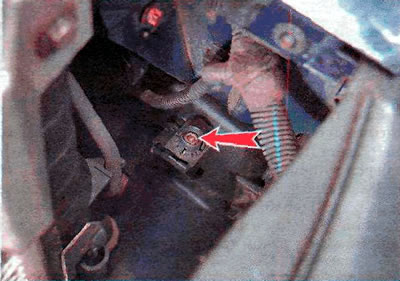
7. Remove the rubber plug of the adjusting bolt 1.
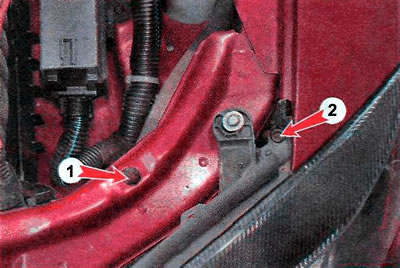
8. Turning the adjusting screw 2 of the left headlight with an 8 mm hex wrench, we bring the horizontal border of the light beam to line D, and then, turning the adjusting screw 1, we combine the break in the border of the light beam with line A.
9. Similarly adjust the right headlight.
If the edge of the light beam is blurred or fuzzy, this may be due to a malfunction of the dipped beam lamp (see «Block headlight - replacing lamps»), damage or destruction of the headlight unit (see «Block headlight of the Astra model - removal and installation» or «Block headlight of the Zafira model - removal and installation») or a heavily clouded plastic protective cap (see below).
Fog lamp adjustment sequence
1. We install the car on a flat horizontal platform perpendicular to the surface selected as a screen, at a distance of 5 m from it. You can install a sheet of plywood in front of the car under the same conditions.
2. We mark the screen according to the figure.
Comment. The necessary measurements can be made using a tape measure.
3. We check the pressure in the tires, bring it to normal, if necessary.
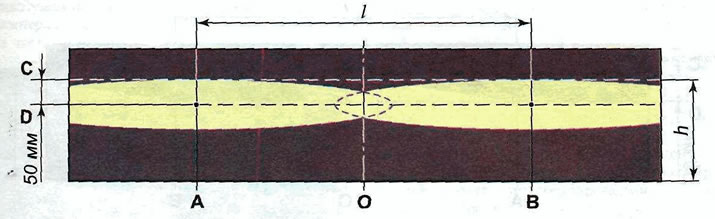
Screen layout for fog light adjustment:
A - a vertical line indicating the location of the lamp of the left fog lamp;
B - a vertical line indicating the location of the right fog lamp bulb;
C - a horizontal line indicating the location of the fog lamps;
D is a line indicating the height of the horizontal boundary of the beams of light;
About - axial line;
l \u003d 1040 mm - the distance between the fog lamps;
h is the distance from the surface of the site on which the car is installed to the fog lamps.
4. The assistant sits in the driver's seat, after which we vigorously shake the car to self-adjust the suspension.
5. Turning on the fog lights, close one of them with a sheet of cardboard, for example, the right one.
Comment. The operation is shown on the Zafira model; on the Astra model, the work is performed similarly.
6. Turn the adjusting screw of the left headlight with a hexagon by 8 mm, bring the horizontal border of the light beam to line C.
7. Similarly, we adjust the right fog lamp.
Visitor comments