
OpelBook.ru
Cars AvtoVAZ Cars Mitsubishi Cars BMW Cars Mercedes Cars Nissan Cars Toyota Cars Chevrolet
English Русский
Български
Беларускі
Український
Српски
Hrvatski
Română
Polski
Slovenský
Magyar
 |  Sitemap  |  Contacts  |    


Main Astra Corsa Insignia Kadett Omega Vectra Zafira Others Articles
Insignia A (2008-2017)
  • Main
  • Insignia
  • Insignia A
  • Power unit
  • Petrol engines 2.0 l
  • Replacing the turbocharger

Replacing the turbocharger (Opel Insignia A)

            0

Contents: Removal ⬇ Installation ⬇

Removal


Caution: If the turbocharger has failed, it is necessary to carefully remove the gasket residue and excess oil from the intercooler system before installing a new turbocharger. Neglecting to remove the gasket residue can cause serious damage to the turbocharger and engine after starting. The presence of oil in the turbocharger air ducts can lead to increased engine speed at start-up, which can lead to serious engine damage.


1. Raise the vehicle to maximum height.

2. Drain the coolant.

3. Remove the decorative engine cover.

4. Loosen the mounting bolts and remove the turbocharger heat shield (1).
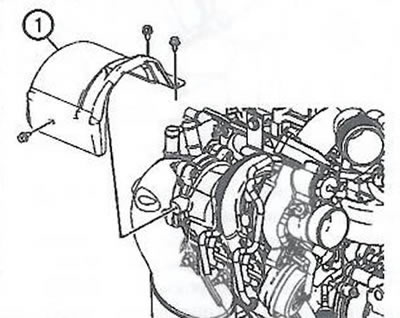
4. Loosen the mounting bolts and remove the turbocharger heat shield (1).


5. Remove the air filter outlet pipe.

6. Remove the turbocharger intercooler intake duct.
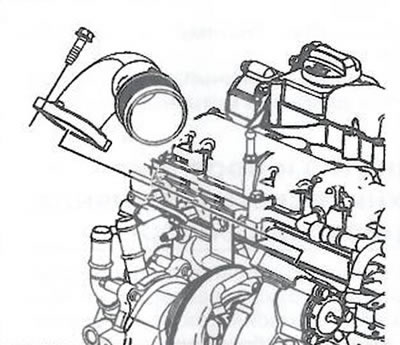
6. Remove the turbocharger intercooler intake duct.


7. Disconnect the turbocharger cooling supply pipe.
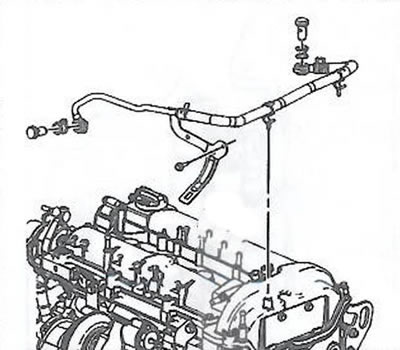


7. Disconnect the turbocharger cooling supply pipe.


8. Disconnect the turbocharger cooling return pipe.
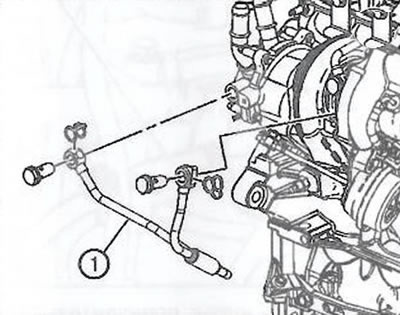
8. Disconnect the turbocharger cooling return pipe.


9. Disconnect the turbocharger pressure oil line.
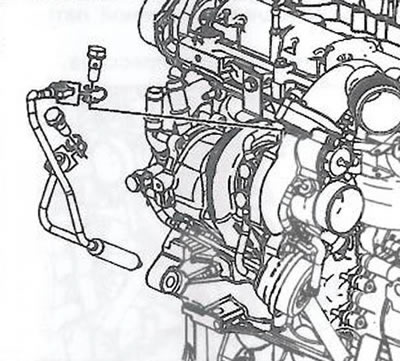
9. Disconnect the turbocharger pressure oil line.


10. Disconnect the catalytic converter.
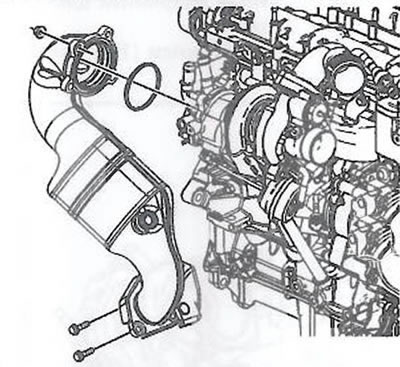
10. Disconnect the catalytic converter.


11. Disconnect the electrical connector (1) from the turbocharger.
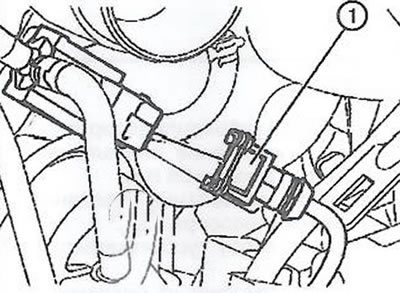


11. Disconnect the electrical connector (1) from the turbocharger.


Material copied from the portal (opelbook)

12. Disconnect the vacuum line (1) from the boost relief valve (2).
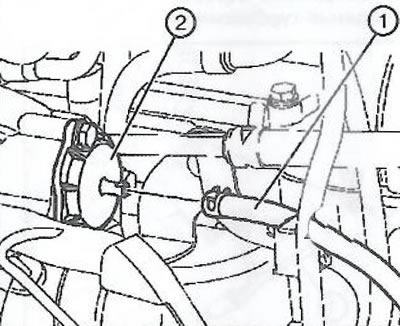
12. Disconnect the vacuum line (1) from the boost relief valve (2).


13. Disconnect the positive crankcase ventilation hose.

14. Raise the vehicle to maximum height.

15. Remove the front exhaust pipe.

16. Remove the turbocharger bracket.
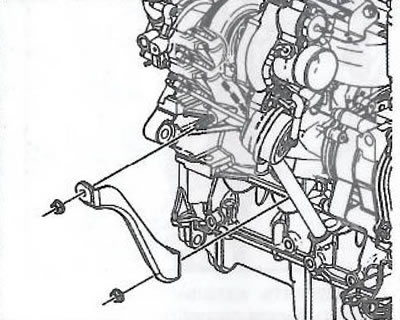
16. Remove the turbocharger bracket.


17. Remove the turbocharger return oil hose.


18. Unscrew the four nuts (1) and remove the turbocharger (2).
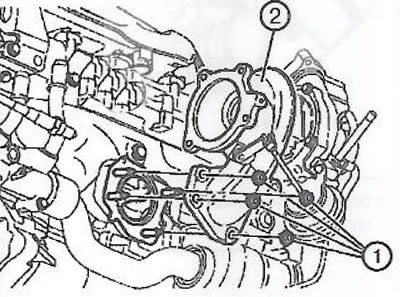
18. Unscrew the four nuts (1) and remove the turbocharger (2).


Installation


1. Install the turbocharger and tighten the mounting nuts first to 30 Nm, then to 35 Nm.

2. Install the turbocharger oil return hose.

3. Install the turbocharger bracket.

4. Raise the vehicle to maximum height.

5. Connect the forced crankcase ventilation hose.

6. Connect the vacuum line (1) to the boost relief valve (2).
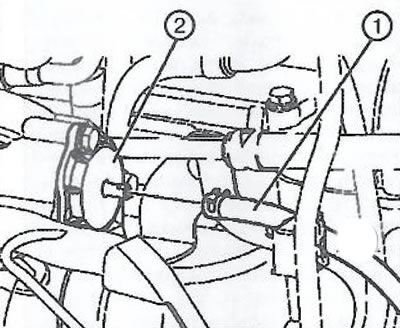
6. Connect the vacuum line (1) to the boost relief valve (2).


7. Connect the electrical connector (1) to the turbocharger.
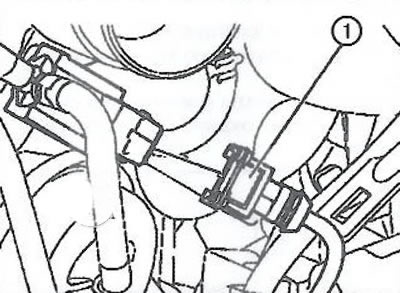
7. Connect the electrical connector (1) to the turbocharger.


8. Connect the catalytic converter


9. Connect the turbocharger pressure oil line.

10. Connect the turbocharger cooling return pipe.

11. Connect the turbocharger intercooler inlet pipe.

12. Install the air filter outlet pipe.

13. Install the turbocharger heat shield.

14. Install the decorative engine cover.

15. Fill the engine cooling system.

16. Replace the oil filter and fill the engine with engine oil.


This article is available at russian, bulgarian, belarusian, ukrainian, serbian, croatian, romanian, polish, slovak, hungarian
Checking the article: Zinoviev Kirill

Share information:

Previous articles
Opel Insignia A: Petrol engines 2.0 l
Next articles

Cleaning and checking the technical condition of the cylinder block
Cleaning and checking the technical condition of the crankshaft
Removal and installation the crankshaft
Cleaning and checking the technical condition of the connecting rod and piston group
Replacing pistons with connecting rods
Replacing the crankshaft pulley
Cleaning and checking the technical condition of the turbocharger
Specification
Special tools and accessories
Operating materials
Tightening torques for threaded connections
Engine Thread Recovery Map


See similar ones from other Opel car manuals:
▶ Coolant Hoses — Disconnecting and Replacing Opel Astra F (1991-1998, petrol)
▶ Checking the condition and replacing the auxiliary drive… Opel Corsa B (1993-2000)
▶ Replacing the valve timing tappets Opel Kadett E (1984-1995)
▶ Replacing lamps Opel Omega A (1986-1993)
▶ Replacing brake fluid Opel Vectra A (1988-1995, petrol)
Link to this page in different formats

Visitor comments


No comments yet


How much will 48 + 25 =


Insignia A (2008-2017) 
  • General information
  • Repair on the road
  • Daily checks
  • Operation and maintenance
  • Safety and tool
  • Power unit
  • Petrol engines 1.6 l
  • Petrol engines 2.0 l
  • Diesel engines 2.0 l
  • Diesel engines 2.8 l
  • Cooling system
  • Lubrication system
  • Supply system
  • Engine management
  • Intake and exhaust system
  • Engine electrical equipment
  • Transmission
  • Clutch
  • Mechanical gearbox
  • Automatic gearbox
  • Transfer case
  • Drive shafts
  • Chassis
  • Wheel suspension
  • Brake system
  • Steering
  • Body
  • Exterior
  • Interior
  • Passive safety
  • Heater and air conditioner
  • Electrical equipment
  • Electrical circuits
OpelBook.ru © 2017–2026 · Mobile version · · Sitemap: EN BG BY UA RS HR RO PL SK HU · Feedback · Site search
Astra F, petrol · Astra G, petrol · Astra G · Astra H · Astra J, petrol · Corsa B · Corsa C, petrol · Corsa C · Insignia A · Kadett D · Kadett E · Omega A · Omega B · Omega B2 · Vectra A, petrol · Vectra A · Vectra B, petrol · Vectra B · Vectra C · Zafira A, petrol · Frontera A, petrol · Frontera B · Ascona C · Vivaro A ·
We want your visit to be comfortable 🤝! We use cookies 🍪 to make that happen.