


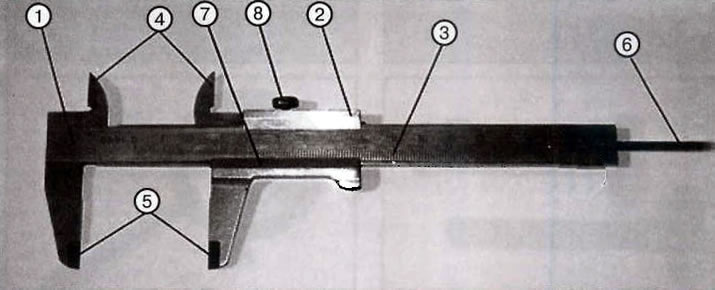
1. Barbell.
2. Movable frame.
3. Barbell scale.
4. Sponges for internal measurements.
5. Sponges for external measurements.
6. Depth gauge ruler.
7. Nonius.
8. Frame clamp screw
A caliper is a universal tool designed for high-precision measurements of external and internal dimensions. In addition, a caliper can be used to determine the depth of holes and protrusions.
The measuring jaws of the caliper can also be used to measure the parallelism of the sides of workpieces.
[Article posted on Internet portal: www.opelbook.ru]
Calipers have measurement limits of 0-125 mm (SHC-1), 0-160 mm (SHC-2) and 0-400 mm (SHC-3).
The most commonly used caliper is ShTs-1.
To measure external dimensions and check parallelism, the main measuring jaws of the tool are used, and to measure internal dimensions and mark out, auxiliary pointed jaws are used.
Using a depth gauge, determine the depth of holes and protrusions.
The basis of the caliper device is a ruler with divisions (rod) and an auxiliary scale-vernier, which moves along the main ruler-rod. With the help of this auxiliary scale, it is possible to count off the division fractions of the main scale.
The operating principle of the vernier is based on the difference in the division intervals of the main scale and the vernier scale. This difference is equal to the division value of the vernier, and the number of divisions depends on the division value.
If the scale division interval is 1 mm, and the vernier division interval is 0.9 mm, then the vernier division value is 0.1 mm.
Thus, if you combine the zero division of the vernier with the zero division of the main scale of the caliper, then the first division of the vernier will "lag" behind the first division of the main scale by the amount of the difference in the scale intervals, i.e. by 0.1 mm, the second division - by 0.2 mm, etc.
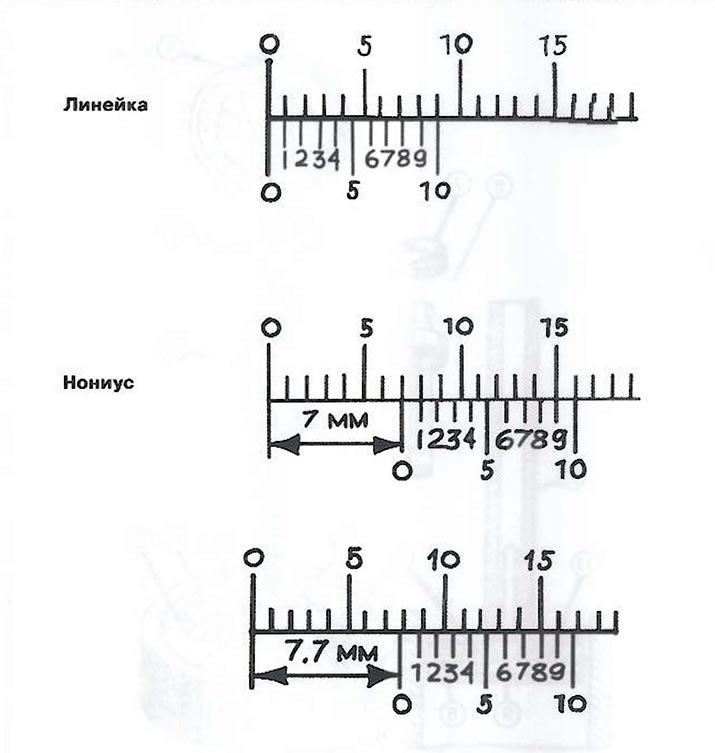
The tenth division of the vernier, having shifted by 1 mm, coincides with the ninth division of the main scale of the rod, that is, if the division value of 1 mm is divided by the number of divisions of the vernier (by 10), we get 0.1 mm (see picture)
Example:
If the zero mark of the vernier coincides with any mark on the ruler, then this division indicates the size in whole millimeters.
If the zero mark of the vernier does not coincide with the mark on the main scale, then the division on the ruler closest to the left shows a whole number of millimeters, and tenths are counted according to the vernier.
To the whole number of millimetres are added as many tenths of a millimetre as there are vernier strokes until any vernier stroke completely coincides with one of the ruler strokes. The figure shows an example of reading 7 mm, and 7.7 mm.
During and after work, wipe the caliper with a napkin soaked in an aqueous alkaline solution, then dry with a clean napkin. After work, cover the surfaces of the caliper with a thin layer of any technical oil and put it in a case. Avoid rough impacts or falls during operation to avoid bending the rod and other damage, scratches on the measuring surfaces, friction of the measuring surfaces against the controlled part.
Visitor comments