
OpelBook.ru
Cars AvtoVAZ Cars Mitsubishi Cars BMW Cars Mercedes Cars Nissan Cars Toyota Cars Chevrolet
English Русский
Български
Беларускі
Український
Српски
Hrvatski
Română
Polski
Slovenský
Magyar
 |  Sitemap  |  Contacts  |    


Main Astra Corsa Insignia Kadett Omega Vectra Zafira Others Articles
Insignia A (2008-2017)
  • Main
  • Insignia
  • Insignia A
  • General information
  • Safety and tool
  • Bore gauge

Bore gauge (Opel Insignia A)

            0

Bore gauge


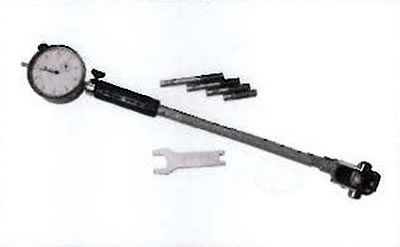
The bore gauge is designed to measure the internal dimensions of parts (for example, the diameter of the cylinder bore, the width of the grooves, etc.).
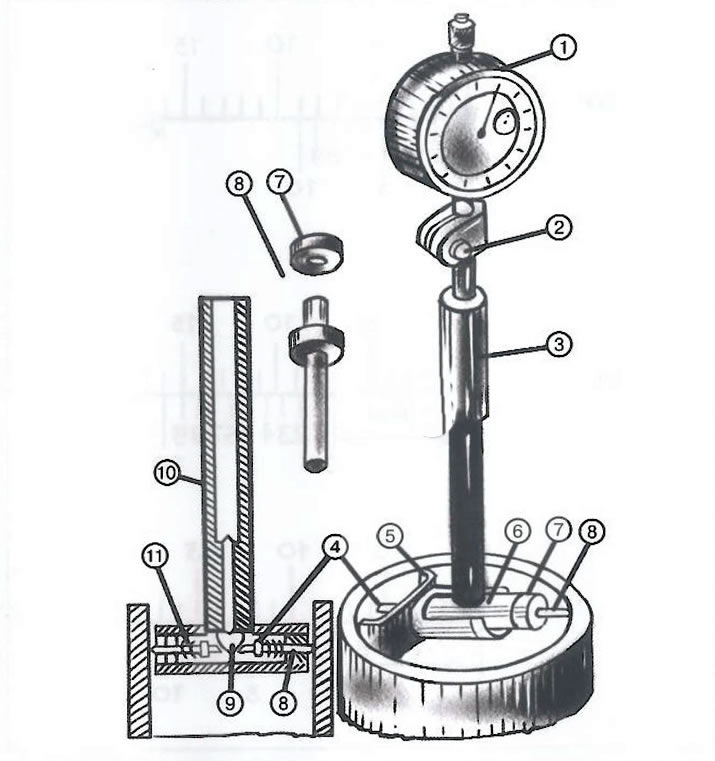
1. Hour type indicator.

1. Hour type indicator.
2. Screw.
3. Handle.
4. Engine.
5. Centering bridge.
6. Tee.
7. Nut.
8. Measuring rod.
9. Fungus.
10. Rod.
11. Spiral spring.


The device has a guide bushing (5), in the upper part of which a dial indicator (1) is installed, secured with a screw (2). Inside the bushing there is a long rod, which contacts a short rod (10), resting against the mushroom (9) of the tee (6) of the bore gauge head. In the tee there is an engine (4) and a replaceable measuring rod (8), secured in the tee with a nut (7). On the side of the movable pin on the tee there is a centering bridge 5, which serves to set the indicator head according to the diameter of the hole. When measuring holes, the engine (4) with a spiral spring (11) presses on the mushroom (9) and through the rod (10) transmits movement to the long rod to the indicator.


The deviation of the size is determined by the movement of the indicator arrow. Before measuring, the bore gauge is set to the nominal size on a ring or block of tiles.

Indicator bore gauges are produced with measurement limits: 6-10; 10-18; 18-35; 35-50; 50-100; 100-160; 160-250; 250-450 mm. For measurement, replaceable washers and rods are attached to the bore gauge, differing from each other by 1 or 5 mm (depending on the measurement limit). The washers are installed in the hole of the head tee.


This article is available at russian, bulgarian, belarusian, ukrainian, serbian, croatian, romanian, polish, slovak, hungarian
Checking the article: Zinoviev Kirill

Share information:

Previous articles
Opel Insignia A: Safety and tool
Next articles

Dial type indicator
Calipers
Micrometers
Flat feeler gauges
Basic set of necessary tools
Environmental protection


See similar ones from other Opel car manuals:
▶ Coolant Temperature Gauge Sensor Opel Astra F (1991-1998, petrol)
▶ Engine condition diagnostics using a vacuum gauge Opel Corsa B (1993-2000)
▶ Temperature gauge sensor — removal and installation Opel Omega A (1986-1993)
▶ Temperature gauge sensor — removal and installation Opel Vectra A (1988-1995, petrol)
Link to this page in different formats

Visitor comments


No comments yet


How much will 48 + 28 =


Insignia A (2008-2017) 
  • General information
  • Repair on the road
  • Daily checks
  • Operation and maintenance
  • Safety and tool
  • Power unit
  • Petrol engines 1.6 l
  • Petrol engines 2.0 l
  • Diesel engines 2.0 l
  • Diesel engines 2.8 l
  • Cooling system
  • Lubrication system
  • Supply system
  • Engine management
  • Intake and exhaust system
  • Engine electrical equipment
  • Transmission
  • Clutch
  • Mechanical gearbox
  • Automatic gearbox
  • Transfer case
  • Drive shafts
  • Chassis
  • Wheel suspension
  • Brake system
  • Steering
  • Body
  • Exterior
  • Interior
  • Passive safety
  • Heater and air conditioner
  • Electrical equipment
  • Electrical circuits
OpelBook.ru © 2017–2026 · Mobile version · · Sitemap: EN BG BY UA RS HR RO PL SK HU · Feedback · Site search
Astra F, petrol · Astra G, petrol · Astra G · Astra H · Astra J, petrol · Corsa B · Corsa C, petrol · Corsa C · Insignia A · Kadett D · Kadett E · Omega A · Omega B · Omega B2 · Vectra A, petrol · Vectra A · Vectra B, petrol · Vectra B · Vectra C · Zafira A, petrol · Frontera A, petrol · Frontera B · Ascona C · Vivaro A ·
We want your visit to be comfortable 🤝! We use cookies 🍪 to make that happen.