OpelBook.ru
Cars AvtoVAZ Cars Mitsubishi Cars BMW Cars Mercedes Cars Nissan Cars Toyota Cars Chevrolet
English Русский
Български
Беларускі
Український
Српски
Hrvatski
Română
Polski
Slovenský
Magyar
 |  Sitemap  |  Contacts  |    


Main Astra Corsa Insignia Kadett Omega Vectra Zafira Others Articles
Insignia A (2008-2017)
  • Main
  • Insignia
  • Insignia A
  • Chassis
  • Brake system
  • Replacing the outer tie rod end

Replacing the outer tie rod end (Opel Insignia A)

            0

1. Raise and secure the vehicle.

2. Remove the front wheel from the vehicle.

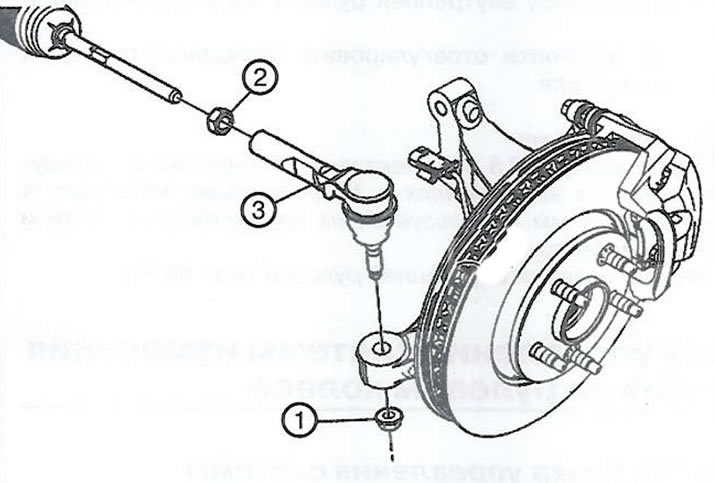
3. Loosen the nut (1) of the outer tie rod end.

Caution: This component is equipped with fasteners that are tightened to the yield point. When installing the component, new fasteners must be used. Failure to do so may result in damage to the vehicle.


Note.
  • Replace the nut (2) with a new one after each removal.
  • Tightening torque: 35 Nm + 30°.


Tightening torque: 35 Nm + 30°.


4. Use paint to mark the position of the nut (2) relative to the inner steering rod.

Note.
  • When installing the outer tie rod end, use the mark made during removal as a guide.
  • Do not tighten the nut completely during installation. The final tightening of the nut is performed after adjusting the toe-in of the front wheels of the car.


5. Loosen the nut (2) of the inner steering rod.

6. Using the KM-161-V puller, disconnect the outer end of the steering rod (3) from the steering knuckle.

7. Unscrew and remove the outer tie rod end (3).

8. Check the inner tie rod for deformation and thread damage.

9. Clean the conical surface on the steering knuckle.

10. Installation is carried out in the reverse order of removal.


11. After installation, check and adjust the toe-in of the front wheels of the vehicle.

Source is on the website OPELBOOK


This article is available at russian, bulgarian, belarusian, ukrainian, serbian, croatian, romanian, polish, slovak, hungarian
Checking the article: Zinoviev Kirill

Share information:

Previous articles
Opel Insignia A: Brake system
Next articles

Checking the level and topping up the power steering fluid
Tightening torques for threaded connections
Operating materials
Special tools and accessories
Service data
Specification


See similar ones from other Opel car manuals:
▶ Replacing the outer tie rod end Opel Astra J (2009-2015, petrol)
▶ Replacing the outer constant velocity joint Opel Corsa C (2000-2006, petrol)
▶ Replacing outer tie rods and tie rod ends Opel Frontera A (1991-1998, petrol)
▶ Replacing the valve timing tappets Opel Kadett E (1984-1995)
▶ Replacing lamps Opel Omega A (1986-1993)
Link to this page in different formats

Visitor comments


No comments yet


How much will 44 + 19 =


Insignia A (2008-2017) 
  • General information
  • Repair on the road
  • Daily checks
  • Operation and maintenance
  • Safety and tool
  • Power unit
  • Petrol engines 1.6 l
  • Petrol engines 2.0 l
  • Diesel engines 2.0 l
  • Diesel engines 2.8 l
  • Cooling system
  • Lubrication system
  • Supply system
  • Engine management
  • Intake and exhaust system
  • Engine electrical equipment
  • Transmission
  • Clutch
  • Mechanical gearbox
  • Automatic gearbox
  • Transfer case
  • Drive shafts
  • Chassis
  • Wheel suspension
  • Brake system
  • Steering
  • Body
  • Exterior
  • Interior
  • Passive safety
  • Heater and air conditioner
  • Electrical equipment
  • Electrical circuits
OpelBook.ru © 2017–2026 · Mobile version · · Sitemap: EN BG BY UA RS HR RO PL SK HU · Feedback · Site search
Astra F, petrol · Astra G, petrol · Astra G · Astra H · Astra J, petrol · Corsa B · Corsa C, petrol · Corsa C · Insignia A · Kadett D · Kadett E · Omega A · Omega B · Omega B2 · Vectra A, petrol · Vectra A · Vectra B, petrol · Vectra B · Vectra C · Zafira A, petrol · Frontera A, petrol · Frontera B · Ascona C · Vivaro A ·
We want your visit to be comfortable 🤝! We use cookies 🍪 to make that happen.