
OpelBook.ru
Cars AvtoVAZ Cars Mitsubishi Cars BMW Cars Mercedes Cars Nissan Cars Toyota Cars Chevrolet
English Русский
Български
Беларускі
Український
Српски
Hrvatski
Română
Polski
Slovenský
Magyar
 |  Sitemap  |  Contacts  |    


Main Astra Corsa Insignia Kadett Omega Vectra Zafira Others Articles
Zafira A (1999-2005, petrol)
  • Main
  • Zafira
  • Zafira A
  • Body
  • Side doors
  • Replacing the mirror element

Replacing the mirror element (Opel Zafira A)

            0

Note: The operation is shown on the Astra model, on the Zafira model it is performed similarly.


1. Prepare the car for work (see "Preparing the car for maintenance and repair").

2. Using the handle (or electric drive) to adjust the mirror, set the mirror element to a position where a slotted screwdriver can be inserted between it and the mirror housing.

3. Using a slotted screwdriver, overcome the force of the clamps and detach the mirror element.
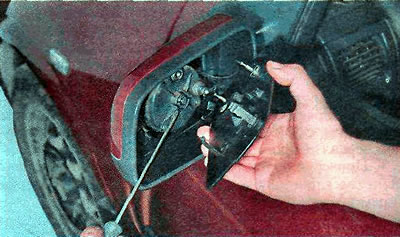
3. Using a slotted screwdriver, overcome the force of the clamps and detach the mirror element.


Original source is on the website: OPELBOOK.ru

4. If a heated mirror element is installed, disconnect the wiring harness connectors from the mirror element.
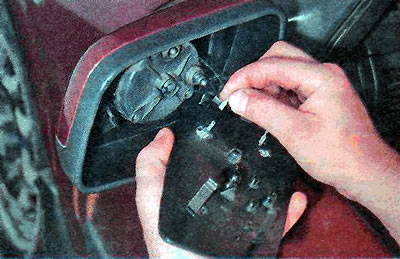
4. If a heated mirror element is installed, disconnect the wiring harness connectors from the…


Recommendation: (It is better to do the work in the warm season or in a heated garage. In this case, the plastic will be less fragile and more pliable.


This article is available at russian, bulgarian, belarusian, ukrainian, serbian, croatian, romanian, polish, slovak, hungarian
Checking the article: Chernov Alexander

Share information:

Previous articles
Opel Zafira A: Side doors
Next articles

Checking the operation of the electric heating of the mirror element
Checking the electric drive for mirror adjustment
Replacing the side mirror of the Astra model
Replacing the side mirror of the Zafira model
Door trims for Astra model — removal and installation
Door trims for Zafira model — removal and installation
Front door lock switch (cylinder) — replacement


See similar ones from other Opel car manuals:
▶ Replacing the control element of the outside rearview… Opel Corsa C (2000-2006, petrol)
▶ Replacing the fuel filter element — diesel models Opel Astra H (2004-2009)
▶ Replacing the filter element Opel Kadett D (1979-1984)
▶ Replacing the air filter element Opel Vectra A (1988-1995)
▶ Cleaning and replacing the air filter element Opel Ascona C (1981-1988)
Link to this page in different formats

Visitor comments


No comments yet


How much will 31 + 12 =


Zafira A (1999-2005, petrol) 
  • General information
  • Governing bodies
  • User manual
  • Maintenance
  • Power unit
  • Engine repair
  • Control system
  • Cooling system
  • Exhaust system
  • Transmission
  • Clutch
  • Mechanical gearbox
  • Automatic gearbox
  • Front wheel drives
  • Chassis
  • Hubs, wheels and tires
  • Front suspension
  • Rear suspension
  • Steering
  • Brake system
  • Body
  • Maintenance and care
  • Exterior
  • Side doors
  • Climate control
  • Electrical equipment
  • Equipment and devices
  • Power devices
  • Lighting and signaling
  • Windshield wipers and washers
  • Electrical circuits
OpelBook.ru © 2017–2026 · Mobile version · · Sitemap: EN BG BY UA RS HR RO PL SK HU · Feedback · Site search
Astra F, petrol · Astra G, petrol · Astra G · Astra H · Astra J, petrol · Corsa B · Corsa C, petrol · Corsa C · Insignia A · Kadett D · Kadett E · Omega A · Omega B · Omega B2 · Vectra A, petrol · Vectra A · Vectra B, petrol · Vectra B · Vectra C · Zafira A, petrol · Frontera A, petrol · Frontera B · Ascona C · Vivaro A ·
We want your visit to be comfortable 🤝! We use cookies 🍪 to make that happen.